As far as I’m concerned, if you are going to spend a lot of time dredging in cold water, a hot water system is definitely the way to go!

“Photo by Tim Cook”
Can you recall ever standing alongside an unheated swimming pool or just next to the water’s edge on the beach, trying intently to muster the nerve to jump into the cold water? Perhaps you even tried to build up to the big leap by counting, “One, two, three.. .jump!” — only to find yourself still standing at the edge of the water after the countdown and feeling like your body is not quite under your control. This can often be the case when you are dredging in cold water. The key to successful cold water dredging is having the proper equipment — particularly those items needed to keep your body from getting too cold and uncomfortable.
Wetsuits
Wet-suits are designed to allow water to get inside the suit. Your body-heat then warms the water up, insulating you from the colder water that remains outside the suit. In really cold water, the main problem with a wet-suit is that initial frigid shock which shocks your body as the initial cold water rushes into your suit when you first enter the water. This happens again every time you re-enter the water after knocking out a plug-up in the jet tube or every time you take a break. This “cold water shock” has an accumulative affect on the body; and even the toughest people often find ourselves going “one, two, three” on the bank and have trouble making our bodies jump back into the water.
Some wet-suit divers lessen the pain of cold water shock by having a hot tub of water on the bank. They pour the hot water into their suits just before re-entering the water to help bring up their body temperature. Hot water systems that provide a steady flow of warm water into a wet-suit are even better — but we will address that topic below.
There are different types of wet-suits, some which are designed especially for cold water use. Cold water wet-suits are usually made of thicker rubber, have few or no zippers, and almost always have the hood directly attached to the wet-suit top. There is also the “shortie,” which is like a pullover wet-suit sleeveless T-shirt with or without a hood attached. A shortie can be worn underneath or over top of a regular wet-suit to create added warmth. In addition to the added thickness of rubber around your upper torso, a hooded-shortie prevents a lot of the cold water shock from running down your neck and back!
Important note: The more rubber you add for insulation from cold water, the more lead you must add to your weight belt(s) so you can remain firmly anchored to the bottom of the waterway when you are dredging. Also: The more rubber that is added around your upper body, arms and shoulders, the more constrained your arms and shoulders will be. Dredge work underwater is mostly stomach, arms and shoulder-work (movement). Therefore, adding more rubber increases the amount of effort required to get the work done. Effort in dredging is like money in your wallet. You only have so much. So it must be managed as efficiently as possible. Because, once you have used it up, your day is over.
Dry-suits
For cold water dredging or diving, dry-suits are definitely a step above wet-suits (when there is not a hot-water system). A dry-suit is designed to keep all of the cold water out. Basically, there are two different types of dry-suits available on the market: Those that use the rubber or nylon shell as insulation, and those that require additional insulation to be worn inside the suit. Both types work well; it is a matter of individual preference as to which kind is best for you.
Dredging activity is very hard on any type of suit. There are many different models and makes of dry-suits available. Some are designed more for sport diving rather than dredging and hard work. Dry-suits generally are quite a bit more expensive than wet-suits. However, you cannot rightfully put a price on comfort and warmth when you are spending many hours underwater working for a living. If you are cold and uncomfortable, you will not get in as much dredging time; and you will not make as much gold (money). So, my advice is to spend the extra money on getting a quality dry-suit if you are going to buy one.
Dry-suits generally require more maintenance than wet-suits. Mainly, the seals at the extremities and the zipper must be properly maintained. Most dry-suits have zippers which should be coated with bees wax every several uses and sprayed with silicone each time the suit is used. The seals should be sprayed just before each use. This allows them to slip on more easily, and prevents unnecessary stretching. The zipper is the heart of a dry-suit and must be handled with care. You have to be careful not to get sand in it, and not to sit on it or rub it heavily while moving rocks around in the dredge hole. I always glue a rubber flap over my dry-suit zippers to further-protect them from dredging wear and tear. Most manufacturers stress having a second person zip it closed rather than doing it yourself. This is because it is difficult to pull the zipper straight when it is behind you, as many dry-suit zippers are. If you damage the zipper, the suit is no good until you get the zipper replaced.
You will find that even the smallest puncture holes in a dry-suit need to be patched when diving or dredging in extremely cold water. Otherwise, you are constantly uncomfortable with cold water entering the suit from that location.
Hot Water Systems
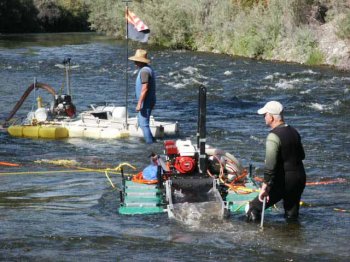
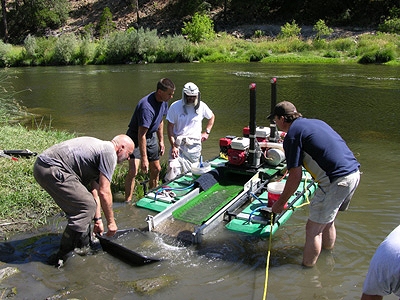
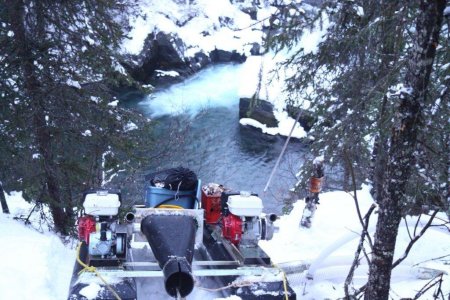 As far as I’m concerned, if you are going to dredge long hours in cold water, a hot water system is definitely the way to go! Water is usually heated with a heat-exchanging device mounted to the cooling or exhaust system of the dredge motor. The dredge pump is tapped to provide a water supply, which runs through the heat-exchanger, then through a steam trap/mixing tank, and then down through a hose to pour a constant volume of warm water into the dredger’s wet-suit. Some dredgers are using propane continuous-demand hot water heaters, but most use heat exchangers mounted to their engine exhaust systems.
Hot water heat-exchangers are available on the market. They are also reasonably easy to build. Most homemade exchangers are built with a long length of copper tubing which is either wrapped around the existing exhaust system or is coiled inside a separate housing through which the engine’s exhaust is channeled.
Photo By Tim Cook
The key to a hot water system is to provide an abundance of hot water. If you do not have plenty of hot water for all of the divers working on a system, then you will most likely end up pumping cooler water into each diver’s suit, which can be worse than having a wetsuit with no hot water system.
Hint: You can never have too much hot water — because you do not necessarily have to use it all.
Most ordinary wet-suits are adequate as hot water suits — particularly with the addition of a hooded shortie vest. Dry-suits normally do not make good hot water suits, unless they are modified. This is because the seals prevent the hot water from exiting the suit. After a while, all the excess water inside the suit cools down and makes the diver cold. Removal of the seals on a dry-suit would probably make it a good hot water system (as long as it is a tight-fitting dry-suit) — but this seems a waste of money when a far less expensive wet-suit will accomplish the same purpose.
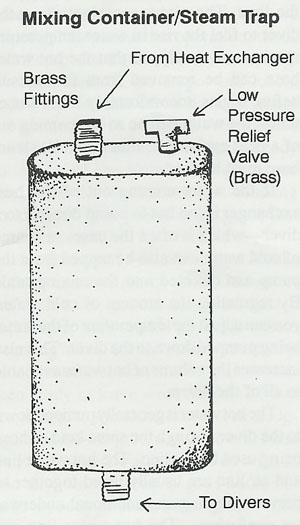
The main problem dredgers can have with a hot water system is being scalded by extreme hot water or steam. This problem can largely be solved by adding a steam trap to the system. Some prefer to call this a “mixing tank.” A mixing container can be made out of PVC plastic tubing. One of the primary purposes of the mixing container is to be a holding tank for water and steam. So, if extreme hot water or steam is created in the system, it will have a chance to mix with the warm water in the tank before being pumped down to the diver. The mixing container should be mounted vertically on your dredge with the input coming from the top, and the output to the diver being on the bottom of the container. This way, steam is prevented from being pumped directly to the diver(s). Some systems contain a low-pressure relief valve at the top of the container to allow air and steam to release.
 The mixing container must be large enough to absorb a shot of extremely hot water, but not so large that it allows the water to cool down before it is pumped to the diver. The mixing container allows the diver to feel the rise in water temperature much more slowly, so that the hot water hose can be removed from the wetsuit before it gets uncomfortably hot. Sometimes, the water can be so hot coming out of a heat exchanger, that a special steam hose must be used. In fact, just for safety, I always use heat hose on the connection from the heat exchanger to the mixing tank.
If the water coming out of the heat exchanger is too hot to pump directly to a diver — which is often the case — a source of cold water can also be tapped from the pump and directed into the mixing tank through a valve. By regulating the amount of cold water, you can adjust the temperature of the water being pumped down to the diver. This also increases the volume of warm water available to all of the divers.
Warm water is usually pumped down to the diver through the same kind of hose being used for air line. The hot water line and air line are usually taped together to prevent tangling and additional underwater confusion. The hot water line can be slipped into your wet-suit down through the neck. I usually poke a hole in my wet-suit near my chest where it is easy to slip the hot water line in and out of my suit.
Or, in extremely cold water, you can devise a splitter system which will direct some of the warm water to your chest, hood, each bootie, and each glove. This is the best way to do it if you are dredging in ice cold water. However, sometimes the splitter system can be avoided simply by having a hot water system which provides so much volume, that the warm water is forced out into these same extremities.
When dredging in ice cold water, if you do not have warm water directed to your hands, it is usually necessary to use three-finger wet-suit mittens. Otherwise, your hands can go numb from the cold. Three finger mittens are bulky; they prevent you from picking up larger cobbles with one hand, and they generally slow you down. With a good source of hot water to the hands, you can often get by with a good set of slightly-insulated rubber work gloves with the openings loosely rubber-banded around your wrists to prevent cold water from entering.
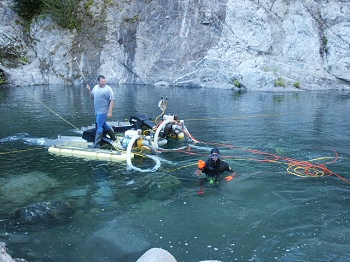
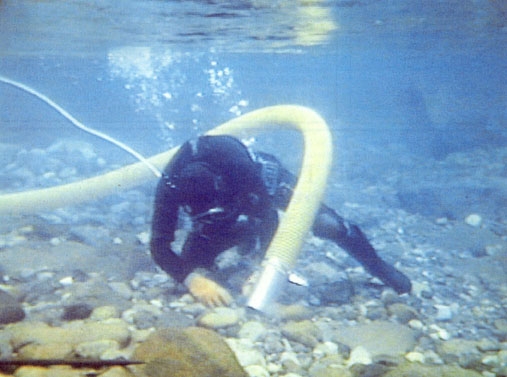
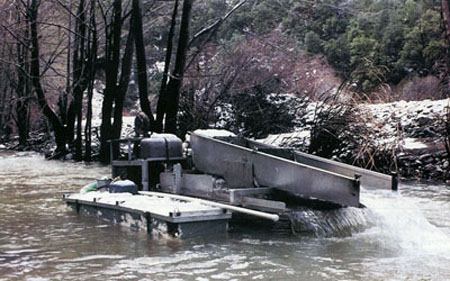 Author was developing some of the early hot-water heaters on his first dredge in 1981 while working in the frigid waters of the Trinity River in Northern California.
It is necessary to warm up your dredge engine to normal operating speed for at least several minutes to properly set the temperature of the water directed to the divers from the mixing container. Once you get the temperature working right for you, you normally do not need to make any further adjustments on subsequent dives, as long as you are running the motor at the same RPM.
If you stand around for a few minutes with hot water pouring into your suit, there is usually no shock at all when entering the cold water. As a matter of fact, it can be a pleasure to enter the cold water after you run your body temperature up to the uncomfortable stage when you begin sweating.
A hot water system should be removed from the dredge when not being used, like during the warm summer months. Otherwise, the heat and vibration will tend to wear the heat-exchanger out unnecessarily. Also, even when not in use, if a hot water system is attached, water should be allowed to flow through it any time the engine is running. This will prevent unnecessary overheating of the heat-exchanger.
Photo by Tim Cook
If you are tapping your dredge pump for a supply of water, be sure the water output is either closed off or underwater when priming your pump. Otherwise, there may be an air leak which can prevent priming.
The nice thing about a hot water system is that it will supply a continuous feed of hot water into your suit. This way, your body’s energy reserves are not being constantly used up to keep warm. As a result, you can be comfortable and get in more dredging time.
Important note: You can also be so warm that your body doesn’t want to work — like being in a hot shower. The solution to this lies in the amount of cold water you valve into the mixing tank, or how far down you zip your wet-suit jacket! Believe me, “too warm” is a much easier problem to solve underwater than “too cold.”
A common question people ask is, “Should I get a hot water system, or a dry-suit?” The answer to this lies in what you intend to do. I suggest having both systems available, depending upon your activity. For production dredging and sampling in extremely cold water, I would use a hot water system. For swimming across the river to stretch a rope, or for swimming down the river with mask and snorkel to look at the bottom in extremely cold water, I would recommend a dry-suit.
Other Things To Know About Cold Weather Dredging
If you are working in freezing temperatures above water, there are certain things that should be done on your dredge each day before knocking off. Your pump should have a drain plug tapped into the bottom. This way, you can drain the water at the end of each day to prevent your pump from freezing solid. It is not a bad idea to bring some hot water with you everyday in a thermos, because sometimes the pump will freeze even with the water drained. Be careful not to crack the pump housing by pouring too much scalding water directly over it when it is freezing cold.
Also, in freezing weather, the concentrates and water must be completely cleaned out of your recovery system at the end of each day. Otherwise, they will freeze solid and prevent the system from working until it thaws out the following day — if it thaws!
If you are not going to process them directly, your concentrates from the day should be stored well underwater to prevent them from freezing on the bank. Your mask, hood and gloves should be brought back to camp each evening and kept warm. Otherwise, you have the misery of putting them on when they are ice cold — unless you have a hot water system on your dredge.
Winter Dredging
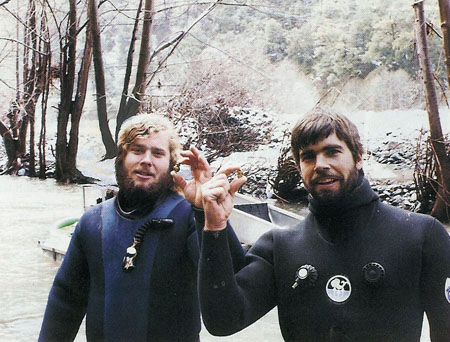
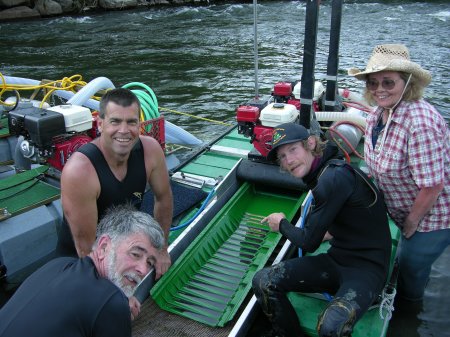
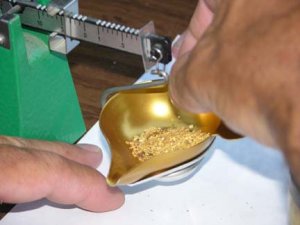
Eric Bosch and author displaying nuggets pulled while diving together.
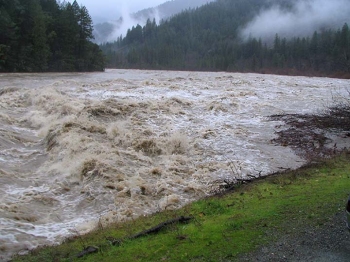
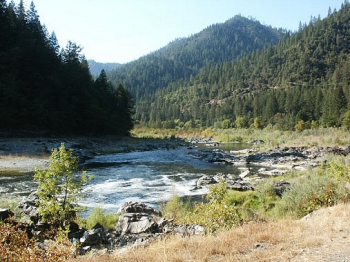
 Even if you are able to handle most of the cold water problems with the use of good equipment, another factor winter dredgers often have to deal with is higher and faster water. While the higher water will allow you to mine further up on the edges of the river, in many areas it will prevent you from mining out in the faster and deeper water areas-which may provide easy mining during the summer months. If, due to the faster, higher water, you are not able to get out and sample in certain sections of the river, you will not be able to run a full testing program on that section of river; and you will miss pay-streaks. So, it can also be more difficult to locate deposits during the faster and higher water months of the year.
On the other hand, if the river edges are paying, the winter months may be the only time they are available for dredging. The location of deposits are going to vary from one place to the next.
While wet-suits, hot water suits and dry-suits do make for good insulation underwater, they generally provide poor insulation to the cold air above water when you are wet. Therefore, it is good to have a warm winter jacket to wear over your diving suit while taking breaks on the surface.
 As a side note on this, my commercial dredging buddies and I ate many hurried lunches on deck during the winter months (even while it was snowing) while the dredge continued to run at operating speed (with a rock placed over the suction nozzle to slow the water in our recovery system), pumping warm water into our suits.
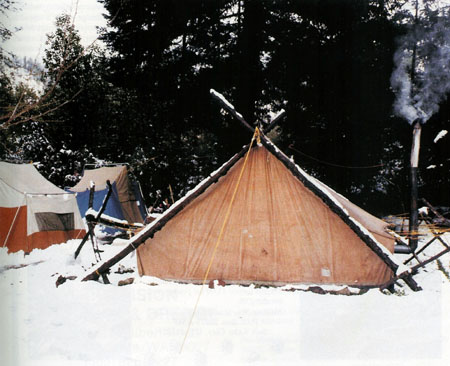
If you are mining in extremely cold conditions, it really helps to have a warm and comfortable camp. A person can put up with some pretty cold and miserable conditions if he or she knows there is a warm shower and hot meal coming later that evening. There are few things worse than freezing all day and then going back to stay in a wet and cold camp!
Author’s campsite during his first several years as a gold prospector.
How Tough Are You?
It takes a pretty tough person to dredge in extremely cold conditions. Even with the best equipment, there is still a substantial amount of cold water exposure on your hands and face. You spend quite a bit of time working on the dredge, tying off lines, swimming the river, cleaning up concentrates, making repairs, etc. This all adds up to exposure which can be painful or uncomfortable. Some people are gung-ho enough to dredge in extremely cold water on a short-term basis. Few people are willing to do it long-term.
We all have the potential to be tough enough to dredge in extremely cold water. What it always comes down to is whether or not we desire to be that tough! A lot of people think they are, and then realize they are not willing to do it!
Talk is cheap!
I was mining with several guys in 34-degree water one winter. One of the divers and I were sampling for a new deposit while the other two guys were actively dredging out a rich deposit we had already located. They were recovering several ounces of nugget-gold each day, while we were knocking out sample holes. One day, we helped get the production operation started and then headed out to do our sampling. We soon realized we forgot our lunch, turned around and drove back to where our partners were dredging. We had not been gone fifteen minutes, and they had already gotten out of the water and were in the truck with the heat turned on — drinking hot coffee! These were tough guys; that water was cold!
A partner and I were dredging in Alaska in October when things started to freeze. We’d had a very good season, but I wanted to put more ounces into my bottle before returning home. Ice had already formed on the edges of the river, and my partner had been ready to leave weeks before. I was determined to spend one more week dredging, because the gold was good and I had plans for what I was going to do with it. One day, with a week to go, I could not make my body go underwater again. “One, two, three, go!” — but my body refused. So, it just wasn’t worth it, anymore! I walked over and tugged on my partner’s air line and asked him if he was ready to go — home, that is. We were on the road later that afternoon in a warm truck with the heat blasting. In that area of Alaska, three feet of snow fell that night!
There is a point where the body just takes over and says, “No!” And, this is probably the point where it is smart for you to listen.


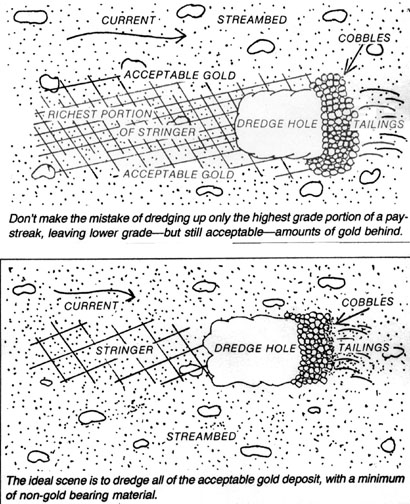
 When larger rocks are pushed through a sluice box by water force, they also create greater turbulence behind the riffles as they pass over, which may cause an additional loss of fine gold.
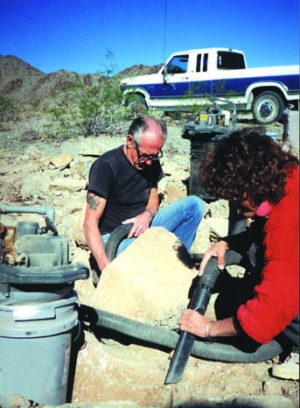 This is a picture that you will seldom see – me getting up at 5:30 a.m. full of excitement – to vacuum! Yet, I spent some of last summer and almost all of this past winter, doing just that. It wasn’t “dust bunnies” I was after, however; it was
 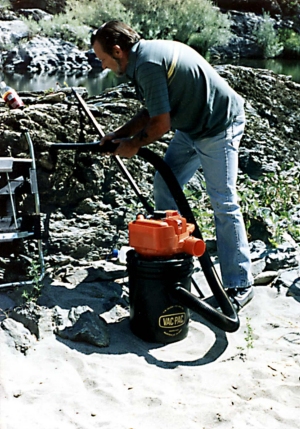 Finding new places to vack was not easy, as I have said. I have known for years, from experience, that the gold in the deserts isn’t always where it is supposed to be. What would look like great bedrock on the rivers often means nothing in the desert, mostly due to the lack of water volume and movement in the deserts. When I arrived at Quartzsite I met up with Al Powell, who is also a
  When I first heard about picking
  Finally, after many, many frustrating hours, the first nugget succumbed to my detector, minutes later, another. I really got excited, and I decided to share this new-found activity with my friends. I helped them learn what I had learned, and then we developed new methods and techniques. Detectors were getting better, and I purchased the latest equipment, knowing that I needed every edge that I could possibly acquire.
 It has never before been more possible to locate your own gold nuggets with the aid of a metal detector, than it is right now. It is not that there is more gold out there. In fact, each day, there is a little less. However, with the new instruments available today, millions upon millions of beautiful gold nuggets are now within easy reach of the intelligent, properly-equipped electronic prospector. You don’t need tons of equipment to haul around, nor do you need many thousands of dollars to get started. The exercise is mild; the air is fresh; and the pursuit of your own gold nuggets is done at your pace — no one else’s.
 I know of a guy that was new to gold dredging, who was into a very large pay-streak which was paying him a little more than half-ounce per day for every day that he went out and dredged. He was happy with this. That was well more than an average day’s wages in the profit he was making over top of expenses, and gold prices have been going up to make that even better. Everything was going along just fine until one day when he uncovered a bedrock up-cropping and pulled six ounces of beautiful gold out of a single pocket in the bedrock just in that one day. The following day, he was back into the half-ounce amounts again. Only that was no-longer good enough. He quit shortly thereafter. He left the area, never came back, and I have not heard of him since.
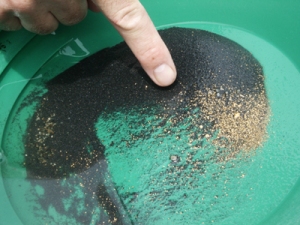 If you stick with


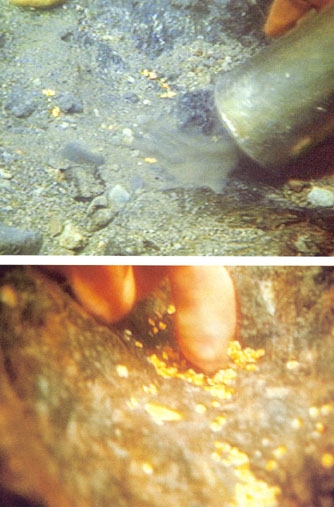
 Seeing an increase in the amount of gold in a sample hole, even if it is just a small increase, is one of the most important signs to recognize in sampling. You would not see the increase if you were not on the general gold path and on or near a low pressure location in the river. Seeing an increase in gold is
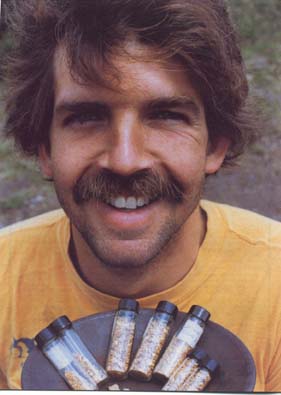

 feel the excitement about the prospects of the new season. What is it about spring that gives people so much renewed hope and interest? Even people who failed utterly during seasons past, who considered giving up gold mining forever, seem to be
  There is more to success than
  the basic way you approach mining. Only you can do that. To experience the magic of success in any activity, failure and inability has to be overcome by positive energy and personal discipline. True magic cannot be obtained by forgetting failure or justifying it away.
 True, it is much easier for us now than it was for them. We have
  While some gold-bearing creeks and rivers tend to have gold values dispersed throughout their entire streambeds, there is generally not enough gold to make a small-scale mining operation payoff very well. Because we are limited as to how much gravel we can process as small-scale miners, we need to find
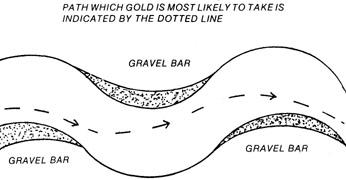

 And, if you are not sure if you have given a sample hole everything it deserves, be honest with yourself about it and give it a little more. It takes personal discipline to be a good sampler!
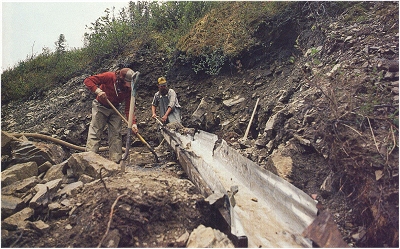 The old man leaned against his shovel and wiped his brow as the hot interior Alaska sun beat down upon him. He was a veteran of the
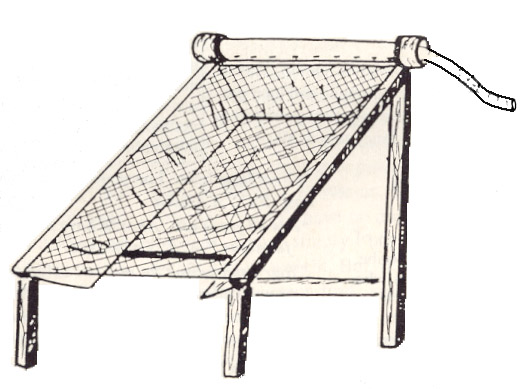
  My first homemade sluice box was built from old photos, some advice (some poor and some good), a few aged pieces of plywood and two-by-fours, wooden slats for riffles and burlap to catch the gold. At sixteen, I had visions of gold, just like any other person would after reading Jack London’s books and other stories about the gold rush. Having been raised in the gold camps of the Circle Mining district in eastern Alaska, I had watched many miners, including my father, extract gold with sluices and gold pans.