Nov 232011
Nov 232011
BY JOHN D. WILBURN
 When discussing gold and silver, a historical perspective is always desirable. Gold has served as money for some 2,600 years, from ancient Hebrew times up until 1933, when the U.S. withdrew gold coins from circulation. Gold has always been desirable for its beauty, rarity, and its resistance to tarnish and corrosion. Kings throughout history have accumulated gold. King Solomon acquired gold, and the “Wise Men” brought gold to Jesus Christ. The quality and value of gold has been trusted like no other commodity. Unlike the history of numerous currencies that have come and gone, there has never been a time when gold wasn’t valuable. All substitutes for gold have led to monetary crisis.
Many kingdoms and empires which became pages in history books followed the same pattern of monetary debasement. First, gold is removed from coinage, then silver, leaving copper coins at best. Paper money is the worst form of debasement. Sir Thomas Gresham in 1558 made the classic observation, “Bad money drives out good money.” The money becomes virtually worthless; and once the delusion becomes a reality, panic results in monetary disaster. Germany is a classic example, among many.
Twice in this century the German mark has become worthless, destroyed in 1923 by hyperinflation, and again in 1947. In 1937, Adolph Hitler said, “Our money is not backed by dusty gold bars sitting in bank vaults, but by productivity of the people.” Then years later the mark was worthless. President Jimmy Carter made the same statement in 1977, relative to the dollar! Historically, paper money has been mistrusted, even the American “greenback.”
Greenbacks were issued in the 1860’s as an expedient to finance the Civil War, but inflation soared and gold and silver went into hiding. The “Panic of ’93″ resulted in greenbacks being redeemed for gold. In 1932, greenbacks were distrusted and redemption was so great that the Philadelphia mint struck a record 4,463,000 ten-dollar gold coins. The people were acting to protect themselves against false values and government mismanagement. False values in the 1929 stock market crash proved paper assets could not be trusted.
On March 6, 1933, the U.S. government stopped exchanging gold for dollars (ironically, Adolph Hitler came into power the same day). The reason for demonetizing gold is to expand the money supply in an attempt to increase productivity and wealth. But wealth cannot be printed. In all cases, an expanding money supply leads to inflation, depreciating the currency. The results are rising prices. The products are not changing value, only the currency! Eventually all monies other than gold become worthless or greatly depreciate.
So why do governments abandon gold? Because goods and services can be acquired at the cost of paper and ink! The government produces nothing but war, waste, greed and debt! The government survives because it gives so much of what it doesn’t own. The bureaucrats penalize producers and reward consumers by acting as a distribution center. The government must continually expand taxes, licenses, fees, permits, duties, etc., to finance its give-away programs (and being so generous assures re-election); and if that doesn’t cover the cost, then it runs deficits, borrows money from the Federal Reserve, and sells the debt to the public! The process works as long as there is productivity and confidence in paper money. But sooner or later, productivity declines, inflation soars, the value of the currency plummets, and confidence is shaken. Years of government expansion adds to the cost of productivity through higher taxes, rules, regulations, fees, permits, etc., forcing businesses to close and fueling inflation. And government debt keeps interest rates high, adding to the cost of doing business. It is ironic that high interest rates make the dollar strong; when in reality it penalizes productivity, the solid backing for the currency!
Today the dollar is worth less than ever.
The reason there is a federal debt (or state debt) is that there are too many people getting something for nothing! And deficits are a major contributor to inflation.
How much longer can the government print “prosperity” before hyperinflation results? Or, will the U.S. debt bomb explode first? Total internal U.S. debt can never be paid. Stocks, bonds, life insurance policies and pension plans all could be wiped out! When money is created out of nothing, it can return to nothing!
Gold is still the world’s greatest monetary asset, and central banks hold nearly a third of their assets in gold, because paper assets cannot be trusted. A sudden lack of confidence is the cause of all monetary crises. Higher interest rates can keep a crisis in check, as greed rules over fear. But eventually a debt crisis will lead to a dollar crisis. At some point, confidence in debt will deteriorate, and the Treasury may no longer be able to sell bonds and T-bills, constituting default, and the “full faith and credit” of the U.S. Government will end, and panic will beset the dollar. Panic debt liquidation is the greatest fear.
The 21st century will see more inflation, more debt, and a weaker dollar. Gold is protection from governments who ultimately run massive deficits, create inflation, devalue the currency, all ending in default and bankruptcies. The value of gold remains stable regardless of inflation or deflation. In an unstable world with depreciating paper assets, gold is still the world’s greatest monetary asset!
- Here is where you can buy a sample of natural gold.
- Here is where you can buy a basic gold prospecting kit.
- More about gold
- More about how to prospect for gold
- Schedule of upcoming events
- For a more thorough explanation of gold mining techniques, checkout these informative books and videos by Dave McCracken.
By Paul J. Badali
You work hard for your gold, And you deserve to get top dollar for it.
 I enjoy mining for gold more than just about anything else I can think of. I also enjoy getting new people involved in prospecting and helping beginners become successful. One question I am often asked by people new to prospecting is “Where do I sell my gold once I find it?” You work hard for your gold, and you deserve to get top dollar for it. So we’ll answer that question, but first, let’s look at some facts you should know about gold before you try to sell it.
Gold is an actively traded metal which is used in jewelry, contact points in computers, communications satellites, as a shield against radiation in the glass of a space helmet–even in your telephone. The price per troy ounce for which gold trades, or the “spot” price, changes and is set daily in the various financial centers of the world such as London and New York. You can find out what the spot price is by checking the financial section of most large newspapers, TV news, or by telephoning a precious metals dealer or stock broker – or even by going to the home page of this web site..
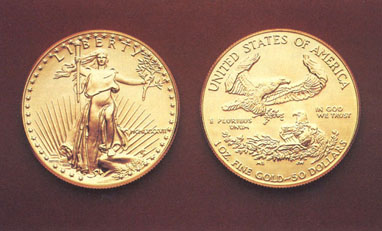
 Gold bars or coins are usually pure 24 Karat gold, also called .999 fine (meaning 99.9999 pure). When you buy gold coins or gold bars, you usually pay a bit more than the spot price. Likewise, when you sell coin or bullion, you are usually paid a little less than spot. That’s how the dealer makes his profit.
Some terms you need to be clear on are karat and carat, and fine. Karat is used to express the pureness of gold. Carat is used to weigh diamonds and other precious stones. One carat is 1/5 of a gram. Twenty-four karat gold is 100% pure gold. Fourteen karat gold, the form which most jewelry items are made of is 14/24 or 58.% pure gold. The rest of the metal determines the color of the alloy. Fourteen karat white gold is 58.3% pure yellow gold and 41.7% nickel and zinc, which give it the white color. Fourteen karat yellow gold is 58.3% gold mixed with equal amounts of silver and copper. Mix 41.7% copper with gold, and you get 14k red, or rose gold. Mix 41.7% silver, and you get 14k green gold. So the amount of added metal determines the karat, and the type of added metal determines the color of the gold alloy.
Fine is a word used to describe both the purity of gold and the size of individual grains of gold. It expresses purity when a decimal appears before the word fine. For example, .583 fine means 58.3% pure gold, or 14k gold. .999 fine is usually used to mean 99.999% pure gold. This is as pure as we can get gold or just about anything else for that matter. But when someone says “fine” gold (no numbers mentioned), they mean small flakes or gold dust. Small gold particles are called fine gold because thy will pass through the holes of a very fine mesh screen.
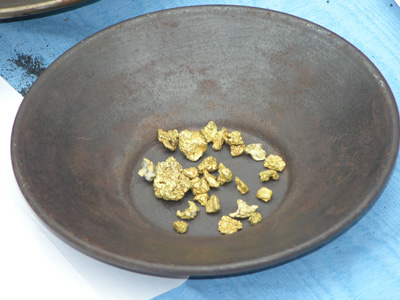
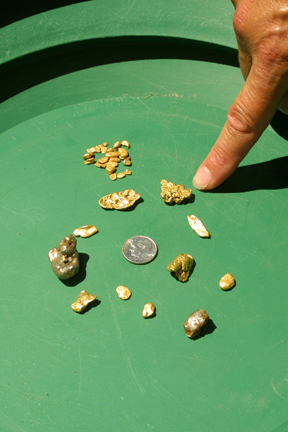
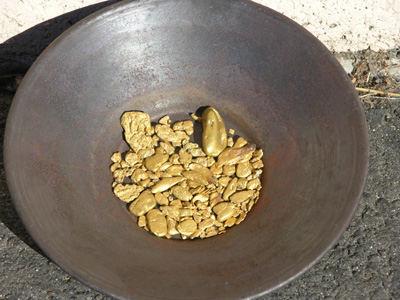 Placer gold is never pure gold. Gold is always found as a natural alloy. It runs anywhere from 50% on up to 96% pure gold. Fine gold of .750 to .870 is the most common. The rest is usually silver, but there can also be other metals alloyed with the gold such as platinum, copper, nickel, iron, etc. Pure gold can be obtained from natural gold by refining it electrochemically. Electrolysis is used to put the gold into a cyanide solution. Other metals fall out of solution to the bottom, and gold is pulled back out of solution eletrolytically as pure gold.
There really is a market for all the gold you can find. So what is the best way to sell it? That depends on how fast you need to sell it, and upon how much you want to get out of it. Usually if you need to sell it fast, you will end up with less than if you can take your time and sell it with some value added.
For a fast sale, just about any pawn shop will be glad to buy your gold from you for 50% of spot or less. This would be my last choice. There are people who will pay more for it. Some people make their living, or at least part of it, buying and selling placer gold. You should find out who these people are in the area where you live and in the area where you mine. They will usually pay you cash on the spot for your gold, and pay anywhere from 70% to 90% of spot for fine gold. Some pay more for nuggets, but many do not. Jewelers who use gold nuggets in their jewelry designs will often pay more for nuggets. There are people who specialize in buying and selling gold nuggets of exceptional size, shape, or quality.
Also there are private nugget collectors who are always in the market for unusual and beautiful nuggets. The best way to find out who these people are in your area is to ask experienced miners who buys nuggets.
Other places to make a fast sale are coin shops, precious metal dealers, and some refineries. Most of these places will want to have your gold assayed to determine its purity, and then they will usually pay around 90% of spot for the actual gold content. As an example, let’s say that you have one ounce of .873 fine gold to sell, and spot is $476/oz. You actually only have .873 ounces of gold. The rest of the weight is silver or some other metal. They will pay you .905 of spot, or 428.40/ounce; and $428.40 X .873 ounces = $373.99. That’s about what you can expect to be paid by someone who needs to make a profit from the gold they buy from you.
So how can you get a better price for your gold? By selling to the final consumer, and by adding value.
The final consumer is someone who intends to keep the gold just the way he or she buys it from you. They don’t intend to refine or resell it. They want it to keep as a specimen, a souvenir, a jewelry item to wear, etc. And by making your gold up into souvenirs, specimens, or jewelry, you add value in addition to the value of the gold. So first let’s discuss what you can do with your gold and then where you can sell it.
Natural placer gold nugget jewelry is very appealing to a large segment of the public, and therefore fairly easy to sell. Nuggets can be made into necklace pendants, earrings, tie tacks, etc., by soldering on 14k gold findings with gold solder. This is an obvious choice if you are an experienced jeweler, but not so likely a choice for someone with no jewelry background. In future articles I will be giving step-by-step instructions on how to become a goldsmith, and how to mount your own nuggets even if you have no previous experience in silversmithing or goldsmithing. But for now, epoxy is probably a less threatening idea than gold solder.
Small nuggets and fine gold can be mounted with epoxy glue onto small jewelry-size gold pans, small Austrian crystal, or sterling silver charms by anyone with a steady hand. These are available through mail order or from your local mining supply dealer. No matter which you choose to mount your small nuggets on, the technique is the same.
Let’s use a small blued steel gold pan hat tack for example. Surface oils keep epoxy from sticking to any surface, so you must remove all of it, even finger oil. Get some acetone from a paint or hardware store, and immerse the pan in it for 10 seconds. Remove, and wipe it off with a paper towel. Press the pin into some styrofoam to hold it in place. Use tweezers to arrange your nugget or nuggets in the pan until you find the arrangement that looks best to you. Remove the nuggets one at a time, and rub the back of the nugget across 320 grit emery cloth or silica carbide sand paper to create a flat rough spot for gluing. Then mix up some epoxy with a toothpick on a small sheet of wax paper. Use slow-drying epoxy if you are gluing quite a few at a time, or quick-drying if you only plan to do a few. Be sure to mix it thoroughly. Super glue is not recommended.
Pick the nugget up with tweezers, and touch a small amount of epoxy to the flat spot you ground on the back. It looks best if the glue does not puddle around the nugget, so apply it sparingly. Also be careful not to get any glue on the tips of the tweezers. Then place the nugget where you want it in the pan, and let the glue set up. The same procedure can be followed to apply nuggets to Austrian crystal or sterling charms. The blued steel pans and antiqued sterling findings look best when finished with a spray coat of polyurethane varnish, available at hobby stores.
Fine gold usually needs some cleaning before you use it. It must be free of black sands, and any mercury should be removed. If the gold is dull, you can shake it up in a vial with some dish soap and water to brighten it.
Fine gold can also be mounted into blued steel pans and sterling mountings. Decide where you want the gold in the pan, and use the toothpick to put epoxy into the pan in the shape that you want the gold to be. Sprinkle fine gold onto the epoxy spot, and arrange it with a dry toothpick until you get it to look just right. After the epoxy sets up, spray it with the polyurethane varnish. You could use fines on the Austrian crystal, but they really look better with single small nuggets. It’s easy to mount small nuggets and get them to look good and sellable. It’s harder to come up with jewelry that looks appealing with the really fine gold. And, you usually have a lot more fine gold than small nuggets, so you would like to be able to use a lot of it in good-looking jewelry. One advantage in using the miniature blue steel gold pans is that the fine gold really looks better in these pans than small nuggets do. It is more to the size scale of these small pans than small nuggets, so it looks great in them, and these pans are available for every type of jewelry item you could want to make, including necklaces, earrings, hat and tie tacks, cuff links, and even belt buckles.
Another good use for fine gold and small nuggets is to work them into a belt buckle with a mining scene on it. Here again, use epoxy and finish with a polyurethane spray.
Look for buckles at mining supply shops and mail order supply houses. You can glue the gold into the prospector’s pan, the stream bed, and eagles’ claws, etc.
Large gold flakes and small nuggets can also be used to make lockets. Lockets can be made by finding coin mounts at a jewelry supply store and buying watch crystals the same size. You can get sterling silver, gold filled, or 14k gold coin mounts for US gold coins, Mexican gold coins, etc. Then find watch crystals that measure the same diameter as the gold coin for which the bezel was designed. You need two watch crystals for each necklace or earring you wish to make. You can also buy these as complete sets ready-to-use from several mail order suppliers and from many local mining supply shops. Also available are small decorative glass bottles which can be filled with gold for necklace pendants or earrings.
The gold goes into the hollow space between the two crystals, and then the bezel is tightened around them and holds them together. The bezel usually has a small screw at the top which is used to tighten it around the crystal. The bezel holds the crystals together when closed, and glue is not necessary. If you choose to glue the two crystals together use epoxy, and use as little as possible. If it runs, there is little you can do to make the piece look good again. Never use super glue. Some watch crystals are plastic and the vapors from super glue make clear plastic turn white and fogged.
Gold flakes look best when displayed in water, but it is not easy to successfully fill watch crystals with water. Air bubbles in the water and leaks at the seal between crystals are common problems. But if you like a challenge, start by using distilled water. Tap water has minerals that settle out of solution as white flakes; distilled water does not. Boil it first, to drive out all the dissolved air, them fill and seal a quart bottle, and put it in the refrigerator to cool. This keeps small air bubbles from forming inside the crystals after the glue dries. The crystals must be glued together under water with the gold and no bubbles in them. The glue must seal them together with no leaks, yet not show too much either. After the glue sets up, and if there are no leaks, they can be put into bezels. You can also get decorative small glass bottles deigned for use as earrings or necklace pendants. Cooled boiled, distilled water should be used in small glass bottles also.
Jewelry is not the only way to add value to your gold. You can sell glass vials containing a small amount of gold as mineral specimens or souvenirs. Glass vials are available in several different sizes, but the two dwt., ½ ounce, and one ounce sizes are the best for selling small amounts of gold. The gold should be clean of black sand and mercury as in the jewelry.
Start by setting a per ounce price for your gold. I charge more per ounce for small amounts than I do for quarter or half ounce in a vial. Next, decide what price you want your vials to sell for, and weigh out $3, $5, $19, etc., worth of gold at your price. For example, if you decide to charge $800 per ounce for small amounts, and you want tomake up a $5 vial, you need 5/800, or 1/160th of an ounce.
There are many different types of scales and balances you could use for weighing. You could use a pennyweight (dwt.) scale, or a gram scale, or one graduated in grains or carats. The units don’t matter, but the scale must be sensitive to very slight weight changes. The example given of 1/160th of an ounce is .125 dwt, or .194 grams, or 194 milligrams, or 2.75 grains, or .97 carats. A table is provided for weight conversions, so that whatever type of balance you have, you can make it work.

I use the two dwt vials for up to $20 worth of gold, the ½ ounce vials for $19 to $50, and the one ounce bottles for $25 to one ounce of gold. Since you can get close to 90% of spot for your fines from a gold buyer, it makes no sense to sell it this way unless you get spot or spot plus 10% at least, even for a full ounce. After weighing the gold, put it into the vials, and fill with distilled water. A good trick to eliminate bubbles in the ½ ounce and one ounce vials is to put the cap on the vial while holding both under water. Bubbles will not appear later on if you use boiled, chilled water.
I made up an attractive card to help in selling the small two dwt size vials of gold. It has a drawing of an old prospector panning and of a modern suction dredge in operation on the front of the card. Both sides of the card are full of scientific and geological information about gold. It also tells about the history of gold mining in America. The vial of gold gets glued on the front of the card, with clear silicone rubber sealant. I use them for $2, $5, $10, and $20 vials of gold, and they really help sell the gold. At gold shows, I find they especially fascinate grade school kids, who can usually talk mom or dad into spending $3 on something which is so educational. I also use the card with small nuggets.
You can purchase and use my cards for your small vials, or make one of your own. If you do take the time to make a card, be sure to copyright it. It only costs $10 to copyright. If you wish to learn how to copyright your work, write to Copyright Office, Library of Congress, Washington D.C. 20559, and ask for copyright information. They will send you everything you need free.
Some more ideas for souvenirs are as follows: You can buy or make ceramic or cast metal sculptures of a prospector with a gold pan, and glue some gold into the pan. The metal ones can be made to use as automobile hood ornaments or paperweights. You could make up a prospector doll with a small gold pan in his or her hands, and glue gold in that. Use your imagination! If you can come up with something related to prospecting that prospectors or the general public would buy, and work your gold into it, then you can usually get at least double spot for your gold.
So where do you sell jewelry, vials of gold, and souvenirs? Friends, relatives, and the people you work with are a good place to start. Just bring what you have made to work with you and show it to people. I know of one guy who sells all he makes in bars. He just pulls his stuff out of his pocket, shows it around, and it sells.
Next try selling to the public at shows. Swap meets or flea markets are an inexpensive way to show your gold. If you have enough jewelry, vials, and souvenirs made up, also consider setting up at gold shows, rock and gem shows, county or state fairs, etc.
If you have enough profit built into your price structure, you can consign your goods or sell wholesale to retail shops that sell to the public. Some good shops to approach would be local mining supply shops, rock shops, etc. Also tourist shops, gift shops, and jewelry stores in areas with a gold mining history. Here again, use your imagination, and you will find shops which will be happy to carry your gold.
There is one final option which we have not yet discussed. You can keep it. There are several ways to do this also, and some good reasons to consider this option. Many people are sure that the price of gold will rise much higher than it is now in the not-so-distant future. The spot price has, in fact, been steadily rising for the last few years, with an average gain in price of about $4 to $7 per month for the last 18 months. So if you hold onto your gold, you may get more for it in the future. There is some speculation involved here, but most economists seem fairly sure that gold prices are more likely to rise than fall in the next few years.
Many people also expect the collapse of the United States and/or world economies in the future; some in the near future. I am not a doomsdayer, but let’s consider the advantages of holding large amounts of gold if it were to happen. Dollars wouldn’t be worth the paper they’re printed on, and stores wouldn’t take your money. It would be worthless, and rich men would be broke. But what if you had gold? You would still have something to exchange for goods and services which is recognized as being of value. You would still have purchasing power, while all around you had none.
A financial collapse may be fantasy. But whether it occurs or not, there are some definite advantages to holding your gold. First and foremost, your gold is not subject to income tax until you sell it. When you sell it, you are required to report what you sell it for, less what it cost you to produce, as income. Placer gold is not pure gold. It is still just gold ore, very high grad ore, but just ore. And mining companies do not have to pay income tax on ore taken out of the ground that is not yet refined and sold. There was a time, not so long ago, when citizens of the United States were not allowed to own refined gold. But unrefined placer gold was still legal to own because it was really just a high grade ore. If such laws were to return, placer would probably still be legal to own.
Finally, most of us miners get a natural high from handling our gold, and showing it off to close friends. It’s a reminder of all the good times and hard work that it took to get it. I take a lot of pride in my gold. I just plain like the look of the stuff, and the memories that some of those individual nuggets bring back: Good friends from Washington state that I met in Idaho dredging’ the day I capsized my dredge on the Klamath; my wife jumping up and down all excited at her first nugget. I have individual nuggets that bring back memories of all these incidents, and more. Those are some pretty valuable reasons to hang on to some of your gold.
No matter what you decide to do with your gold, I wish you success with It.
Nov 232011
Story by Marcy Stumpf/Foley
Photos by Norm Frain
 As I finished the last of the dinner dishes under my tarp “roof,” I looked out over our mining camp, nestled in the bottom of a steep, narrow, forested canyon. Camped in tents along the bank of our sparkling clear creek, we seemed very small in the miles of wilderness that surrounded us. We were three families, eleven people in all, with children ranging from five years to 21, and this was our first summer together as partners in a mining claim. Wet suits were drying on the clothesline, and the final clean-up of the day’s gold was done, as we all hurried to finish the last of our chores. The other women also washed dishes, the children joked and teased as they returned with fallen wood for our campfire, and the men finished minor equipment repairs and refilled solar shower bags and water buckets for the next day’s use. The sun was leaving our canyon, taking its warmth. “Our” blue heron was making his evening flight down our canyon as we gathered around our campfire.
We looked forward to this part of each day, but today a shout of, “Hello, the camp!” brought our stragglers hurrying, for visitors to our remote camp were a special treat. It was a fellow miner from upstream on his way out of the canyon to visit family and get supplies. He joined us for awhile. He had been coming to this area since he was a boy, with his father, and still returned for a portion of each summer.
All mining areas are rich in history, and this area was well-documented by a local historian. We often went over portions of his book at our campfires. Signs of the past were plentiful all around us. In the creek, still in place in front of our camp, were two huge logs, the base of a long-ago dam. From that point down, up on the mountainside, remains of a wooden flume, which now provided us with a trail the length of our claim. It was a welcome alternative to the long-hike down the middle of the creek through our narrow canyon, crossing deep pools or scrambling over bedrock and huge boulders.
 We continuously dredged-up reminders of former miners-square nails and mule shoes, hand-forged picks and other tools, and even old coins. Dimes from 1839, 1848 and 1849 and a “large” cent from 1832, all caused as much excitement as the gold nuggets we were finding.
On this evening, our visitor told us a story that intrigued us all. It was of an old mine just over the mountain. It was worked and guarded by an old hermit for many years, who had disappeared about 10 years before, after a shoot-out with law enforcement officers.
Our visitor told of a three-story cabin still standing, and a lot of equipment around; since the only way in or out of the valley was to hike over a mountain. He said he had been shown an old photo of a huge steam engine suspended on a cable as it was being taken across our canyon, 1,000 feet or more in the air. Downstream a short way, he pointed out the spot it had been taken across. According to him, the huge engine was still there.
After he left, we excitedly made plans to hike over the mountain on our next day-off from dredging; and in the meantime, we checked our book for information. It seemed the steam engine was brought in 1901 to power a lumber mill for wood to rebuild and repair our flume. Wow, that flume crossed the mountains for eleven miles to provide water to hydraulic mine a rich area. There were even several photos in the book that were taken long ago.
 Our day finally arrived, and we were all up early, packing lunches and donning packs while the air was still crisp and dew sparkled around us on the plants. The sun was just rising over the mountain as we forded our creek and started up the mountain on the other side. It was a steep climb, and we paused often to admire the beautiful patches of wildflowers and pick raspberries.
Soon, a shout from those ahead brought us up the last steep ascent, where we struck the trail our visitor told us of. It went around the top of the mountain at this point. We were shaded by the forest now-much welcomed after our steep climb. We were now on a narrow trail just wide enough for a mule. It was carpeted thickly with pine needles and leaves, and well-worn from many years of use.
When we reached the other side, the mountain was very steep, but the trail had a series of switchbacks which made the descent relatively easy. As we neared the bottom, we saw the first sign indicating that we were in the right place. Here were faint, but unmistakable, remains of the chute used to transport logs from the top of the mountain to the bottom. This was shown in one of the photos in our book.
We didn’t pause for long, because we could hear the creek and knew we were almost there. The trail ended at the creek. We crossed the creek, passing through the trees lining the bank to see if we could pick up the trail, again.
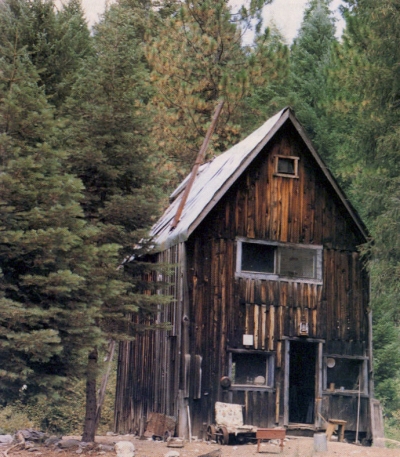
Once through, we stopped in astonishment. Immediately before us rose the rear of a tall narrow cabin. Its weathered boards grew moss, and its smokestack stuck out at a crazy angle. It dominated a large meadow. We saw several other cabins-all in various stages of falling down-and trails branching off in all directions.
This was definitely the scene from our book; but the whole area was denuded of trees in the photo. Except the meadow was now covered in forest, making it difficult to recognize. At that moment, we felt as though we were stepping from a time machine into the past, into a scene frozen in time, undisturbed.
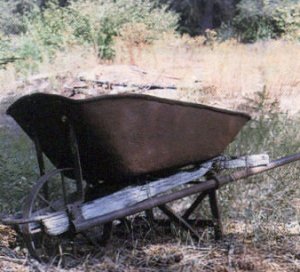
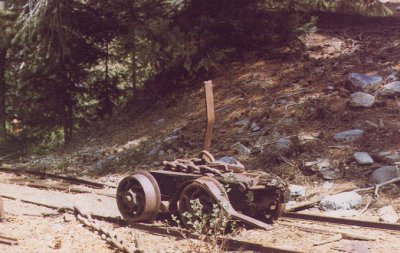
As we circled the cabin and approached the front, we found a crude sluice leaning against a tree and a large old grinding wheel from a blacksmith’s shop, laying broken were it fell from its stand as the wood rotted and could no longer hold it. An old wheelbarrow, ore cars and a narrow gauge track which had come from Germany were all visible.
However, before investigating the rest, we wanted to see what was inside the cabin. The door stood wide open, but we called, “Hello” into the interior several times. Receiving no answer, we finally stepped up inside onto the worn, wooden floor and waited for our eyes to adjust to the gloom.
Once we could see, we found ourselves in the single room which made up the entire ground floor. The room was dominated by an immense, fancy wood cook stove. How we wished that stove could talk, and what stories we imagined it could tell! It had obviously been well cared for; and even with its heavy coating of dust, it retained an air of dignity.
The rest of the room in contrast, had crude, handmade furniture–a large table, benches and stools, and crates and powder boxes tacked to the walls to hold supplies. The only bright color in the room came from old cork-top bottles of amber, blue and green placed on a window ledge to catch the sunlight. A stairway tilted against one wall proved to be pretty sturdy; so we slowly ascended it, one at a time. This room had been a bedroom, and we were once again surprised by what we found. Sunlight, filtering through the dusty window, lay across a narrow iron bedstead covered with an old, worn wool blanket.
 As we looked around, sunlight streamed through large cracks between the wall-boards. How cold it must have been when the winter winds and snow came whistling through!
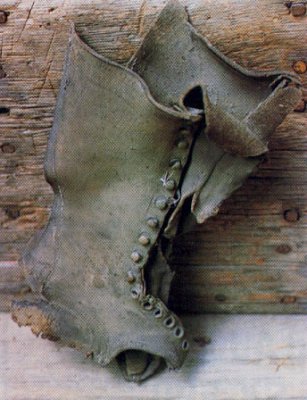
There were two more narrow beds of the same type with only ancient, lumpy ticking mattresses covering the sadly-sagging springs. The end of a peach crate with a once-bright label was propped on a wall ledge, now dull and faded. A coat, looking as if it would disintegrate if touched, was hanging on a nail in the wall next to one of the beds. This room had an air of sadness about it, and we touched nothing. Soon, we filed back down the tilted stairway and went out into the sunlight.
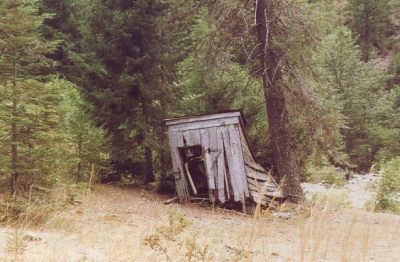
We spent the rest of the day exploring the area. We found one path that led past a whole row of small cabins, each one collapsed, with many square nails laying about, with the doors and windows laying where they’d fallen. The trees were very thick here, many grew inside the cabin walls.
Following a narrow gauge track, it was found to end at the entrance to a tunnel which was completely filled in with dirt and boulders. There were several ore cars about the area.
Harder to find was the steam engine, but it was found just where it had been in the photograph, and a search through the thick trees and underbrush disclosed its building collapsed around it. We found signs of other buildings, some of which had burned, others we knew not what had happened. It was definitely a bustling little community at one time. We also found some signs of more recent inhabitants of the area, but no signs of any trash at all. They, too, seemed to have left everything undisturbed. They also must have felt that this was a very special place.
 All too soon, it grew late and we had to cross back over the mountain and return home. We vowed we would return, but we only had two weeks left on the claim and we did not make it back. However, we planned to make the journey again the next summer.
When we returned that next summer, we had a visit from the couple who bought the claim. It was then that we discovered it had been destroyed by fire just one month after our visit. It was speculated that a hunter took refuge there during a snow-storm, and lit the old stove, then fell asleep. He burned in the fire also. We were saddened by the loss of life and of the cabin. It was a special piece of history that can never be replaced.
Although we took nothing with us but photographs, nothing was needed. We had our memories of it, and always will. It gave us a special feeling to leave it as we found it, and the fact that it burned did nothing to diminish that feeling.
We feel very privileged and special to have had our chance to step back in time and gain a special closeness and insight into what it must have been like to live there so long ago. We feel our children, especially, had an experience that few of their generation will ever have.
I didn’t ever go back, and don’t intend to. As long as I don’t, the cabin still stands there, waiting.
- Here is where you can buy a sample of natural gold.
- Here is where you can buy a basic gold prospecting kit.
- More About Gold Prospecting
- More Gold Mining Adventures
- More History on Gold Mining
- Schedule of Events
- Best-selling Books & DVD’s on this Subject
BY PAUL BADALI
It’s a great way to enjoy your gold, create special gifts, and make some money
 Making gold nugget jewelry can be an enjoyable enterprise. It is a good way to enjoy your gold, give it as gifts, and make some money. It is not as difficult to solder gold as you may think, and you do not have to mortgage the homestead to buy the necessary tools and equipment to do it. It does not take up lots of space. So why not give it a try?
In this article, you will learn the basics involved in gold soldering. You will also get specific instruction in three projects:
1. How to make a pair of gold nugget post earrings.
2. How to make a pair of gold nugget dangle earrings.
3. How to put rabbit ears on a gold nugget for use as a necklace pendant.
The following is a list of tools and supplies you will need:
- A good desk lamp
- Torch-either a Smith air/acetylene or Blazer air/butane
- Torch igniter
- Soft fire brick
- Tweezers
- “Third hand”
- Graphite probe
- Flux brush
- Flux (Batterns Self-Pickling Flux, HR Superior, or similar)
- Pickling solution (Pre-Po, Spare, or similar)
- 14k yellow gold easy flow solder.
- Small metal snips.
- 14k gold findings (ear posts, rabbit ears, jump rings, etc.)
- Small hand-held polishing motor with soft brass wire brush
- Muslin buff for hand held motor or bench polisher
- Red rouge or Fabuluster
- 2 pair chain nosed pliers
- Cut 6 Equaling needle file
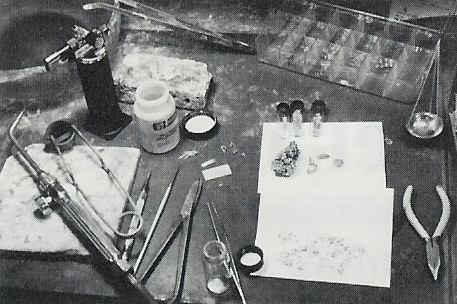
If you live near a large city, there will be a jewelers supply store where you can purchase all your needed tools and supplies. If not, there are many mail order sources. The company I deal with most is Rio Grande Jewelers Supply, 6901 Washington N.E., Albuquerque, NM 87109. They are a complete jewelers supply company selling all tools, supplies, gold, silver, gemstones, diamonds, etc. If you intend to be doing lots of jewelry-making, you should write them for their two catalogs, one for tools, one for findings.
The basic process involved in attaching findings to a nugget is to make the gold solder melt and flow between the finding and the nugget. When it cools and solidifies, they are permanently joined. This is done by heating both the nugget and the finding with the torch until the solder melts. All the other tools and supplies make this easier to accomplish or are necessary to re-polish the 14k gold after it has been discolored from heating. Now let’s get started and make a pair of 14k gold post nugget earrings:
POST EARRINGS
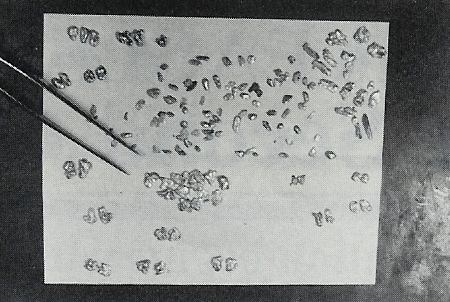
Begin by choosing the nuggets to be used. Flat flakes between 1/8″ and 1/2″ work best. Small rounded nuggets between 1/8″ and 1/4″ also look good. Pour your gold out onto a sheet of white paper and move them around with tweezers until you match up a pair of nuggets which are about the same size, shape, and character. Use the side with the most character as the front and the plainest, smooth side for the back.
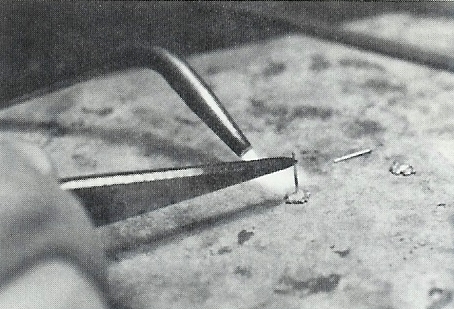
Place one nugget front side down on the soft fire brick soldering block. The advantage of the soft fire brick is that you can press the nugget into it. You can press it into the soft fire brick and position the back exactly where you want it.
Flux is used to help the melted solder It is applied to the back of the nugget with a small camel hair paint brush. You need just a drop in the exact spot you want the post to go. This spot should be as flat and smooth as possible with no cracks or holes in the nugget and no quartz. Gold solder does not fill cavities well, and it will not stick to quartz or other rock; only to metal. If you cannot find a flat spot where you want it, sometimes you can sand or file a flat spot in the right location.
Gold solder comes in flat sheets which usually weigh a pennyweight, and that’s enough solder to make about 500 pair or more. Use metal snips to cut off a strip of solder about 1/32″ wide, and then snip two small squares of solder off, about 1/32″ square. Touch the flux brush, slightly moistened with flux (not dripping wet, but almost dry), to a snippet of solder, and it will stick. Now touch it to the drop of flux on the nugget, and it will come off the brush and stay on the nugget. You can use tweezers for this, but the brush is much quicker and easier when you get the hang of it.
The type of 14k gold posts I like to use have a 1mm flat pad on the end that attaches to the nugget. This pad gives more metal surface area for the solder to grab hold, and makes a much stronger bond between post and nugget than would be the case with a post with no flat pad. They do not cost any more either. For large nuggets, you may wish to use threaded posts with screw-on backs. They cost lots more, but there is less chance of the back falling off and the earring being lost.
The post can be positioned by hand with tweezers or with the use of a “third hand.” If you have steady hands, it is much quicker to grasp the top-end of the post in tweezers and hold it upright on the back of the nugget while heating. Rest the tweezer-hand on the workbench top to be steady. Use your right hand if you are right-handed. If the post does not go on exactly perpendicular to the nugget back, it can easily be straightened later. I almost always use tweezers and place the post pad on top of the solder snippet and drop of flux.
If your hands are shaky, then use a “third-hand.” This is a set of tweezers attached to a heavy base, with adjustable linkage. Place the top-end of a post in the tweezers and adjust it so that the post is perfectly straight up and down, and the post-base is just a little above the nugget back. Now move the “third-hand” base so that the post is just in front of the nugget. Adjust the tweezers down so that the post base is even with the nugget back, and move it back onto the nugget. The post-pad should contact the nugget but not with a lot of pressure, or the post may bend while heating. When using the “third-hand,” apply the solder snippet after the post is positioned, and apply it behind the post. Solder flows towards the heat source, so the solder should be located at the junction of the post and nugget and away from the side being heated.
With a Smith air/acetylene torch, use a size 00 tip for soldering on earring posts. With the Blazer torch, I usually use the flame turned up all the way. Before heating, you must first dry the flux so that it does not boil and flip the solder snippet off. Sweep the flame over the nugget to heat it a bit and dry the flux. If it starts to boil, pull the flame off. The flux turns white when it is dry. It will puff up when you start applying more heat and may raise the solder snippet off the gold, but it will decrease in volume before it melts, and the solder will set back down onto the gold. If it isn’t in the right place, use a graphite probe to push the solder back where it belongs when the flux is melted. You can make a graphite soldering probe by buying some thick mechanical drawing pencil leads at an office supply store and putting one in some kind of a holder. I use a small metal pin vice.
You must heat the nugget and post in a certain way in to get a good solder-bond between the post and the nugget. Keep in mind that you are trying to heat the nugget and post until they are hot enough to melt the solder. Do not try to heat the solder directly. Hot melted solder does not adhere to cool metal. Get the metal hot enough to melt the solder and then you get a good strong joint. You also need to know that a large mass of metal changes temperature more slowly than a small piece. The nugget or flake is usually more massive than the tiny post and will heat more slowly when post and nugget receive equal heat. If you put your flame right on the joint area, the post will reach the solder flow temperature before the nugget does. The solder will flow on the post but will not stick it to the nugget. If you continue heating this way in an attempt to get the nugget hot enough for the solder to stick, you will usually melt the post.
To avoid this, direct the flame mostly onto the nugget. If the nugget gets hotter than the post and the solder flows on the nugget first, this is no problem. If that happens, simply direct the flame to the junction point, and within one second, the post is usually up to temperature and a good joint is made. Remove the flame from the earring as soon as you are sure the solder has melted and flowed; you do not want to over heat and melt the earring. Gold nuggets almost always melt at a higher temperature than 14k gold does. So if you over heat, it is usually the post that is melted and not the nugget.
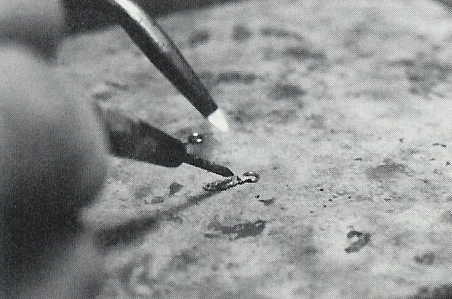
You may hear some popping noises in the nugget as you heat it. This may be rock cracking, or it may be gases forming inside the gold and exploding through the surface of the nugget. Often, you will notice bumps on the surface of the nugget that were not there before heating, which make it less attractive. These can often be corrected, and this is covered in the polishing instructions. After heating, allow the earring to cool and solder to solidify for 1 or 2 seconds (longer for more massive nuggets), then pick it up with tweezers, and drop it into the pickle solution.
The pickle reduces fire scale. 14k gold is alloyed with copper and silver. Gold does not oxidize when heated, but the copper alloy in 14k-gold does oxidize if exposed to the air when heated and leaves a black and a red coating on the surface of the post called fire-scale. Pickle removes the black coating (cuprous oxide), and hides the red coating (cupric oxide). It does not remove the red fire-scale (cupric oxide), but if the piece is left in the pickle long enough, it deposits a very thin layer of pure gold on the surface and hides the red cupric oxide coating. You get a perfectly acceptable finish on posts and rabbit ears when this gold layer is polished correctly.
You can avoid the fire-scale altogether by completely coating all 14k gold findings with flux, but any tiny part missed will fire-scale. Since the pickle does a good job of covering up the effects of fire-scale with careful polishing, I seldom flux posts, jump rings, or bails. Larger areas of 14k gold as on rings or pendants should be fluxed completely to prevent fire-scaling. The flux cuts the air off from the surface of the 14k gold, so the copper does not oxidize. Nuggets will not fire-scale, as they are usually more pure and seldom contain much copper.
The pickle is an acid. Avoid splashing it on clothing or in your eyes. Never introduce any iron or steel objects into the pickle. Iron sets up a galvanic plating action in the acidic pickle and will place copper onto the surface of silver or gold objects in the pickle. Use copper, brass, wood or plastic tweezers to remove objects from the pickle, never iron or steel. If you do goof up and plate copper onto a piece of jewelry by putting steel tweezers in the pickle, you can hide it by reheating and quenching it in the pickle several times. Heat to a dull red color but not hot enough to re-melt any solder joints, and quench in the pickle. Do this three or four times, and it will place pure metal over the copper.
Pickle should be used in a glass or porcelain container. Pickle works faster when heated, but do not boil it. It also evaporates faster when heated, and you will need to add water more often. 14k-gold parts that have black fire-scale on them should be left in the pickle until all the black is gone and has changed to a light brown or blond color. I leave them for one or two hours in cold pickle. Remove the earrings from the pickle, rinse in water, and they are now ready to polish.
Use a soft brass wire brush 3/4 inch in diameter in a flex shaft unit or Dremel-type, hand-held, motorized tool to burnish the post. When burnishing large areas such as on a ring or pendant, it is often good to use a lubricant. Clothing detergent (Tide, etc.) in a little water works good, but the best burnishing fluid seems to be stale beer. (brand doesn’t seem to matter.) On earrings, I don’t use any liquid. Just touch the rotating (800 – 1000 rpm.) brass wire brush lightly to the gold post, and the brown frosty-looking areas turn shiny gold. I hold the nugget between my thumb and pointer finger with the nugget under my thumbnail and the post sticking out. This only takes .four or five seconds per post, and most of the time is spent twisting the earring to get at a new spot on the post with the brush. The brush only touches the gold post for about 1/4 second in each spot.
If any bubbles developed in the nugget from heating, these can be pushed down with a smooth piece of polished steel. I use an old needle file that I ground and polished smooth. You want to be careful not to dent or scratch the nugget, but try to push the bubbles down if any have formed. This can be tricky with an earring which has a post sticking off the back of it. I use a 3/4 inch pine board with a 1/16 inch hole drilled in it. The post goes in this hole, and the back of the nugget rests on top of the board. Nuggets without posts just rest on the soft pine board.
The nugget needs very little polishing. Nuggets and flakes should not be “polished” like gold and silver jewelry. Brightly polished nuggets do not look natural, and you can actually ruin the appearance of a beautiful nugget by brightly polishing it. Use the soft brass wire brush to just bring out some highlights on the front side of the nugget. Lightly touch the rotating brass brush to the front of the nugget for one second or less. Then rub it a little with your thumb or a piece of soft leather, and the nugget is done.
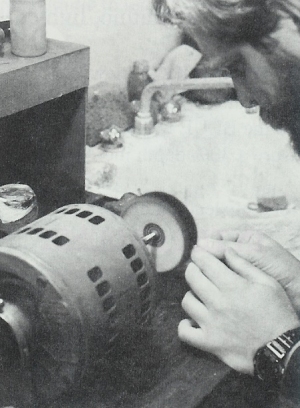
The post should now be brightly polished with a soft muslin buff. Either a small buff in the hand-held motor-tool or a larger bench-mounted buffer work fine. Red rouge is the traditional polishing compound to use on the buff, but I have found a new compound that I prefer called Fabuluster. Fabuluster is available mail-order from Rio Grande Jewelers Supply. Rotate the buff at high speed, and press it into the polishing compound fairly hard to load the buff with the compound. Then gently touch it to the post with a little more pressure than the brass wire brush, but still use a light touch. One-half second is enough time in any one spot. This will give the post a brilliant polish. If you polish the post too vigorously, you can polish down through the surface gold into the red cupric oxide layer, and the post looks pink instead of yellow, so care must be taken in polishing. Avoid buffing the nugget. Wash the post with an old tooth brush and sudsy ammonia to remove any polishing compound; dry, add ear nuts, and sell or wear. They’re done.
DANGLE EARRINGS
Select nuggets which match and are long and flat or shaped like grains of rice but a bit larger. Take two 14k-gold jump-rings and close the ends together. This is done with two pair of chain-nose pliers. These are similar to needle-nose pliers, but with smooth polished jaws which will not mar the gold. Jump-rings are not closed when you get or make them. The proper way to close one is to grasp one end in each pair of pliers, and push the ends slightly past each other (making the circle slightly smaller). Then pull on them slightly, and twist the two ends sideways into alignment with each other. The tension you put into the ring by first making it smaller will hold the two ends together. Next, solder it closed with a very small snippet of solder.
Next decide where the jump-ring should be joined to the nugget. This should be a smooth, un-pitted, un-cracked spot at the tip, with no quartz. If the spot is not smooth, use a small needle-file to make a smooth flat spot for the solder to grab. You need only file a flat spot big enough for the solder to stick: 1/32nd of an inch to 1/16-inch usually is plenty. Make sure the jump-ring is round. If not, use the pliers or a small round mandrel to fix it. Place the nugget into the fire brick. Position the jump-ring away from the nugget, and use the graphite probe to reposition it when the flux melts. Pickle, and polish the jump ring the same as you would a post.
Sometimes, you will find a weak spot in a long nugget. This can be a thin spot, large crack or crevice. If you can easily bend any one area in the nugget with your fingers, then it may break there under normal wear. This condition must be corrected, and it is easy to do. Figure out why the weak spot is weak, and figure out where you could solder in a piece of gold that would strengthen it. Now pick out a small flake or nugget of gold that is the same color (from the same placer), and position it until it looks like it belongs there.
Cut two small snippets of solder. Flux the areas to be joined, position the solder, and solder. Use the graphite probe to move the flake or solder if needed. The flake should bridge the crack or weak spot and be soldered to either side. Solder will not bridge a gap. The added flake must bridge the gap and be attached to both sides by soldering.
Try to limit the amount of solder visible around the flake on the surface of the nugget, as gold solder is a lighter color than the nugget. Don’t do extensive polishing of the area. Just use the brass wire brush as usual. You can use this trick to save some otherwise unusable nuggets. If you plan to sell the finished piece, you should probably point out this modification to the customer before you sell it, as it is not technically a 100% natural nugget. Honesty is the best policy. If you know a nugget is weak, and you will be repairing it, this is best done before the other findings are soldered on.
Completed dangle-nuggets can be worn on french hoops, kidney wires, or ball posts. Each gives the nugget a little different 1ook, and you will have to decide which makes it look the best or which you prefer to wear. You can also make your own “ball” posts with roundish nuggets. Make a pair of post nugget earrings, and solder a jump ring onto the bottom of the nugget just like the ball posts have. Place the jump ring opening towards the back side, and don’t solder it closed. Then you hang your dangle-nugget from this jump ring, and you have a nugget hanging from a nugget.
RABBIT EARS
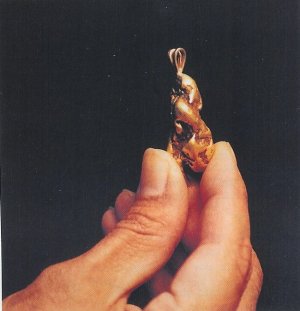
Rabbit ears are soldered to a nugget to use it as a necklace pendant. They come in several styles and sizes. Look over the nugget to determine the front side, and figure out exactly how it should hang. This will help you identify the top point where the rabbit ear will be attached. If this spot needs to be flattened slightly, use a small needle file. You only need a small flat spot, just large enough to accept the base of the rabbit ear. If the rabbit ear is not joined at the base, first solder this gap closed. Position the nugget front side up on the soft fire brick, and press it in until the spot where the rabbit ear will go is at the level of the brick. Then press the rabbit ear into the fire brick so that it lines up with the nugget. View it from straight above and from the side to be sure that the rabbit ear is lined up perfectly. Then flux, solder, pickle, and polish as before. If any bubbles appear in the nugget, press them out with a smooth polished steel tool on a soft pine board before burnishing it with the brass brush.
As you practice working with gold solder and nuggets, you will get better and better. All of my students in Happy Camp, California last summer were able to get perfectly-acceptable results on their first try. You should be able to also. So start looking through your gold, get some tools and supplies, and mount some of those nuggets!