You have a substantial prospecting-advantage with a modern gold detector!
 I highly recommend The Fundamentals of Electronic Prospecting be read before reading this article.
All the rules of placer and desert geology apply to gold nugget hunting, and this knowledge should be utilized to establish where gold deposits and nuggets are most likely to be found.
Particular attention should be paid to locations which have little or no streambed or other material present, so the detector’s coil can search as closely as possible to bedrock or false bedrock layers. Also, exposed tree roots along the edges of the present streams, rivers and dry-washes have been proving successful, especially along the smaller tributaries in the higher elevations of known gold country.
Some of the most productive areas for electronic prospecting in the dry regions are in the near vicinity of old dry-washing operations. The old-timers were only able to make dry-washing work in very high-grade areas. They seldom recovered all the high-grade gold out of an area, because they did not have the means or equipment to prospect extensive areas. You have a substantial prospecting-advantage with a modern gold detector. Natural erosion over the years has likely uncovered more high-grade in the immediate area, or concentrated other spots into new high-grade gold deposits.
When prospecting old dry-wash workings, it is always worth a little time to rake back some of the old tailings piles and scan them with your detector. Dry-washers, today and during the past, almost always used a classification screen over the feed area. The screen was commonly around half-inch mesh. An operation shoveling onto the screen at production speed in dry high-grade gravel might have missed larger nuggets as they rolled off the top of the screen. Sometimes, when working a layer of caliche, if the material was not broken-up well enough, it would roll off the screen with nuggets still attached. A metal detector reads out strongly on these kinds of targets. Make sure to ground-balance to the tailing pile. One nice thing about prospecting in these tailing piles is that they usually are not filled with iron trash targets.
When dealing with natural streambeds above the water, you generally do not find too many other reading metallic objects besides gold, unless the spot which you are scanning is near an inhabited location, like a park or an old dump. So it is reasonably safe to dig any target that gives off a metallic reading in a streambed.
However, some locations have lots of trash and small iron targets. Sometimes, iron targets seem to accumulate heavily in the same areas as gold. This presents a big challenge! Once you have been scanning a particular area for a while, you will gain an understanding of how much “trash” (metallic objects of no value) exists within the vicinity. With some experience on gold objects, you will learn to distinguish the different tone changes between most gold objects and most trash targets. Pay particular attention to the very faint readings, as is often the case with natural gold targets.
One of the main keys to successful electronic prospecting is to slow down your sweeping action. You cannot do it fast like when hunting for coins. You almost have to crawl across the ground. Remember, you are listening for even the faintest whisper of a sudden increased threshold hum. A gold target may sound like a coin—only a quieter signal.
Different types of detectors have special non-motion or pinpointing settings which allow the coil to be moved very slowly and still pick up targets. This means you are able to slow down your sweep to almost a standstill and still hear a target as the coil moves over it. On the other hand, these settings may be too sensitive to use for nugget hunting on some detectors, depending upon field conditions and how fast you are sweeping. When in doubt, experiment while using a test-nugget on or in the ground you are searching.
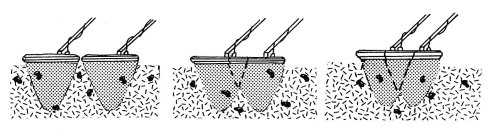
Another important point is to overlap your coil sweeps. The area covered by the search-field under your coil is similar to a triangle. Directly underneath the coil, the search area is about the same size as the diameter of your coil. The search area becomes narrower as it penetrates the ground further away from the coil.
However, the size of this triangular search-field is not constant underneath the coil. It changes as mineralized conditions change in the ground below your search coil. If you do not overlap your search strokes, you can leave as much as 50 percent or more of the area below the search coil behind, without being adequately searched.
You have to use your own judgment about how to discriminate between which targets to dig, and which to leave behind. This comes with practice and experience. Discrimination of any kind, whether by electronic circuitry or the audio sounds given off by the target, has limited accuracy. The depth of a target and the degree of ground-mineralization in that particular location can confuse any discriminator. In some places, you will want to dig every target. In other places, where there is lots of trash, you may find it more productive to discriminate your targets by sound and/or in combination with electronic discrimination features on your detector. In this case, you have to balance the need to leave some small pieces of gold behind, with not wanting to dig a bucket full of trash and valueless iron targets; and therefore, less gold.
When in doubt, dig! Or at least toss your sample nugget down and get a comparative reading.
With lots of practice in the field, you will eventually reach the point where your metal detector is like an extension of your arm—like an extension of your perception and knowingness. You will gain the ability to look down into the ground and have a pretty good idea of what is there.
Big nuggets are generally not too difficult to find. In most areas, however, there are hoards of smaller gold targets in ratio to each large nugget found. Small pieces of gold are your bread and butter! Most gold is small gold, but it has to be large enough to be worth your while. Some of the modern gold detectors will pick up pieces of gold so small that you could be finding them all day long; and at the end of the day, not have accumulated very much gold by weight. In this case, you may want to move to a different area.
Just like in other forms of gold mining, electronic prospectors have to set standards for themselves. Someone pursuing the activity to make money will be motivated to recover volume-amounts (by weight) of gold. Another person pursuing electronic prospecting as a part time activity may receive his or her best thrills by recovering the smallest-sized targets.
One interesting development in the electronic prospecting field, which I have not seen happen in other gold mining activities, is the tremendous emotional success gained from finding extraordinarily-small pieces of gold. Normally, in gold prospecting, we get excited to find a big nugget or a rich deposit. These are easy to locate when scanned over by a metal detector. The big challenge with a metal detector is in locating the smaller pieces. Experienced prospectors know that if they are finding the small pieces, they will easily-find the big pieces.
When scanning, keep your coil as close to the ground as possible. It takes a coordinated arm and wrist-action to keep the bottom of the coil parallel and close to the ground throughout the full sweeping action. Allowing the coil to move one or two inches away from the ground during the outside of a sweeping motion will also reduce depth-penetration by one or two inches. This will certainly result in lost gold targets. You have to practice keeping the coil close to the ground. Shorter sweeps is usually the answer.
Sometimes it helps to kick rocks out of the way, or use a garden rake to remove multiple smaller obstructions before you search an area. This allows you to keep the coil close to the ground with minimum obstructions.
During your prospecting activities, it is possible that you may find occasional targets which could potentially be classified as artifacts. The Archaeological Resources Protection Act defines just about anything you might find as a “protected” artifact. There are criminal penalties for disturbing or removing artifacts. What constitutes a protected artifact is primarily up to the judgment of local bureaucrats. Searching for natural gold targets is legal. Messing around with old junk and trash may be illegal. Sometimes, it is better to just leave old items where they lie. You will have to decide.
The main suggestion I commonly give to beginners about electronic prospecting is to not give up. With practice and by working in the right area, you will surely find some gold!
PINPOINTING
When you do have a reading target, its exact position in the ground should be pinpointed. This can be done by noting when the detector sounds out while scanning over the target in fore and aft and left to right motions. A steel or iron object can be often be distinguished by noting the size and shape of the object during the pinpointing process. Sometimes trash objects are large and/or lengthy in size.
Sometimes a stronger-reading target will seem to cover a larger area than it actually does. If you are having trouble getting an exact location, continue to lift the search coil higher off the ground while scanning with an even back and forth motion. As the coil is raised higher, the signal will become fainter; but the position of the metal object will sound-out at the very center of the search coil.
PINPOINTING WITH THE GOLD PAN IN WET AREAS
Once you have pinpointed the exact position of a target in an area near water, one way of recovering the object is to carefully dig up that portion of ground, using a shovel or digging tool, and place the material in your gold pan. Here is where a large plastic gold pan comes in real handy. Be careful not to cause any more disturbance or vibration of the streambed than is necessary while you are attempting to dig up a target. It is possible to miss the target on the first try and cause it to work further down into the streambed because of its greater weight in the wet environment. Sometimes you can lose the target, and not be able to locate it again with the detector.
Sometimes the ground is hard and needs to be broken up or scraped with a small pick. Keep in mind that a sharp blow from a pick can destroy a coin or disfigure a gold nugget, reducing its value. Digging and scraping is better than pounding, if possible. In hard ground, sometimes it is easier to loosen the material up and shuffle it into several small piles. These can then be flattened out and scanned to see which contains the target.
Once you have dug up that section of material where the target was reading, place it in your plastic gold pan and scan it with your detector. If the contents of the pan do not make your detector sound-out, scan the original target area over again. If you get a read in the original location, pour the contents of the pan neatly into a pile out of your way, pinpoint the target all over again, and make another try at getting the target into your gold pan. Continue this until you finally have the target sounding out in your pan. If you cannot see the target, and water is immediately available, pan-off the contents until the target is visible.
There is a good reason why you should not ever throw away any material from the target area until after you know for certain exactly what the reading target is. If you are looking for placer gold deposits and it happens that your detector is sounding out on a gold flake or nugget, the chances are pretty good of additional gold being present in paying quantities within the material which has been dug out of the hole, even if it does not sound-out on your detector. Remember, small particles of gold often do not make metal detectors sound-out. Therefore, the possibility exists that there could be hundreds of dollars worth of gold in a single shovelful of material not tightly-concentrated enough to cause your detector to sound-out. So wait until you have seen the reading target before you start throwing any material away.
If you dig for a target and then cannot get any further reads on the detector from either the pan or in the original target area, quickly pan-off the pan’s contents. There is always a possibility of a concentrated gold deposit which is no longer concentrated enough to read-out on your detector. In this case, you are most likely to have some of the gold deposit in your gold pan, which will quickly be discovered when you pan off the contents.
There is also another reason why you save the material from a hole until you have recovered your target. Because of the shape of a gold pan, and depending upon the size and shape of the coil you are using, if the gold target (especially a small target) ends up in the bottom of your pan, your coil may no-longer be able to scan close enough to the bottom of the pan to sound-off on the target. Because of this problem, gold pans have limited workability as a pinpointing tool in electronic prospecting. Sometimes, you can have better luck scanning the bottom-side of a gold pan.
DRY METHODS OF PINPOINTING
There are several popular methods of pinpointing reading targets in the dry regions where water is not available for panning. Some prospectors use a plastic cup. Material from the target area is scooped up and passed over the coil. If the contents of the cup do not sound-out on the detector, the target area is scanned again until the target is located. Take another scoop, pass it over the coil for a signal, and repeat until the target is in the cup. Then pour some of the contents into your hand. Pass the cup over the coil, then your hand, until you locate the target. Put the rest away in a neat pile, and repeat the process until you recover the object.
One important point to mention is that most search coils have equal sensitivity to targets both above and below the coil. In other words, during pinpointing, you can pass material over top of the coil and obtain the same results as if you turn the detector upside down and pass the material across the bottom of the coil.
Your handy magnet can be a big help when you are having difficulty finding a faintly reading target. Sometimes it is just a small piece of iron.
There is also the hand-to-hand method of pinpointing a target. You can reach down with your hand and grab a handful of dirt or material. Pass your hand over the coil to see if you are holding the target. Continue until you have the target in one hand. Then pass half the material in that hand to your other hand. Use the coil to find which hand has the reading target. Discard the material from the other hand and pass half the material from the reading hand to the second hand, again. Keep up the process until you only have a small amount of material in the reading hand. Carefully blow off the lighter material to locate the target.
Another procedure is to grab a handful and pass it over the coil as explained above. Once you have a reading handful, toss it in a pouch for later panning.
Some prospectors prefer to sprinkle a handful of reading material slowly on top of the detector’s coil. There are different ways to do this. One effective way, which requires some practice, is to sprinkle material over a slightly slanted coil while you vibrate it so that material slowly sweeps across and off. When the target drops onto the coil, the detector will sound-off with a distinctive bleep. Then, all you have to do is gently blow the dirt off the coil, or recover the target from the top of the pile where the material is landing. This method is nearly impossible in wet material.
One important thing about using your hands to pinpoint and recover gold targets, is that some of today’s most sensitive high frequency gold detectors react to the salt (mineral) content on or in your hand. When this occurs, your hand will give a reading when passed over the coil by itself, sometimes even a strong signal. This makes hand pinpointing methods more difficult. In this case, the plastic tray or cup works just fine, or the method of pouring material onto the coil.
If you find a gold target, be sure to scan the hole again. Sometimes it is worth doing a lot of digging and/or raking, with alternate scanning of the immediate area. Gold targets almost never travel alone! I have seen dozens of gold flakes and nuggets come from within a one-foot square area on bedrock. Many times!
HOT ROCKS
Sometimes you get soft or strong signals from your metal detector when the coil is passed over rocks which contain heavy mineralization. These rocks are called “hot rocks.” This needs to be clarified. It isn’t necessary for a rock to have an extraordinary amount of mineralization to sound-off as a hot rock. It just needs to have more than the average ground which your detector is ground-balanced to. The opposite of this is also true. A rock containing less mineralization than the average ground will change tone on a detector in the opposite way. These are called “cold rocks.” A hot rock from one location could be a cold rock in another location containing higher mineralization in the average ground.
Put another way, when your detector is properly ground-balanced to the average ground, it will sound-off on rocks containing condensed heavier mineralization. Often, the signals given off by these hot rocks can be mistaken for signals which might be given off by gold targets in the ground. Some locations have lots of hot rocks. Naturally, since gold travels with other heavy mineralization, you can expect to find hot rocks in the various gold fields.
Hot rocks come in all sorts of colors and sizes. A big hot rock, depending upon the degree of mineralization over the average ground, can sound very similar to a gold target. The same goes for small hot rocks.
Quite often, most of the hot rocks within a given area will be similar in nature, color and hardness, but not necessarily in size. After searching an area for a while, you will know what most of the hot rocks look like. This makes pinpointing targets a little easier, especially when dealing with small hot rocks. When receiving signals from rocks which are dissimilar to the average-looking hot rock of the area, check them out closely, especially when they have quartz. Some of these may not be hot rocks at all, but gold specimens.
If you are finding hot rocks on top of the ground, you will almost always find them buried, as well.
Metal targets gradually lose signal-strength in proportion to the increased distance from the coil. Hot rocks rapidly lose their signal-strength as they are scanned further from the coil. Also, a metal target tends to create a more specific, sharper signal as the coil is passed over. The signal given off by most hot rocks is not as sharp. It is more of a mushy sound which doesn’t have as clear a change in tone-intensity as the coil passes over the target.
When uncertain about a reading target, one way that some hot rocks can be identified is by passing the coil over the target from different directions. If the target only sounds out when being swept from one particular direction, then it is nearly certain that the target is not a gold nugget.
Sometimes, when lowering the sensitivity on your detector a few numbers, the signal given off by a nugget will continue, but weaker. A hot rock signal will quickly disappear by lowering the sensitivity. You can get a better idea how your detector is reacting to sensitivity changes by running it over your test-nugget.
Another test is to slowly raise the coil further away from the reading target as you are scanning. The signal of a metal object will become progressively fainter as the distance is increased. The signal given off by a hot rock will rapidly die away as just a little distance is put between the target and the coil. Most hot rocks in a given area will have a very similar sound, the intensity depending upon size and distance from the coil. Sometimes, you will find that a gold nugget gives off a much sharper signal. But not always. Much also depends upon the size of a gold target, its distance from the coil, and the amount of mineralization interference in the ground that is being scanned.
Each area is different. The hot rocks in some areas are reasonably easy to distinguish. In other areas, it is necessary to dig every signal.
Larger hot rocks are easier to detect. Many can simply be kicked out of the way. It is the smaller pebble-sized hot rocks which create faint signals. In some locations, these signals are so similar to the signals given off by gold nuggets that you have no other choice but to dig them up.
If lots of hot rocks are making it difficult for you in a particular area, you might try experimenting with smaller coils. Smaller coils are more sensitive to smaller pieces of gold. Therefore, the sharpness of the signal over gold targets is also intensified. This may give you the needed edge in distinguishing the slightly-different signals being given off by hot rocks in that area.
Some gold prospectors go so far as to ground-balance over top of a hot rock until it no longer gives off a signal. This will eliminate a large portion of the hot rocks in the area, but it is also likely to eliminate a large portion of the small and marginal signals given off by gold targets. This procedure may work well in areas containing just large nuggets. However, most areas I am aware of have dozens or hundreds of smaller pieces of gold for every larger piece that you will find.
Since cold rocks are made up of a lesser-concentration of iron than the average material which your detector is balanced to, they give off a negative reading signal on your detector. Ground-balancing over a cold rock will cause your detector to react positively to the average ground within the vicinity.
PRODUCTION
Once you find a location which is producing gold targets, you will want to thoroughly work the entire area. This is commonly accomplished by carefully gridding the site. By this, I mean creating parallel crisscross lines on the ground, usually about four feet apart. You can do this by drawing light lines in the sand with a stick. Grid lines allow you to keep track of where you are, and what has already been searched.
If there are obstructions in the producing area (“nugget patch”), they should be moved or rolled out of the way if possible. The smaller rocks and materials on the ground can be raked out of the way. This allows you to keep the coil closer to the ground. In a proven area, this will surely mean more recovered gold targets.
Some areas produce quite well on the surface. Then, by raking or shoveling several inches off the surface and scanning again, sometimes you can find even more targets. I know of numerous small-scale mining operations in many different parts of the world, using metal detectors as the only recovery system. They use a bulldozer to scrape away material which has already been scanned, two or three inches at a time. A layer is removed; the area is scanned thoroughly with metal detectors to locate all of the exposed gold targets. Then, another layer is removed and scanned. This process is done all the way to bedrock. They make good money at it!
I have heard of others doing the same process on a smaller-scale by attaching plow blades to four-wheel drive vehicles. Some even do it using ATV’s!
While hunting over a proven nugget patch, be sure to keep your detector properly tuned all the time. Otherwise, you will certainly miss gold targets.
PROSPECTING OLD HYDRAULIC MINING AREAS
Perhaps the most productive areas of all to prospect with metal detectors are areas which were already mined by the old-timers using hydraulic methods. Many of these areas are left with a large amount of bedrock exposed. This allows immediate and easy access for search coils to get close to old gold traps. Sometimes, the exposed bedrock has been further-deteriorated because of direct exposure to the elements. Once a nugget patch is located, raking away decomposed bedrock sometimes can produce remarkable results.
While searching such areas, pay attention to the color of dirt which covers and surrounds nugget patch. You might discover a pattern. In our area of operation, it is a white powder which often signifies the possible presence of a good spot. Perhaps in other areas, it might also be this white powder, or something else.
PROSPECTING OLD MINING TAILINGS
It is usually possible to find piles and piles of old mining tailings throughout most proven gold-bearing country.
Many of the larger earlier gold mining operations (the ones that were set up to move large volumes of material), concentrated on recovering only the fine and medium-sized values from the material being processed. This meant that the larger material was classified-out so the smaller material could be processed through controlled, slower-moving recovery systems. On the larger operations, classification was usually done either with mechanical vibrating classification screens, or with the use of a “trommel.” A trommel is a large circular screening classifier which rotates and tumbles material through, allowing the smaller classification of materials to pass through the outer screen and into a channel which directs them to the recovery system. The larger materials are passed down the inside of the trommel to be discarded as tailings.
In many of the larger operations, there were no means to recover the larger pieces of gold which were screened-out along with the other large materials. As a result, larger nuggets were sometimes discarded along with the waste material as tailings.
Anywhere you see large tailings piles, especially near the present waterways, it is evidence of a large volume operation where it is possible that the nuggets were discarded with the waste and are likely to still be there. Some large tailing piles still have large goodies inside them, which sing out very nicely on the proper metal detectors. One way to distinguish the right kind of tailing pile to be looking through is there should be a pretty wide range of material sizes in the tailing pile. Tailing piles which consist only of the larger rocks (cobble piles) were most likely stacked there by hand during a smaller surface-type operation.
Scanning tailing piles with a metal detector is proving to be highly-productive in some cases, and should not be overlooked as a possibility for finding nice specimen-sized gold nuggets. VLF ground-cancelling detectors are usually best-suited for this, because tailings almost always also contain a large quantity of mineral content, which is likely to cause interference on a BFO-detector.
PROSPECTING OLD MINING SHAFTS
Even the most experienced cave explorers shy away from entering declining mine shafts because of the dangers involved.
CAUTION: The first thing to say about prospecting in old mine shafts is that they are dangerous! There are different things that can go wrong when prospecting around in such places, one main danger being a potential cave-in. The shoring beams in some of these old shafts may have become rotten and faulty over the years. So it is best not to lean up against or bump any of the old wooden structures situated in old mine shafts. Loud, sharp noises should also be avoided.
Shafts which extend down into the earth on a declining angle are particularly dangerous; because if the ladders or suspension systems are faulty and collapse while you are down inside, you may not have any way to get out again. It is never a bad idea to bring along a caving rope, and use it, when exploring declining-type old mine shafts. Caving rope is different than mountaineering rope in that it is made not to stretch nearly as much. But I suppose, when going down in dark holes, any rope is better than no rope at all!
Another potential danger involved with exploring old mine shafts is encountering poisonous or explosive gasses. Entire mines were shut down because of such gasses—even when they were good-producing mines. These, however, were usually caved in and closed off to prevent unsuspecting adventurers from entering at a later date and getting into trouble.
Before you enter any old mine and start sorting through its low-grade ore piles, or pecking samples off the walls of the mine, it is a good idea to make sure the mine is not already owned by someone else. Or, if somebody does own it, it is wise to get the person’s permission first. There is probably nothing more dangerous in a mine shaft, cave-ins and poisonous gases included, than some old cantankerous miner who catches you, uninvited, in his mine and thinks you are stealing his gold!
There is probably more danger in prospecting old shafts than in any other gold prospecting activity.
After all that, just in case I have not succeeded in scaring you out of the idea of entering old mine shafts in your prospecting adventures, here are a few pointers about how and where you might find some rich ore deposits, or rich ore specimens, with the use of your metal detector:
But first, let me recommend that if you do go into such places, you bring along a buddy and leave another one at the surface with explicit instructions to not enter the shaft under any circumstances, but to go get help in the event that you should get into trouble within. It is also a good idea to let a few others know where you are going, just in case your outside-man doesn’t follow orders and you all become trapped inside.
There are two main sources of possible gold and silver in an old mine:
1) High-grade ore specimens that may have been placed in the low-grade ore piles and left as waste material.
2) High-grade ore which has yet to be mined.
With the exception of the largest production hardrock mines, there is always a certain amount of rock (ore) which has been blasted away from the wall of the tunnel that was not milled and processed. This was because some ore is of such apparent low-grade value that it is not worth the expense to process.
Sometimes the vein being followed into the mountainside was not as wide as the tunnel needed to be in order to progress into the mountain. Therefore, that rock material which was not part of the vein itself, or the contact zone, that looked to be of lower-grade value, was also discarded into the waste piles.
Crushing and milling ore is, and always has been, somewhat of a timely and expensive process. For this reason, a good many mines only processed what appeared to be the highest-grade ore that was blasted from the ore body. The rest was usually piled out of production’s way inside or outside of the shafts.
In the smaller operations, the kind where the ore was crushed and milled by hand and then processed with a gold pan to recover the values, only the highest of high-grade ores could be processed at a profit. The rest was usually laid aside out of the way.
The sorting of a higher-grade ore from lower-grade ore has always been a matter of judgment on the part of the person who was doing that part of the job. And, until the more recent breakthroughs in electronic detecting equipment, sorting needed to be done by eye or by feel (weight). There simply was no other way.
The interior of mine tunnels was often poorly lit with miner’s candles during earlier days, and the air inside the shaft was often foul after the powder explosions used to blast ore from the interior of the mountain. As a result of all this, it is not difficult to imagine that some higher-grade ore was likely discarded as waste material in most mines.
How rich the ore was in a mine will have a lot of bearing on whether or not a present-day prospector will find high-grade ore in the waste piles of that mine. The size of a mine does not necessarily have anything to do with how high-grade its ore was, although it may have a bearing upon how much waste ore will be available to test.
County reports can be looked over to locate the old mines within an area. Many of these reports also include information about the grade of ore being extracted from some of the mines.
When you are testing ore samples from a mine with a metal detector, and you do not come up with any specimens, try a few different piles. If you still do not come up with any specimens, it was probably not a high-grade mine. Try another.
Keep in mind that the floor of a mine shaft is likely to have some iron, brass and other metallic objects which will cause your detector to read-out.
One of the fastest and most effective ways of thoroughly checking out samples of ore is to lay the detector down on the ground or upon a makeshift bench with the search coil pointing upward so individual ore samples can be quickly passed by the most sensitive portion of the coil. The 3-inch diameter search coils are probably best-suited for this kind of work, because of the increased sensitivity, and because there is seldom great need for increased depth-sounding when testing ore specimens.
The most sensitive portion of the search coil is usually located near the center of the coil. It can be easily pinpointed by passing a coin back and forth across the coil while the detector is in tune, and by finding that spot where the coin causes the loudest and sharpest reading. The most sensitive area should be marked brightly with a Magic Marker so it will be easier for you to move ore samples directly past it. It is worthy to note that the top of the coil should have similar sensitivity to targets as does the bottom.
Ground-balancing would probably best be achieved by tuning to the overall ore pile. But, you may need to experiment. A lot will depend upon the grade of ore you are looking for. High-grade gold specimens will require the surrounding mineral to be cancelled out. On the other hand, sometimes high-grade ore is full of fine particles of gold which would not sound-off on a detector. In this case, the high degree of mineralization in the ore specimen might sound-out like a hot rock. Therefore, you would not want to ground-balance out high mineralization. So, depending upon the nature of the ore in a mine, you will need to use your own best judgment regarding the proper way to ground-balance.
Bring along a bucket, canvas bag or a knapsack so you will have something to carry your specimens as you find them.
Both BFO and the VLF ground-cancelling metal detectors can be successfully used to locate high-grade ore specimens. For the individual who is interested in finding a wider range of high-grade ore specimens rich enough to be worth milling on a small-scale for the gold and silver values, perhaps a BFO is the better type of metal detector to be used for the job. This is because the BFO does exceptionally well at picking up highly-mineralized ore. When you are dealing with hardrock veins, high mineralization is a good index of gold being present, especially when you are working with the ore that was blasted out of a previously-successful gold mine. Ore which contains large amounts of locked-in values or lots of fine gold that is thoroughly dispersed throughout the ore is not likely to read-out as a metal on any kind of conventional metal detector, although the high degree of mineralization which usually goes along with such ore probably will sound-out on a BFO-detector as a mineral. So the BFO-detector is handy in finding rich ores which might otherwise be undetectable.
By placing a BFO-detector on its mineral setting and keeping the pieces of ore which sound-out, you can accumulate a lot of good-paying ore. With the use of a BFO as such, the perimeters of ore piles can be scanned first to find a pile that has a lot of mineralization.
Portable rock crushers and mills and processing plants are available on the market. Perhaps by combining these with the use of a good BFO-detector to pick out the highly-mineralized, discarded ore, a small operation could be quite profitable without having to invest the higher costs associated with developing a lode mine from scratch.
LOCATING RICH ORE DEPOSITS
When prospecting around in an old mine with a metal detector, don’t discount the idea of searching the walls of the various shafts to locate rich ore deposits which may have been overlooked by the miners who originally developed the mine. With today’s market value of gold and advanced milling techniques, a small-scale mining operation can be run profitably in ore producing about ½-ounce to the ton in gold values, or perhaps even less. Abandoned mines which will pay this well and even better are scattered all over the west. If a person were really interested in locating a lode mine that he could work at a profit, one way would be with the use of a BFO-detector to prospect the various abandoned mines within the area of his or her interest. In using the BFO to scan the walls of such mines, highly-mineralized ore deposits can be located, samples can be taken for assay, and a person could find the mines having the richer-paying ore deposits. When prospecting like this, it is a good idea to bring a can of spray paint, a pen and paper and some zip-lock bags, so samples can be accurately marked as to where they came from, along with their respective deposits being marked with the spray paint.
If you are not interested in starting up a lode mine, but are just prospecting around for a bonus, again, the VLF detector is good for looking through mineralization and detecting the richest deposits. If, however, you do locate a reading metal inside the wall of a mine shaft with a VLF detector, and you have determined that it is not some falsely-reading mineralization, it could be well worth your while to investigate further. This is because the chances are pretty good that you have located some bonanza paying ore. I know of one highly successful high-grade gold mine in the Mother Lode area of California that is using VLF detectors as its sole method of determining where to blast. At this writing, they have located and recovered millions of dollars in gold during the past two years, in a mine which was failing prior to the use of metal detectors.
MEDICAL
Bring along some mosquito repellent during electronic prospecting ventures. Otherwise, if bugs are around, sometimes it is difficult to put your full attention on listening to what your detector is trying to tell you.
In some areas, you also have to be careful of ticks. Some ticks carry Lyme disease. Some insect repellents will keep ticks off of you. DEEP WOODS, TECNU 10-HR INSECT REPELLENT, and OFF seems to work pretty well. Spread the repellent on your boots, pants and other clothing.
In the hot climates, you should bring along the proper sunscreen and apply it to exposed body parts.
It’s always a good idea to bring along a good first aid kit, and at least leave it in your vehicle in case of emergencies.
Extra clothing and water is also a good idea. You can leave it in your vehicle. You never know…


 Some have said that the pen is mightier than the sword, and I am sure that on occasions this has truly been the case. Throughout the ages, man has used words to explain, convince and cajole his fellows about one thing or another. Advertising executives are no exception to the rule; and in their deft hands, a word can become downright dangerous or at least costly to some of us. I am, of course, speaking about the use of the language without explaining the meaning of the terms used.
 But with the advent of meter identification on many detectors, the user was no-longer locked into searching in a discriminate mode with limited depth. He or she could finally search in an all-metal mode if desired and check the meter for probability of target identification. This is where the definition of terms is becoming important and what I have been leading up to. I have recently heard it said that this or that detector is better for prospecting because it doesn’t discriminate, and many a treasure hunter has set aside his or her perfectly good multipurpose unit and bought another unit just for prospecting. I am not suggesting that these new units are not worthy of the task; but in many instances, it was costly and unnecessary to buy two units. First of all, the original unit should be able to cancel the ground effectively; and secondly, the owner must learn the skills necessary to operate it in a prospecting environment. Every company makes such units, and all are capable of finding the elusive gold nugget. The meter should work independently of the all-metal audio signal. That is, you should be able to operate the detector in the all-metal mode and hear every target that the loop passes over. The meter should respond to these targets in some sort of predictable fashion.
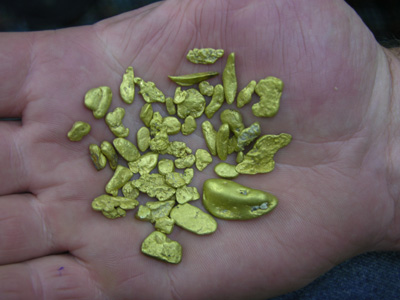 Several years ago, I decided to devote my time entirely to nugget hunting in
  1) Seek out friends or other qualified individuals who can answer questions and show you how to use metal detectors designed for gold nugget hunting. Nugget detecting is a specialized field in itself.
 Preston poses with his collection which came from a pocket in northern Nevada.
 The term “nugget hunting” is so ambiguous that no description of it could ever be complete. Countless books have been written about this method of searching. Weekend prospectors generally find their instructions too complicated. By condensing descriptions of target areas and summarizing the easiest searching methods for beginners to use, I offer you instructions that are simple but that employ methods proven successful the world over.
 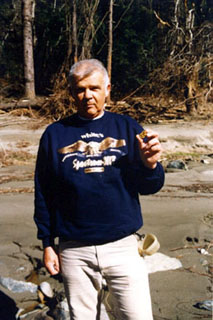 During my recent visit to
  Searching for tiny, elusive
  As all gold hunters know, we are blessed with
  In 1879, Professor D.E. Hughes demonstrated to the Royal Society in London his Induction Balance (I.B.). Its purpose was to study the molecular structure of metals and alloys. However, Hughes and his instrument maker, William Groves, soon recognized the potential of the I.B. as a metal locator, and several were supplied to various London Hospitals for locating metal objects in human bodies. The Royal Mint used the Induction Balance for assaying metals and detecting forgeries.
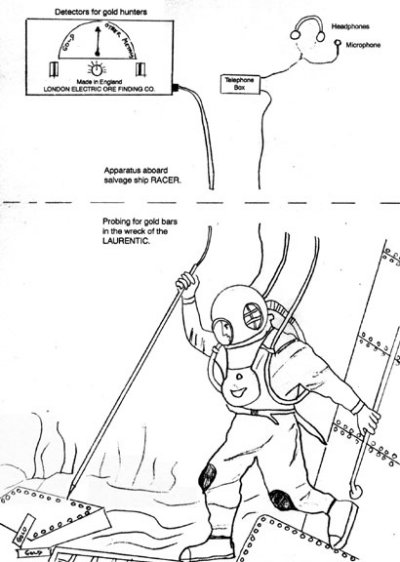 This company also developed an underwater spear-type detector which was used in locating gold bars in the wreck of the LAURENTIC, which was torpedoed during World War 1. This was a discriminating-type detector which could distinguish between gold and other metals. Unfortunately, the patent specifications are very brief and no illustrations are enclosed, hence we lack full information of how this detector worked.
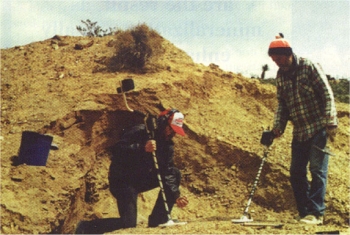 I met Don Gaines in late 1994, and he changed the way I think about gold hunting. Gaines, a retired Navy technical instructor, has found hundreds, maybe thousands, of
 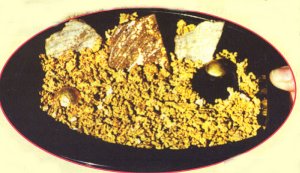 Four months later, I sat in Gaines’ four-wheel drive, looking across a sage-brush canyon at the mouth and head-frame of an old mine. Right there, next to a gravel road, was a sign that read, “PRIVET PROPERTY, KEEP OUT.” I didn’t know if the incorrect spelling was intentional or not, but it sure was effective. I had to wonder what kind of dangerous red neck could have written it.
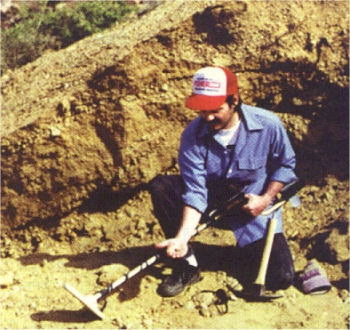 So, Harley’s father had known where the gold was, I thought; and that’s where he went to go find it. Of course, 90 years ago he did not have a metal detector to prospect with. Because of that, he missed