video subscription graphic

By Dave McCracken

“The Gold Pan as a Production Tool”

Dave Mack

The main thing to remember about the use of a gold pan is that while it is very effective as a gold-catching device, it can only process a limited volume of streambed material. For this reason, the gold pan is normally not used as a production tool in commercial use, other than in the most remote locations where it would be very difficult to haul large pieces of equipment, and where there is only a small amount of streambed material present — which is paying well enough to make the panning worthwhile.

The gold pan is most commonly used to locate a richer paying area by sampling, so that larger production equipment can be brought into that location to work the ground to recover more gold.

There are stories in the old mining records about the ground being so rich during the 1849 gold rush that as much as 96 ounces of gold were recovered from a single pan. That is $100,000+ at today’s rate of exchange, and must have been some very rich ground indeed!

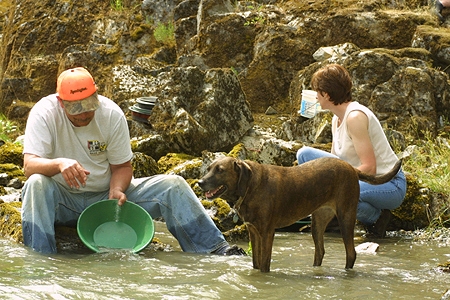
Stories like that are rare and pay-dirt like that is not run across very often. However, it is not too uncommon to hear of prospectors today who are able to consistently produce better than an ounce of gold per week with a gold pan in the high country, and have the gold to show for it. Some do better, but these prospectors have usually been at it for awhile and have located hot spots. I personally know of two guys who support themselves with a gold pan, and one of them lives pretty well. As mentioned earlier, the gold pan gives you unlimited accessibility, and these prospectors look around to find the pockets in the exposed bedrock along the edges of the creek-beds in their areas, picking up a few pieces here, a few there, and a little pocket of gold once in awhile. It adds up, and to them it is better than punching a time clock.

There is still plenty of rich ground to be found in gold country if you are willing to do the work involved in finding it.

Gold Panning Procedure

Panning gold is basically simple, once you realize that you are doing the same thing that the river does when it causes gold to concentrate and deposit during flood storms.

The process basically consists of placing the material that you want to process into your pan and shaking it in a left to right motion underwater to cause the gold, which is heavy, to work its way down toward the bottom of your pan. At the same time, the lighter materials, which are worthless, are worked up to the surface of the gold pan where they can be swept away. The process of shaking and sweeping is repeated until only the heaviest of materials are left-namely the gold and heaviest black sand.

Once you are out in the field, you will notice that no two people pan gold exactly alike. After you have been at it awhile, you will develop your own little twists and shakes to accomplish the proper result.

Here follows a basic gold panning procedure to start off with which works well and is easy to learn:

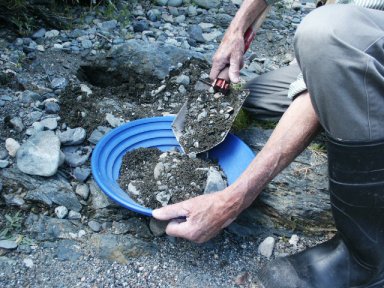
STEP 1: Once you have located some gravel that you want to sample, place it in your gold pan-filling it about 3/4 of the way to the top. After you have been at it awhile, you can fill your pan to the top without losing any gold. While placing material in your pan, pick out the larger-sized rocks, so that you can get more of the smaller material and gold into the pan.

STEP 2: Choose a spot to do your panning. It is best to pick a location where the water is at least six inches deep and preferably flowing just enough to sweep away any silty water that may be washed from your pan. This way, you can see what you are doing better. You do not want the water moving so swiftly that it will upset your panning actions. A mild current will do, if available.

It is always best to find a spot where there’s a rock or log or stream-bank or something that you can sit down upon while panning. You can pan effectively while squatting, kneeling or bending over, but it does get tiresome. If you are planning to process more than just one or two pans, sitting down will make the activity much more pleasant.

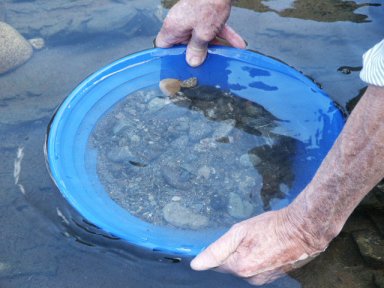
STEP 3: Carry the pan over to your determined spot and submerge it underwater.

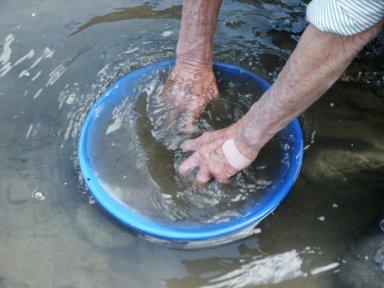
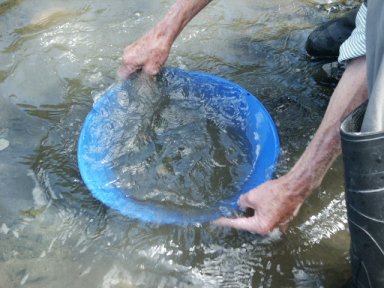
STEP 4: Use your fingers to knead the contents of the pan to break it up fully and cause all of the material to become saturated with water. This is the time to work apart all the clay, dirt, roots, moss and such with your fingers to ensure that all the materials are fully broken up and in a liquid state of suspension whithin the pan.

The pan should be underwater while doing this. Mud and silt will float up and out. Do not concern yourself about losing any gold when this happens. Remember: gold is heavy and will sink deeper in your pan while these lighter materials are floating out and away.

STEP 5: After the entire contents of the pan have been thoroughly broken up, take the pan in your hands (with cheater riffles on the far side of the pan) and shake it, using a vigorous left and right motion just under the surface of the water. This action will help to break up the contents of the pan even more and will also start to work the heavier materials downwards in the pan while the lighter materials will start to surface.

Be careful not to get so vigorous in your left and right shaking that you slosh material out of the pan during this step. Depending upon the consistency of the material that you are working, it may be necessary to alternate doing steps four and five over again a few times to get all of the pan’s contents into a liquid state of suspension. It is this same liquid state of suspension that allows the heavier materials to sink in the pan while the lighter materials emerge to the surface.

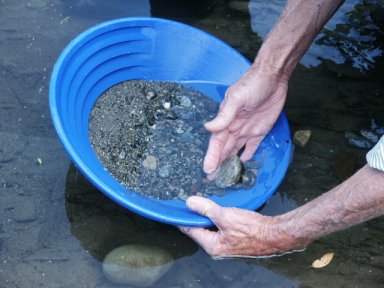
STEP 6: As the shaking action causes rocks to rise up to the surface, sweep them out of the pan using your fingers or the side of your hand. Just sweep off the top layer of rocks which have worked their way up to the pan’s surface.

Don’t worry about losing gold while doing this, because the same action which has brought the lighter rocks to the surface will have worked the gold deeper down toward the bottom of the pan.

When picking the larger rocks out of the pan, make sure that they are clean of clay and other particles before you toss them out. Clay sometimes contains pieces of gold and also has a tendency to grab onto the gold in your pan.

Note: Working the raw material through a classification screen into the gold pan during Step 1 or Step 3 will eliminate the need to sweep out larger rocks in Step 6. This will also allow you to pan a larger sample of the finer-sized material(which contains all the gold you will find in a pan sample).

STEP 7: Continue to do steps five and six, shaking the pan and sweeping out the rocks and pebbles(if present), until most of the medium-sized material is out of your pan.

STEP 8: Tilt the forward edge of your pan downward slightly to bring the forward-bottom edge of the pan to a lower position. With the pan tilted forward, shake it back and forth using the same left and right motion. Be careful not to tilt the pan forward so much that any material is spilled over the forward-edge while shaking.

This tilted shaking action causes the gold to start working its way down to the pan’s forward-bottom edge, and continues to work the lighter materials to the surface where they will be more easily swept off.

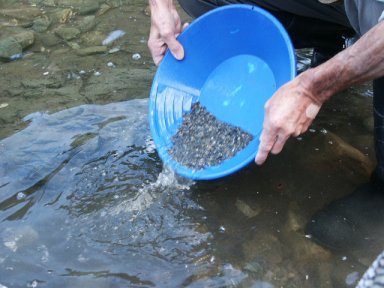
STEP 9: Carefully, by using a forward and backward movement, or a slight circular motion just below the surface of the water, allow the water to sweep the top layer of worthless, lighter materials out of the pan. Only allow the water to sweep out a little at a time, while watching closely for the heavier materials to be uncovered as the lighter materials are swept out. It takes some judgment in this step to determine just how much material to sweep off before having to shake again so that no gold is lost. It will just take a little practice in panning gold before you will begin to see the difference between the lighter materials and the heavier materials in your pan. You will develop a feel for knowing how much material can be safely swept out before re-shaking is necessary. When you are first starting, it is best to re-shake as often as you feel that it is needed to prevent losing any gold. When in doubt, shake! There are a few factors which can be pointed out to help you with this. Heavier materials are usually

darker in color than the lighter materials. You will notice while shaking the pan that it is the lighter-colored materials that are vibrating on the surface. You will also notice that as the lighter materials are swept out of the pan, the darker-colored materials are uncovered.

Materials tend to get darker (and heavier) as you work your way down toward the bottom of the pan, where the darkest and heaviest materials will be found, they being the purple and black sands, which are usually minerals of the iron family. The exception to this is gold, which is heaviest of all. Gold usually is of a bright and shiny metallic color and shows out well in contrast to the other heavier materials at the bottom of the gold pan.

One other factor to keep in mind is that the lighter materials sweep out of your pan more easily than do the heavier materials. As the heavier materials are uncovered, they are increasingly more resistant to being swept out of the pan, and will give you an indication of when it is time to re-shake.

As you work your way down through your pan, sometimes gold particles will show themselves as you get down to the heavier materials. When you see gold, you know it is time to re-shake your pan.

There is another popular method of sweeping the lighter materials out of the top of your pan which you might prefer to use. It is done by dipping your pan under the water and lifting it up, while allowing the water to run off the forward edge of the pan, taking the top layer of material along with it.

STEP 10: Once the top layer of lighter material is washed out of your pan, re-shake to bring more lighter materials to the top. By “lighter materials,” I mean in comparison to the other materials. If you continue to shake the lighter materials to the top and sweep them off, eventually you will be left with the heaviest material of all, which is the gold. It does not take much shaking to bring a new layer of lighter material to the surface. Maybe 5 or 6 seconds of shaking will do it, maybe less. It all depends upon the consistency of the material and how much gold is present.

Continue to pluck out the larger-sized rocks and pebbles as they show themselves during the process.

STEP 11: Every few cycles of sweeping and re-shaking, tilt your pan back to the level position and re-shake. This keeps any gold from being allowed to work its way up the forward-edge of your pan.

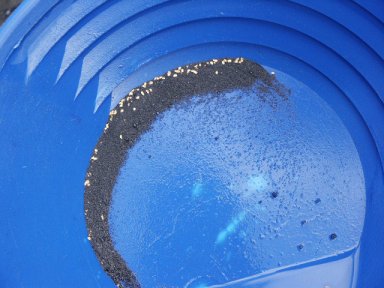
STEP 12:Continue the above steps of sweeping and re-shaking until you are down to the heaviest materials in your pan. These usually consist of old pieces of lead and other metal, coins, BB’s, old bullets, buckshot, nails, garnets, small purple and black iron rocks, and the heavy black sand concentrates. Black sands consist mainly or in part of the following: magnetite (magnetic black sands), hematite (non-magnetic black sands), titanium, zircon, rhodolite, monazite, tungsten materials, and sometimes pyrites (fool’s gold), plus any other items which might be present in that location which have a high specific gravity-like gold and platinum.

Once down to the heaviest black sands in your pan, you can get a quick look at the concentrates to see how much gold is present by allowing about a half-cup of water into the pan, tilting the pan forward as before, and shaking from left to right to place the concentrates in the forward-bottom section of your pan. Then, level the pan off and swirl the water around in slow circles. This action will gradually uncover the concentrates, and you can get a look at any gold that is present. The amount of gold in your pan will give you an idea how rich the raw material is that you are sampling.

A magnet can be used to help remove the magnetic black sands from the gold pan. Take care when doing this. While gold is not magnetic, sometimes particles of gold will become trapped in the magnetic net of iron particles which clump together and attach to the magnet. I prefer to drop the magnetic sands into a second plastic gold pan, swish them around, and then pick them up once again with the magnet. Depending upon how much gold this leaves behind, I might do this several times before finally discarding the magnetic sands.

Many beginners like to stop panning at this point and pick out all the pieces of gold (colors) with tweezers. This is one way of recovering the gold from your pan, but it is a pretty slow method.

Most prospectors who have been at it for awhile will pan down through the black sands as far as they feel that they can go without losing any gold. Then they check the pan for any colors by swirling it, and pick out any of the larger-sized flakes and nuggets to place them in a gold sample bottle. Then the remaining concentrates are poured into a small coffee can or bucket and allowed to accumulate there until the end of the day, or week, or whenever enough concentrates have been collected to make it worthwhile further process them. This is really the better method if you are interested in recovering more gold, because it allows you to get on with the job of panning and sampling without getting deeply involved with a pair of tweezers. Otherwise, you can end up spending 25% of your time panning and up to 75% of your time picking out small colors from the pan!

Panning Down All The Way To Gold

It is possible to pan all the way down to the gold-with no black sands, lead or other foreign materials remaining in the pan. This is often done among prospectors when cleaning up a set of concentrates which have been taken from the recovery system of a larger piece of equipment-like a sluice box or suction dredge.

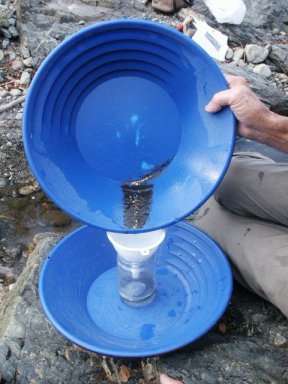
Panning all the way down to gold is really not very difficult once you get the hang of it. It is just a matter of a little practice and being a bit more careful. When doing so, most prospectors prefer to use the smooth surface of the gold pan, rather than using the cheater riffles. The key is to run the concentrates through several sizes of classification screens and pan each size-fraction separately. Use of a smaller-sized pan (“finishing pan”) makes this process go easier.

When panning a set of concentrates all the way down to the gold-or nearly so, it is good to have a medium-sized funnel and a large-mouthed gold sample bottle on hand. This way, once you have finished panning, it is just a matter of pouring the gold from your pan into the sample bottle through the funnel. Pill bottles and baby food jars can make good gold sample bottles for field use, because they are usually made of thick glass and have wide mouth. Plastic bottles are even safer.

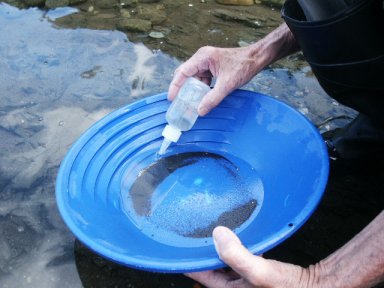
Another method is with the use of a gold snifter bottle. This is a small hand-sized flexible bottle with a small sucking tube attached to it. Squeezing the snifter bottle creates a vacuum inside. Submerged gold from the pan can consequently be sucked up through the tube.

If you do not have a snifter bottle or funnel, try wetting your finger with saliva and fingering the gold into a container, which should be filled with water. The saliva will cause the gold and concentrates to stick to your finger until it touches the water in the container. This works, but the funnel method is faster.

Practice Gold Panning

If you are not in a known gold-producing location, but want to do some practice panning to acquire some skills before going out into the field, you can practice in your own backyard. Use a washtub to pan into and some diggings from your garden (or wherever) to simulate streambed materials. I recommend that you throw in some rocks and gravel along with the dirt so that it takes on an actual streambed consistency. Take some pieces of lead, buckshot or small lead fishing weights, cut them up into various sizes ranging from pellet-size down to pinhead-size, and pound some of them flat with a hammer. This puts the pieces of lead in the same form as the majority of gold found in a streambed-flake form. They will act in much the same way as will flakes and grains of gold. Leave a few of the pieces of lead shot so that gold nuggets can also be simulated.

When panning into the tub, place some of these pieces of lead into your pan, starting off with the larger-sized pieces first. Keep track of how many pieces of lead you use each time so that you can see how well you are doing when you get down to the bottom of the pan. Practice panning in this manner can be very revealing to a beginner, especially when he or she continues to put smaller pieces of lead into the pan as progress is made.

If you can pan small pieces of lead successfully, then you will not have much difficulty panning gold (higher specific gravity) out of a riverbed. And, who knows? You may end up with gold in your pan-right out of your own backyard! It wouldn’t be the first time.

Bags of real panning material are also available from different sources within the industry. These bags usually contain some real gold along with the type of materials you would commonly encounter when panning out in the field. Practice panning with the “real thing” is the best way to get started!


by George McConnell

What can go wrong will!! And does!!

Never has such an adage been more true than with small engines – on a prospecting trip – a BILLION miles from nowhere! The engine sits after your arm breaks from trying to start it, and tempers flare while someone screams “The thing worked last year!”

Here are a few tips:

Repair of anything in the field is much more difficult, not to mention the trips to town for a spark plug 
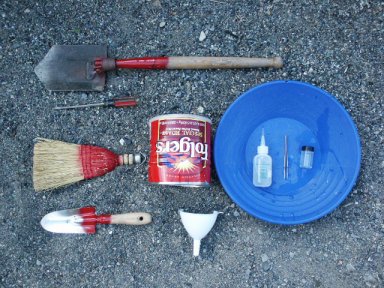
wrench, or a clamp, only to find the store just closed! Make up a small kit of tools and parts to keep with the mining equipment.

1. Pliers
2. 4-way screwdriver
3. Inexpensive socket set with spark plug socket that will fit your spark plug!
4. Allen wrenches
5. Extra engine oil
6. Extra pump seal kit and gaskets and clamps
7. Extra spark plug
8. Whatever else you can think of that you’ll need!

Ok-ok, the season is over and I’m dreaming of next year’s expedition. DON’T WAIT. Now is the time to pickle that engine!

How to “Pickle”:

1. Make it a habit to run the engine until it runs out of fuel. This helps stop problems from “modern” gas formulas, forming gum and goo in the carburetor.

2. Check the fuel filter and replace it if you’re not sure.

3. Disconnect the spark plug wire and “ground” it to the engine. Most small engines have a triangular “tab” for slipping the spark plug wire onto it.

4. Change the engine oil (dispose of the old oil properly). If you don’t remember when you changed it last, or just “checked” it, change it NOW.

5. Remove spark plug. If it looks oily, cracked, black, or just plain crummy, REPLACE it. If it’s ok, check the spark plug GAP – .020-.025 is typical. If you’re not sure, get a new plug and make sure it’s the right plug for your engine.

6. “Pickling” rings and valve, and cylinder walls, protection hint: Pour a TEASPOON of “Marvel Mystery” oil (any light oil will do) into the spark plug hole. (Don’t go crazy and overdo it.) Let it sit for a minute, then press your thumb over the spark plug hole (after making sure the spark plug wire is grounded to the frame. Caution: “Instant Shock Therapy” is very possible if it is not.) SLOWLY pull the starter cord, ONE TIME ONLY! You will feel a suction and then a pressure “poof” on your thumb. (If you don’t, it’s time for the repair shop engine doctor!) The oil is now distributed into the cylinder rings and other engine parts to keep them from freezing up and happy while in storage.

7. Make sure weeds and twigs are not hanging in or on the fan.

8. Clean the air cleaner (foam type) and replace if needed.

a) For the foam type, wash in light soapy water, squeeze and let dry. Oil it up, squeeze out the excess oil and re-install.

b) For the paper type, blow carefully on the inside of the filter with an air hose. If it’s too clogged, replace it.

9. Re-install spark plug and wire.

10. Wipe the entire engine down removing dust, dirt and goo. You paid a lot of money for it, take pride in it by keeping it clean.

11. Don’t “adjust” those little screws by the carburetor, unless you’re SURE of what you’re doing. Those “adjustment” screws normally don’t “un-adjust” themselves. Consult the engine manual for adjustments and tweaking for altitude load or for poor fuel, only after everything else checks out, (clean air filter, etc…)

Hint: After dredging, high banking, etc…, I cover the engine, after it cools, with a plastic garbage bag in case it rains! That way, it will start easily the next time.

Now you can get back to dreaming and planning your next expedition with reasonable confidence that y our engine will run when you get there.

See you on the river!


By Dave McCracken

You don’t know what frustration is until you have gone back and forth from your dredge to your dredge hole three or four—or eight—times trying to knock out a single plug-up!

Dave Mack


plug upOne of the main impediments to production in gold dredging is the occurrence of plug-ups in the power jet and/or suction hose. A plug-up is caused when a single rock, or a combination of rocks, lodge in the suction hose or power jet, which then prevent further material from being sucked up.

Beginners are especially plagued with many, many plug-ups, because they have not yet learned which types of rocks, or which combinations of rocks, to avoid sucking up the nozzle. Everybody that dredges must get through this part of the learning curve.

When possible, an experienced gold dredger will watch to see what kind of rocks caused a plug-up every time he or she will get one. Beginners should do this as well. This way, after a while, you gain an understanding of which type of rocks and combinations to avoid putting through the nozzle.

For the most part, the rocks to avoid sucking up are those that are just large enough to fit in the nozzle that are sharp and angular, or that are shaped in such a way that if turned sideways, they could possibly lodge in the suction hose or jet.

Sucking up a larger round rock, just after a long-thin rock, or just after a medium-sized flat rock, is just asking for a plug-up. The reason for this is because the round rock, having more surface area, will move up the hose faster than the flat rock. So the round rock can catch up and possibly cause the flat rock to turn and lodge. Generally, we avoid sucking up large flat rocks altogether.

Generally, we avoid sucking up large flat rocks altogether. Just like there is a system of knowing how to avoid plug-ups, there is also a system for removing plug-ups quickly.

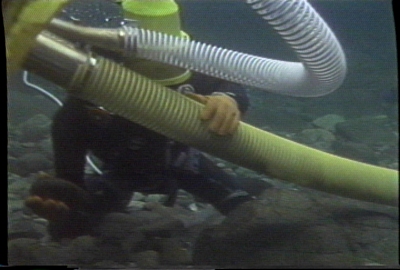
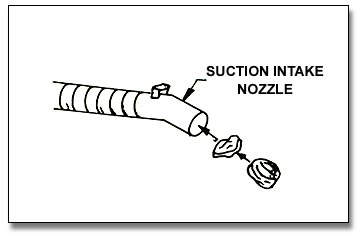
Many plug-ups occur in the power jet. These are generally caused for two reasons (in addition to sucking up the wrong rocks). The first is because of a design-flaw. Many power jets are smaller in diameter than the inside of the suction hose. Where the larger-sized suction hose meets the smaller-sized jet, there is a restriction which can cause rocks to lodge.

The other reason for plugs in the power jet is further up just beyond the inductor(s). High-pressure water comes from the side into the main jet tube from one or more inductors which can spin a rock just right to make it lodge.

Once you gain some experience in dredging, you can often tell from the feel of the plug-up when you get it whether the plug-up is in the hose or the jet. Jet plug-ups are usually very sudden; you can feel them “slam”, with a sudden complete loss of suction. Hose plug-ups sometimes leave you with some smaller amount of suction at the nozzle.

The first thing to remember with a plug-up is to stop sucking material into the suction nozzle as soon as you realize you have one!

All of us, sooner or later, experience the joy of loading a suction hose full of rocks and gravel. But you haven’t experienced life to the fullest until you have had the opportunity to do this with a 12-inch dredge! A plug-up is much easier to remove if you have not sucked up a bunch of additional rocks and gravel to complicate the problem.

When you get a plug-up in the suction hose, sometimes you can free it up simply by yanking forward on the hose, or by popping your hand over the intake of the suction nozzle. If there is still some suction, sometimes purging air from your regulator into the nozzle will help free the plug-up. When I get a plug-up, I will do this a few times, and then set down the nozzle (where it will not suck up further material) and move rocks out of my way for a little while to see if the plug-up will free itself.

I always like to keep the outside of my suction hose nice and clean. This means using a good wash brush to clean the algae off once every two weeks or so. Or, you can disconnect your suction hose from the dredge and clean it with a pressure washer. The good thing about a clean hose is that you can look into it for plug-ups as you move towards your dredge to knock the plug-up out of the jet. Sometimes, when you think it is a jet plug-up, you discover that the plug-up is in the hose. With a clean, clear hose, it is usually pretty easy to spot the plug-up quickly. This all saves time, energy and frustration.

When leaving your dredge hole to find a plug-up, always leave the suction nozzle positioned so that it will not suck up additional material, or will not get sucked against a larger cobble or boulder as the plug-up is being removed. As the plug-up is being freed, you need water movement through the hose to help carry the rocks which caused the obstruction out of the system. Sometimes, the offensive rocks free-up and then cause another obstruction further up the hose. On tough obstructions, I will generally follow the rocks up the hose until I am certain they are through the system. You can hear the rocks rattle up through your metal power jet if you are listening.

Another reason for leaving your suction nozzle so it will not get blocked by a cobble or boulder, is that when you are probing the power jet for the plug-up from the surface, you are paying attention to how much water is flowing through the sluice box. A plug-up slows the water down. When the obstruction is freed up, more water consequently flows through the box. If you are watching, you will then see the offensive rocks flow into the sluice (where you can take a look at them). This is, unless the suction nozzle gets sucked up against something down in your dredge hole which prevents forceful water movement through the suction hose.

It is really important to get this right. You don’t know what aggravation is until you have gone back and forth from your dredge hole to your dredge three or four—or eight—times trying to knock out a single plug-up!

You need to develop a feel for probing the jet from the surface for plug-ups. This is done with a “jam rod” (Also sometimes referred to as the “plugger pole.”).

What I mean by getting a feel for probing, is that you have to learn to feel around and find where the obstruction is in the jet.

Some beginners start off thinking the key is to simply slam the jam rod down into the jet over and over again—the deeper the better. This does absolutely no good if the plug-up is further up into the jet and the rod is just bypassing it. Sometimes the jam rod goes down into the jet, through the rocks causing the obstruction. The person comes to the surface, slams the jam rod deep into the jet a few times, feels no plug-up, decides the obstruction is in the hose, goes back down and follows the hose back to the dredge hole, follows the hose back up to the dredge, jams the rod deep into the jet, etc., etc., and finally decides there is something wrong with the pump! This is all part of the learning curve, and can be very frustrating.

What I mean by getting a feel for probing, is that you have to learn to feel around and find where the obstruction is in the jet. Some beginners start off thinking the key is to simply slam the jam rod down into the jet over and over again—the deeper the better. This does absolutely no good if the plug-up is further up into the jet. Sometimes the jam rod goes down into the jet, through the rocks causing the obstruction. The person comes to the surface, slams the jam rod deep into the jet a few times, feels no plug-up, decides the obstruction is in the hose, goes back down and follows the hose back to the dredge hole, follows the hose back up to the dredge, jams the rod deep into the jet, etc., etc., and finally decides there is something wrong with the pump!

And, this is why it is important to learn to get a feel for probing. I do this by probing down the jet about a foot at a time, probing at different angles, feeling for the obstruction. The obstruction is that solid-something that the jam rod touches as you are feeling around in the jet. Sometimes, it is barely a nudge as the rod slides past the obstruction. So you really need to pay attention when probing!

Once I feel the obstruction, I direct the jamming action to free it up. If smacking on the obstruction does not free it, try again after turning the engine down to idle.

Some experienced dredgers weld a “T” onto the upper-end of their jam rods. This is for the simple reason of avoiding the additional aggravation of having to remove the suction hose to recover your jam rod if it slips from your hand and slides down the jet and suction hose! If you make the T-handle narrower than the diameter of your power jet, you can turn the jam rod around and use the T-handle to help you find the occasional elusive rocks that lodge in the power jet.

It is also a good idea to have a bolt or some other solid rod material welded onto the probing-end of your jam rod. Otherwise, the pounding action can cause the probing-end to flair out. This causes problems when you jam the rod down through an obstruction, and the flared portion gets stuck when you are trying to pull it back out. The probing-end of your jam rod should be a smooth continuation of the rod itself.

If a plug-up is found in the suction hose, it can usually be freed-up by tapping against it with a smooth cobble from your cobble pile. If you look over the obstruction, you can usually see the best angles to tap against the obstruction. If one angle does not work, perhaps another angle will free it up. If the obstruction does not free up easily, the answer is not to beat your suction hose full of holes! The next step is to turn your dredge engine down all the way to an idle. This releases the heavy suction pressure holding the plug-up in place. Once the engine is idled down, you can usually tap the obstruction free with little difficulty. Then, by turning up the engine, often the rocks which caused the obstruction will get sucked through the system. Sometimes, they will also plug-up the hose or jet again—in which case, you go through the process all over again. This same procedure is used also in jet plug-ups.

If this procedure does not work on a hose plug-up, the next step is to remove the water from the hose. This can be done by lifting the suction nozzle out of the water while the engine is running at idle, or at just enough throttle to pump the water out of the suction hose. With no water in the hose, an obstruction is usually very easy to free up. In this case, however, it is wise to shake the rocks completely down the hose and out of the nozzle—to be sure you are finished with them. Here is a helpful hint: Remember to then toss the offensive rocks out of your hole, so you do not suck them right back up again when the dredge’s throttle is turned back up!

When a really difficult plug-up is in the suction hose near the jet, sometimes it is necessary to disconnect the suction hose and pull it up onto the bank to remove the obstruction. This is only on very difficult obstructions. If you are paying attention to what you are sucking through the nozzle, you should not be burdened with this chore very often!

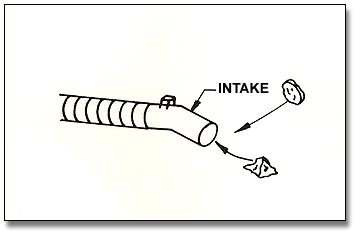
All of this unnecessary additional work will prompt you to pay more attention to what you are feeding into the nozzle! I have spent plenty of time watching beginners invest more than 50% of their day just on freeing plug-ups!

Several years ago, in an effort to enhance production, we developed oversize power-jets and exterior suction hose clamps. In this way, the suction hose fits into a jet tube which is slightly larger in size than the hose. This can eliminate 95 percent or more of the plug-ups which a dredger will get on a normal day. Some of the dredge manufacturers are now creating dredges with oversized jet tubes and exterior suction hose clamps—which is one of the best things that has happened for suction dredges in quite some time.

Caution: just because a dredge has an exterior suction hose clamp does not mean that the jet is larger than the hose. You have to look closely and measure to be certain. If the mechanism has any part of the jet smaller in diameter than the inside of the suction hose, you are going to get plug-ups there no matter how careful you are at the nozzle. What I am saying is that an oversized jet tube for a 5-inch dredge should have an inside diameter greater than 5-inches.

Team work on removing plug-ups can be very efficient when two or more dredgers are working together. When I am nozzling and get a plug-up, I usually hand the nozzle to one of my rock men, or send the rock man up to find the plug-up. Once the plug-up is removed, material is immediately sucked into the nozzle. This creates a signal to the person trying to locate the obstruction that it has been cleared. If no material is moving through the hose and sluice box, it is a definite signal that the obstruction still exists somewhere in the system—or that the partner has fallen asleep and lost track of what is going on (It is a good thing that you cannot hear miners when they get frustrated at each other while underwater).

While sampling, or during production dredging, the end result is directly proportional to how much material you are able to feed into the suction nozzle. Plug-ups play a big part in this; because while you are spending time freeing up obstructions, you are not sucking up pay-dirt!

If you are having problems with plug-ups, sometimes you can improve production by just slowing down a little.

The real key is in oversized jets. The amount of work to build and install one on your dredge is small compared to the amount of energy and time you will spend knocking plug-ups out of your jet during the course of a mining season!

Everyone gets some plug-ups. The thing to do is improve your control of the nozzle to the point where you only get a few (or none) each day.


Dave Mack

“…Having good mining property available to you is only about half the battle. You also need to know how to find high-grade gold deposits! I hope the information on the following pages will be helpful to you.”

 
Dave Mack

“Gold panning is the basic prospecting activity. Everyone should know how to do it very well.”


By Dave McCracken

The main barrier to overcome is the psychological impact from the uncertainty of whether or not you are going to find an acceptable gold deposit.

Dave Mack

During the past five years, we have had an opportunity to work with hundreds upon hundreds of different gold miners, and we have realized many different things about how to approach a gold mining operation to improve a person’s chances of success. One of the things we have realized is that some people become so serious about a mining operation that they lose track of the fact that the operation is simply a game.

All games consist of a goal, a means to achieve the goal, and barriers or problems in the way of the goal’s achievement. And, of course, the GAME consists of overcoming the obstacles and achieving the goal. Football is a game; basketball, soccer, everybody knows these are games. What some people fail to realize is that your job, raising your family properly, getting through life successfully, and even gold mining–are all games, too. Each of these games have their own unique set of problems to overcome.

Because of the seriousness and importance of winning, sometimes we lose track of the fact that these different aspects of life are a game. The importance of winning simply requires that we play the game harder.

It is much easier to win at a game when you know what the game is that you are playing.

Gold mining is a game in which the obstacles and problems to overcome are not, generally, other people or other teams as in the game of football. The main obstacle to overcome in gold mining is the UNCERTAINTY of where acceptable gold deposits are located.

The best goal, of course, is to find lots of gold–enough to resolve your financial or emotional needs. I say emotional because some people are not in gold mining necessarily for financial gain. One person’s goal might be to continuously recover enough gold to support his family and the lifestyle. Another person might want to find enough gold to retire in luxury. Someone else might just like to find any amount of gold. Each individual will have his or her own goals. Once one goal is nearly achieved, a person naturally tends to set a higher, more difficult goal. One of the interesting things about gold is that you never seem to have enough of it–even if you have a lot compared to the goal you set for yourself some time ago! Therefore, as a miner gets better, he or she tends to elevate the goal higher and higher.

The means of achieving the goal in gold mining is by applying mining and prospecting techniques with available mining equipment on gold bearing locations so that you can to locate and recover valuable deposits.

The equipment is readily available. There is nothing difficult to understand about the techniques and procedures. The main difficulty is NOT KNOWING WHERE THE GOLD IS. This makes gold mining unique, in that the main obstacle to overcome is not an external, material or barrier–as in most games. The main barrier is the psychological impact of the uncertainty of whether or not you are going to find an acceptable gold deposit.

In reading this, you might find yourself feeling that you are dedicated and strong enough, that you have all of the discipline needed, that you have plenty of emotional fortitude, and that you are smart enough to overcome any psychological doubts which may arise in your own mind during the course of a sampling operation. We all have this, and we are all potentially strong enough to persevere. However, there are also negative voices in our heads–which can become quite strong when we are directly confronted with difficult situations. Sometimes we forget about these voices during times when we are not confronted by difficult situations!

None of us are super-beings. We are human. We all have our personal limitations–which are set by ourselves. This happens when we make decisions that we can’t do something, or that we don’t want to do it. A person takes up running and decides he can only run two miles. Does that mean he cannot run a step further than two miles? Of course not. The person could run twenty miles if he set his mind to it. If I did not learn another thing in SEAL training from my navy days, I learned that you can always take at least one more step. This is true in any aspect of life–in any endeavor; you can always do it a little more or a little better.

But, when we get close to a limitation which we have already set for ourselves, we run smack into the negative voices in our heads which we have ourselves identified with. “I can’t do it!” Just because the voice says we can’t doesn’t mean we can’t. We can, and by doing so, a person becomes stronger.

The problem in gold mining is different than in most other games. If you were cutting firewood for money, the barriers to overcome in the game would be the physical challenge of cutting down trees, sawing them into rounds, splitting the rounds

up, loading them in a delivery truck, hauling them to a location, selling them to someone, and maybe stacking the firewood on the buyer’s back porch. The easy thing about this challenge is that you are working with a reality that you can see all the way through the cycle. The wood is there. It is just the physical work of getting the wood onto the buyer’s back porch–that is, as long as you have a buyer.

Gold mining is different. The gold is not there until you find it. Yet, it’s really not that the gold isn’t there. When we see other miners recovering gold out of commercial deposits on the same river, we know there are more commercial deposits to be found. The problem is that we might not be sure that we are going to find them.

And, it’s not that the procedures and techniques for finding gold deposits are difficult. We know that gold, because of its weight, tends to travel along its own narrow path in the river. We know that pay-streaks (gold deposits) form in their own unique locations along the gold path–where water velocity slows down during major flood storms. We know these pay-streaks form quite regularly along a gold-bearing waterway. And, we know that prospecting consists of digging or dredging sample holes in an attempt to locate the gold path and the pay-streaks. None of this is difficult to understand and apply.

The difficulty is in the uncertainty–and this is the main barrier to overcome in the game of gold mining. We see a fair percentage of people who have themselves psyched out and talked out of it, even before they finish their first sample hole. Why is this? They have adequate equipment. They understand the procedures. They can confront the physical work. Why do they quit so quickly? It is because they don’t understand who the real opponent in the game is.

If it were a game of football, would they quit after the first play of the first inning just because the opposing team looked stronger? Not if the players have any degree of personal pride in being a football team. Yet, quite often in many games, the opposing players try to psyche-out the members of the members of the other team. A demoralized team is easy to conquer! More likely, a serious football team would psyche themselves up in an attempt to win over a stronger opposing team.

What people don’t realize is in the game of gold mining, you are really playing with and/or against yourself. It is your own inner voices which you listen to and decide whether to quit early, or to pour on the steam even harder to find the gold deposits you are looking for. When a person quits in gold mining, it is often because he has psyched his or her own self out.

I can understand quitting when your legs are busted and you are on your last breath of air. This is understandable. But, to quit gold mining because you have talked yourself into the idea that you are not going to find any gold just means that you don’t understand the game. Basically, in this case, you have lost to your own inner voices.

There is a fantastic feeling of self-accomplishment when you succeed in gold mining. A professional football player, when retired, will look back and remember certain games that were won. He probably won’t be thinking much about the money he made. He probably won’t be thinking of the easy victories. He will be thinking about the games his team was losing, and how the team pulled together, raised themselves up, and won against all odds. These wins are cherished, because they occur when a player, or a team of players, reach down inside and create the necessary additional energy and willpower to overcome large barriers and obtain the goal after all.

Success in gold mining brings about this same kind of intense emotional satisfaction–only better or different in the fact that you usually accomplish it on your own. You generally don’t have a team of other players helping you to make a touchdown in the game of gold mining.

Like it or not, gold mining is similar to a game of solitaire. You are playing the game with yourself as your teammate, and possibly with yourself as the main opposing force. you have a chance to overcome the little negative voices in your head that tell you to quit–not just in gold mining, but also in the other aspects of your life. Each time that you persevere and finish that next sample hole properly, despite the inner voices which tell you there is no gold in that location, not only do you get that much closer to the gold deposit you’re looking for, but you also grow stronger as a person. And, in the end, this is worth more than gold.


By Dave McCracken

Everything was going normal. My partner and I were using an 8-inch dredge, pumping rich gold from underneath about seven feet of hard-packed streambed. It was just another day in god’s country. Then, without any warning, we ran out of air. “Out of gas,” I thought. As I turned around to go back to the dredge, there it was, upside down, with the engine muffler resting on the bottom of the river!

Dave Mack

 
flipped dredgeThere are few things more disheartening in gold dredging than flipping your dredge upside down in the river! But if you spend some time talking with experienced dredgers in river-dredge country, you will find a good percentage of operators have experienced turning one or more dredges over at one time or another.

Dredges get flipped over because of numerous different factors. One common reason is not having enough flotation under the dredge. Another is having a dredge design where the dredge is not wide enough. Another common problem is in dredge designs whereby the forward-most floats are not tapered enough to help deflect the river’s flow.

Design problems aside, there are two common situations which cause dredges to flip over. The first is when something happens to cause the sluice box to start loading up with the material you are pumping. As more and more material piles up in the sluice box, and then perhaps onto one of the pontoons, the increased weight eventually overwhelms the dredge’s floatation capacity, and over she goes! This can happen in minutes if you are feeding the nozzle at production speed!

The second common reason for flipping a dredge is floating it out into faster water than the design can manage. Every dredge has its limits! A dredge which might float just fine in shallow, slack water might not last five minutes in the faster flow of a river. fast water

As fast water often poses more risk to the dredge than an experienced operator, sometimes you have to find some slack water along the edge of the river where it is safer to float the dredge!

Gold quite often deposits in the fast water sections of a river. Also, because of the faster water, these areas often have less gravel and overburden covering the pay-streaks. Less streambed makes sampling go faster. Consequently, river dredgers often find ourselves dredging in the faster sections of gold-bearing rivers—including white water rapids.

It is difficult enough to overcome the underwater problems associated with fast water dredging. Knocking out plug-ups in the suction hose is particularly difficult. A dredger should not also have to worry about his or her dredge flipping over at the same time. Therefore, a certain amount of dredge modification might be necessary on any store-bought dredge before it is used under fast water conditions.

Normally, dredges are modified for fast water by adding more flotation—sometimes to the sides, sometimes to the forward-part of the dredge.

Here’s something important: Additional side flotation tends to make the dredge more stable from side to side and generally prevents the flipping problem. However, additional side flotation enormously increases the dredge’s water drag in the fast current. This puts a great deal of pressure on the tie-off lines, and it also makes it more difficult to get on and off the dredge, or work around the dredge (knocking out plug-ups) without getting swept down river. This is because the additional drag directs a larger volume of water around the sides of the pontoons.

It is usually more difficult to mount additional flotation as an extension of the front of your dredge; but we have found in our own operations that this is the better overall modification for several reasons. Reduced water drag is very important in swift water conditions. More floatation up front helps prevent the dredge from doing a submarine dive! Also, the additional platform in front of the dredge provides more space to place support gear on your dredge. And, in the case of larger dredges, if you should ever want to mount a winch on the front of your dredge, the extra flotation and frame will already be in place.

But you do not need to be in fast water to flip a dredge over. As mentioned above, a very common reason for a dredge to flip over during operation is sluice box load-up. This is when rocks and gravel overwhelm the sluice box, start flowing over onto the decks, and eventually cause the dredge to list over to one side and flip. If you have a water-flow problem with your recovery system, the problem must be resolved before you operate your dredge without someone at the surface to keep an eye on it. The key is to get enough water-flow to keep all of the rocks and material moving through and out of the recovery system. We always make sure we have a little more flow than necessary, because we choose not to hire a dredge tender to stay on deck.

Occasionally, even with a dredge which is set up perfectly, just the right rock can lodge in the sluice box and create an obstruction. Then that single rock can be the cause of a sluice box load-up. If not caught in time, the load-up can collect enough weight to flip the dredge over. This is why I say many experienced dredgers have had the fun (not) of flipping a dredge. Helpful hint: It never hurts to look back every once in a while to make sure your dredge is floating alright!

Tying off the dredge properly in swift water is also an important factor in preventing a flip-over. Obviously, you do not want your dredge sitting broadside in a fast current! It is a matter of applying Murphy’s Law: you must observe the water-flow and its effect on the dredge. If it looks chancy, come up with another plan.

When a dredge is flipped over, you usually lose all of the items that float. If the river is swift, these things are usually quite some distance down river before you get back up on the bank and remove your dive gear. I will never forget the time we came up from a dive several years ago just in time to see the five-inch dredge that was operating just downriver from us was underwater and

hanging by just one pontoon. The guy was dredging when we started our dive, so we assumed he was still underwater, pinned by a rock, or perhaps knocked in the head by the dredge when it flipped over, or something. Because the owner of the dredge was nowhere to be seen!

However, it turned out that when the dredge flipped over, the dredger came to the surface and saw his other pontoon going downstream fast. He off-loaded his dive gear and swam through three separate sets of rapids trying to catch the pontoon. These were the very substantial rapids on our Mega Hole claim at K-15A! He never did catch up with the pontoon. He showed back up at the dredge about 45 minutes later, exhausted and demoralized. We already had dragged the remainder of his gear out of the river. Using my jet boat, several hours later, we located his pontoon about eight miles downriver in a back eddy. It only took him several days to get his dredge running again. He installed extra flotation to prevent further such incidents.

When a dredge is flipped over, after it is set right-side-up again, the water needs to be completely removed from inside the engine and hookah air compressor. We usually do about half a dozen oil changes, starting the engine for a few seconds each time, to remove more water. As long as the oil keeps turning milky, it is necessary to keep changing it.

It is not as hard on an engine if it is not running when it goes underwater! Sometimes it is necessary to remove the electrical components and blow them out with air or replace them altogether in order to get spark at the spark plug again.

The air compressor must have all water removed from inside, as well as the intake air filters and air lines. If the compressor was running when it was submerged, it will be necessary to pull out the reed valves and make them straight again or replace them.

And of course, if you were dredging gold, some or most of that will have been lost from your sluice box when it flipped over. So, you will have to decide whether it is worth going through your cobble and tailing piles to retrieve it. It usually is not worth the effort, because you can get more gold by just continuing forward on your pay-streak.

One important dredge modification worth doing is to secure the sluice box to the frame or deck of your dredge so it will not flap free in the current should the dredge become flipped over. This prevents the box from being damaged or lost altogether. It also makes it a heck of a lot easier to get the dredge flipped back over.

At the end of last season, one of our local commercial dredgers was trying to winch his dredge up through a particularly difficult section of rapids on our K-17 property along the Klamath River. He was trying to test a potentially-excellent hot spot that no one else had ventured into, yet. The spot looked great; many pounds of gold were recovered just upstream and just downstream. The spot is probably still loaded with gold!

He was moving the dredge alone, using a power winch anchored to the streambank some distance upstream. Just as he was almost around a large rock, the outside edge of his dredge took a dive and the dredge flipped over — just like that. This is the way it usually is in fast water; when something goes wrong, it happens quickly and decisively. Usually, there is little time to do anything effective about it.

connecting sluiceBesides all of the damage to a dredge, the loss of support gear, and the loss of production time, there is also a large amount of embarrassment which goes along with having a dredge floating upside down in the river!

Once we found out about his problem, we put the word out, and experienced New 49’er members from the area converged on the site to help our friend. It is no small task to right an eight-inch dredge in fast water! The images in this article were captured as we made it happen.
First, we had him winch the dredge around the rock and pull it into slower moving water. This did not help the equipment much, because his sluice box was dangling in the current and dragging along the river-bottom. His engine was also dragging the bottom. Not good!

We spanned the bottom of his pontoons with some beams, and then cranked his sluice box back up to his deck before trying to winch the dredge back over.

winchingThen, we had several divers go under the dredge and use chains and a come-along to lift the sluice box up and secure it to the deck. We used a boat to set up an electric winch on the far bank. We secured the two outside corners of the dredge to the bank on the close side of the river. We secured the winch cable to the opposite corners of the dredge and we winched the dredge over. What a mess the dredge was! Since it was late fall anyway, this pretty-much finished the dredger’s season. Miners are a hardy bunch; he returned the following year, better and smarter than ever!


The moral of the story is that a little prevention goes a long way. Another thing: we are dealing with the forces of nature. We use our observation and judgment. We take some chances and we are not always right. Murphy lives! And, when he wins a battle, it doesn’t mean he has to win the war. There is always another day and another opportunity.

Another thing: We are dealing with the forces of nature. We use our observation and judgment. We take some chances and we are not always right. Murphy lives! And, when he wins a battle, it does not mean he has to win the war. There is always another day and another opportunity!

Never quit!


By Dave McCracken

Using the Le Trap Sluice to make your
final clean-up go faster.

Dave Mack

Because we have so many innovative, active gold dredgers and small-scale miners on the Klamath River, I don’t recall exactly who came up with the original idea of using a Le’ Trap sluice for final cleanup. When I first heard of it, I had reservations. We have been improving the fine gold recovery on our dredges for years. I was afraid the plastic sluice in final cleanup would lose a large percentage of the extra-fine gold that we are now recovering in our dredges. However, upon close inspection, this proved not to be the case.

One of the most time consuming jobs on any serious gold dredging activity is the final cleanup procedure of separating your gold from all of the other heavy black sands and materials which are also recovered by the dredge. My personal operation is utilizing two eight-inch dredges. We are working in an extensive fine-gold paystreak, which requires us to cleanup about two-thirds of our recovery systems at the end of each day. This amounts to about three five-gallon buckets of concentrates to process. In the past, we have utilized spiral wheels and just about every other kind of cleanup device available to process our final concentrates down to our final gold product. Always, with any of these devises, we succeeded in reducing the amount of concentrates down to about a handful, which we would then process with mercury amalgamation.

During the last several years, we have been using a professional shaker table to work our concentrates down. We found that the shaker table was faster than spiral wheels and the other devises we had tried. Even so, with three five-gallon buckets to process, we were spending several hours each day just running our concentrates across the table. Once the concentrates are worked down to a handful-sized amount, the final amalgamation process only takes about a half hour. In other words, the most time consuming job had been to work the concentrates down to just a small amount.

Shortly after we heard that the Le’ Trap sluice was being successfully used, there were other dredgers on the Klamath, dredgers who knew what they were talking about, starting to rave about how fast and effective the sluice was for final cleanup. Lots of people were starting to use the new system. Consequently, we decided to give it a try. We were quite impressed with the results!

Basically, the system is quite easy, and also quite inexpensive. The Le’ Trap sluice retails at about $90. When used in conjunction with a dredge, no further equipment or pumps, etc., are needed, except a garden trowel of some kind to shovel concentrates with.

We start our dredge and run it just over idle speed to get a small amount of water moving through the primary dredge sluicebox. Water flow through the Le’ Trap sluice can be adjusted by engine speed, or by placing any flat objects under the tail end of the sluice. If you do not have enough water flow, you will notice the black sand does not move through the sluice with any regularity. Rather, it tends to pack up and bury the riffles. In this case, you will notice your gold sitting on top of the black sand, rather than inside the riffles.

If you have too much water flow, you will notice that the black sand flies through the box, with little chance to make contact with the riffles. There is plenty of margin for error. Ideally, with the proper water flow, as you feed concentrates into the sluice with a garden trowel, you will watch the black sands work their way down the box in an orderly procession. The flat, smooth section of the box ahead of the riffles allows the pieces of gold to trail along just behind the black sands. And the riffles stay somewhat clean and open. You can watch the flakes of gold wash down and drop into them.

When done properly, you will find 90% of your gold trapped behind the first four or five riffles. A few pieces, just a few, will work their way further down. But, almost none make it all the way out of the Le’ Trap sluice. We were working with several ounces of very fine gold per day; and to test the system, several times we brought all of the tailings home to see what we had lost from the Le’ Trap Sluice. It was never more than a half of one percent of our total gold recovery.

And, really, we didn’t even lose that gold, because it simply ran back into our dredge recovery system.

The Le’ Trap sluice is a one-piece molded unit which has a unique set of very efficient short riffles which seem to suck the gold right out of the water’s current. Cleanup of the sluice is simply a matter of tilting it up and dumping it into a tub or gold pan. The final product ends up not being much more than a handful of gold and your heaviest concentrates. Needless to say, this is much easier to deal with, rather than having to lug several heavy buckets of concentrates up the hill to our vehicles!

The main ingredient that we saved with this new cleanup system is time. We were able to feed the Le’ Trap sluice about twice as fast as our commercial shaker table. And, we only needed to screen the concentrates down through a quarter-inch screen using the Le’ Trap sluice, rather than through a quarter-inch mesh screen, then an eighth-inch screen, and then a 20 mesh screen to use the shaker table. This saved a lot of time in itself.

Plus, the system was so simple to use, we purchased a second sluice and used one on each dredge to cut our cleanup time in half again!

Since it only takes one person to feed the Le’ Trap sluice, we would put everyone else to work with end-of-the-day organizational activities while the concentrates were being run. Things like putting airlines and weight belts away, transferring used gas cans off the dredges, minor equipment repairs, etc. About the time that everything is put away and finished for the day, the concentrates are also finished, and we only have a half-hour of finish-up when we get home. This is a HUGE improvement over our old systems for final cleanup.

While smaller dredges have lesser amounts of concentrates to deal with at the end of the day, the time it takes to work them down usually is considerable, even on a three-inch dredge operation. That is, providing you are recovering worthwhile amounts of gold, especially fine gold. I don’t see any reason why the Le’ Trap sluice could not benefit any dredging operation where the dredge sluice is wide enough to allow the Le’ Trap box to fit inside.

We will be using this system in our operations during this upcoming season, and in future seasons until someone comes up with something better and faster. Anyone want to buy a good commercial shaker table?

Tags