video subscription graphic
This story first appeared in Gold & Treasure Hunter Magazine Nov/Dec, 1998 on Page 24. This issue is still available! Click here.

By Dave McCracken

You never really know what might lurk deep down in the depths of a muddy, tropical river…


This story is dedicated to my long-time loyal friend and fellow adventurer, Ernie Pierce. Ernie and I did three prospecting trips to Madagascar together, of which this is just one of the stories. He played a very important part on this project in working out how to increase fine gold recovery when processing heavy sands through standard riffles within the sluice box of a suction dredge. Ernie has an enthusiastic, magic disposition for being able to work out solutions to challenging problems in the field. He also overcame the primordial fear that every human being has of going down into deep, black underwater holes (where dangerous monsters lurk, if only in your imagination). I don’t know very many people who are willing to do that! It has been one of my greatest pleasures, and it has been a personal honor, to participate in adventures alongside of Ernie in California, and in multiple other interesting places all around the world.

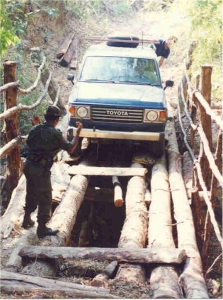
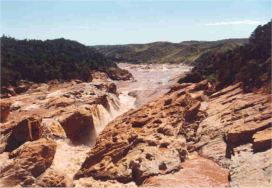
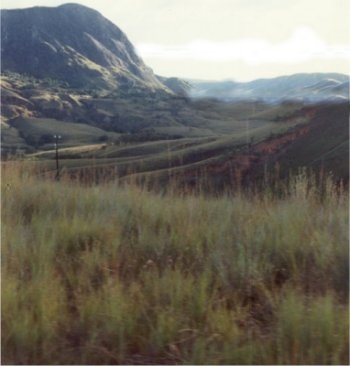
It was difficult to see into the deep canyon, because it dropped off so steeply, and because the driver was veering around the bends in the road so fast, racing the Toyota Land Cruiser down the mountain road. This road had no guard rails to prevent us from plunging a thousand feet into the abyss. So, while I would like to have taken a better look at the breath-taking scenery, and I should have captured this part of the adventure with my video camera, all of my personal attention was riveted on the bumpy, narrow, winding road in front of us. I was scared that we were going to fly out over the edge to a certain and violent end! Once in a while, though, I did get a glimpse of a large river cascading down a steady series of natural falls. What an wonderfully-spectacular place! And I did manage to capture the incredible, wild river in the following video segment at one place where we stopped for a moment so I could relieve myself:

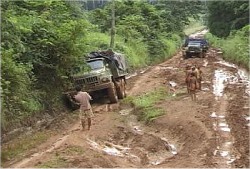
The traffic obstacles that posed the most serious threat to our safety were the pain-stakingly slow, and what appeared to be an endless procession, of supply trucks that were inching their way up and down this very steep grade, taking advantage of the lowest gear they had, to save their brakes, those that even had breaks! Our driver, as did all the other drivers of the smaller vehicles moving in both directions, had the hair-raising
challenge of passing the slower vehicles without running into something coming from the other direction. One blind curve after the next placed us almost entirely in the hands of fate. Our driver had no way of knowing whether a vehicle was or was not coming from the other direction, as he committed our vehicle to many of the “go-for-it” passes that we made.


I was holding on for dear life!

Madagascar was colonized by the French, so driving is done on the right side of the road. Being on the right side of the road put us dangerously-close to the precipice! At the high speed we were traveling, I was certain my time had finally come this late afternoon! On several occasions, by my calculations, there was no possible way that we were going to make it around the next curve! There just wasn’t enough room on the road to get past oncoming traffic without our wheels slipping over the edge of a very deep canyon. I couldn’t even see the canyon’s bottom! Each “go-for-it-pass” succeeded, either by divine intervention, or by the incredible driving ability of the young Malgasy man at the wheel.

I have lived a pretty gifted life, and I find myself counting my blessings pretty often. It’s not that very much was given to me; I have pretty-much had to climb the painful ladder of success several times. The end-result is all the more sweet when you have to work hard and sacrifice greatly to get there. I have lived on the cutting edge of danger a good part of the time; this is really true! There are not that many more things I feel I need to do before I meet my end of this life. So I find myself saying every once in a while that when the time comes, I am ready to move on to whatever is next. A lot of people say they/we are not scared to die. And you really feel that way when you are saying it! But we only feel that way when we are not looking death right in the eye! When sudden death lurks near, I feel the terror just like anyone else!

As quickly as the hair-raising ride began, we suddenly found ourselves safe at the bottom of the mountain. The immediate danger was over. We were graciously treated to a hot meal and a comfortable bed in the best (and only) hotel in the small village located at the base of the mountain. It was great to still be alive!

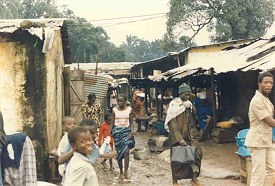
This was my fourth expedition to Madagascar in search of gold. Madagascar is the world’s fourth largest island. It is located about 400 miles off the south-east coast of mainland Africa. The country is approximately 1,200 miles long by 400 miles wide (at its longest and widest points). So it is no small country. The country is extremely poor, one of the poorest nations on earth. It is also extremely rich in mineral wealth. Especially in precious stones! Madagascar is an incredibly beautiful and scenic country! For the most part, the country is nearly undeveloped. Although, there are some larger towns that are quite developed. I captured the following video segment in the capital city of Antananarivo, a place where I have spent quite a lot of time:

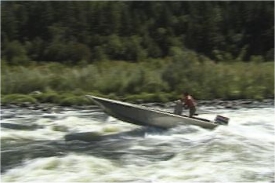
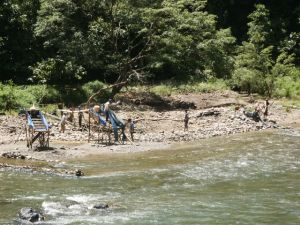
This preliminary dredge sampling program was on behalf of clients who own some gold mineral concessions in Madagascar. Ernie Pierce was along to assist with the sampling. We were there to get a preliminary idea of how much gold we could recover using suction dredges on two large rivers. We already knew gold was there because of an earlier expedition that we made into both locations to do a preliminary evaluation. Local gold miners were mining gold all over the place. They were mostly panning river gravel alongside the active river. Some were shoveling gravel from the active waterway in the shallow areas. Others were shoveling deeper-water areas out of dug-out boats, using the longest-handled shovels I have ever seen. The native miners were getting gold from everywhere!

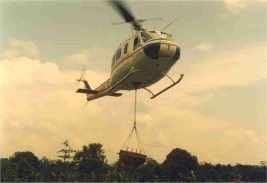
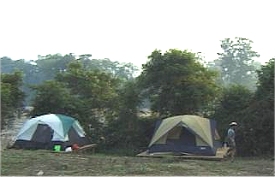
As this area was accessible by road, the logistics for setting up a dredging project were not too bad. We arrived with a substantial contingent of people and equipment. We had enough support to move us around, set up our camps, cook for us, do laundry and take care of all our basic needs.

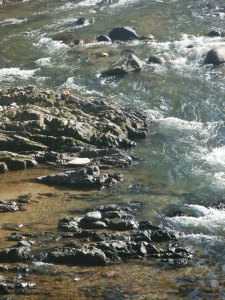
The company we were working for had quite a substantial base camp located where the end of the road met this river. There was a mess hall, some hot showers, individual bungalows; all the comforts of home! Unfortunately, the river near to and downstream of the base camp appeared to have deep sand deposits everywhere. There was no bedrock showing anywhere along that part of the river. Our initial impression was that the sand deposits in that lower section of river were going to be too deep to penetrate using our 5-inch sampling dredge. So we made a plan to pack all of our sampling gear and a fly camp (only basic needs) several kilometers upstream where the streambed deposits were shallow to bedrock. Our intention was to float down river, dredging sample holes through the entire distance back to the base camp.

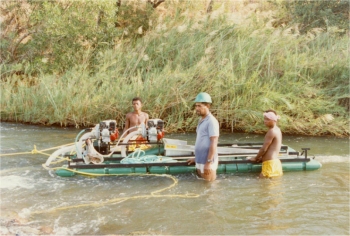
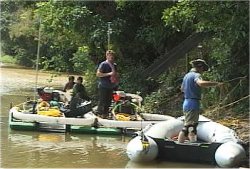
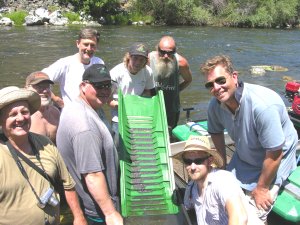
After initially settling into our fly camp, the primary task at hand was for Ernie and I to determine whether or not the gold here was present in sufficient quantities (over a large enough area) to justify a production dredging program on this river. Ernie captured the following video sequence showing myself, Sam Speerstra (project manager) and Jack (Malagasy manager of our local support team) finalizing a sample plan after our camp was set up alongside the first river:

We spent the better part of a rather uneventful week dredging sample holes on this first river. Interestingly, while local miners were supporting their villages panning gold from placer deposits alongside the river, we could not find any high-grade gold deposits inside the active waterway. Ernie and I devoted long hours to making sizable excavations through hard-packed streambed material to bedrock. And while there was some amount of gold present everywhere, we could find no places where gold concentrated enough to justify any type of production dredging program. While we could speculate about the reasons why, the important thing was that we ruled out the possibility of a commercial dredging program in this area. This was what we went there to do. End of story!

As we did not bring anything extra with us when we packed our gear into the upper area of this river, I was not able to capture video until we arrived back down near the base camp. The video link just above includes a sequence that I took while we were dredging the final sample in front of the base camp. See how deep the light sand and gravel deposits appear to be? We did not expect to find the bottom of this loose streambed material, and we didn’t. But our sampling plan required that we at least try in several areas.

After spending a week on the first river, we were eager to relocate ourselves and our sampling infrastructure over to the second river that we intended to sample, which was several hundred miles away. That process took several days to accomplish. Prospects for commercial dredging opportunity on the second river looked much better to us during the earlier preliminary evaluation. We decided to save this area for last so we could devote most of our time there.

Normally, the first thing we do before making a sampling plan on a new section of river is walk, boat and/or swim the entire length if we can, to see what is there. This allows us to look everything over to see where the best opportunities appear to be. If lucky, we will come upon local mining operations. Those will communicate a lot to us about the prospects. This is because local miners, having spent generations prospecting for gold in the area, will already have a good idea where the best potential opportunities are for the type of mining that we do.

The following video segment found us making a plan on the first morning after we arrived at this second river. The person talking is Sam Speerstra:

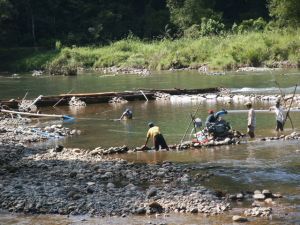
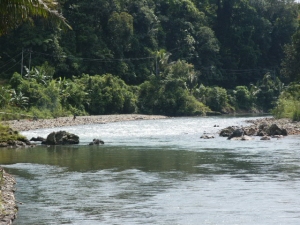
Note the active shoveling operations in the river behind where we were pulling the dredge upriver.

How clear is the water?

The first and most important fact of note about the second river was that it was flowing with muddy water. Too bad! Water clarity is the first thing I look for when evaluating a river for dredging. Will I be able to see anything when I get on the bottom of the river? The answer in this case was an emphatic “NO!” This was pretty disappointing to me, because I had been assured by Sam months before, when we proposed the sampling program, that I could depend upon having clear water in this river. As it turns out, this particular waterway drains many thousand acres of upstream rice paddies. It never runs clear!

This was not Sam’s fault. It is nearly certain that you are going to get wrong information from locals in these types of places. With the help of even the best interpreters, communication and understanding tends to break down on technical things. What is clear water to me, and what is clear water to a rice farmer in remote Madagascar, are sure to be widely-different perceptions of reality. Especially when he has never even seen a face mask or a diver before! Over time, on the important things, I have learned to keep asking the same question over and over again in different ways. In doing so, it never ceases to amaze me how many different answers we come up with! Sometimes, no matter how many different ways you pose the questions, you can still never arrive at an answer that you have much faith in. This is not because the locals are lying. It is usually because their perception of the world is so vastly different than ours.

You have to be pretty flexible when conditions turn out not to be the way you expected them to be…

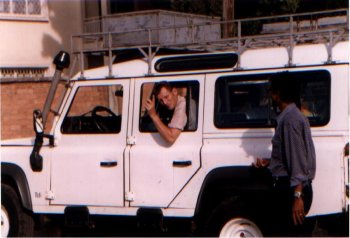
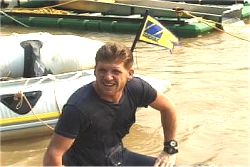
Sam Speerstra is the modern incarnation of “Indiana Jones.”

Sam Speerstra is the true-life incarnation of “Indiana Jones.” Sam has gotten me into and out of more (mis)adventures than anyone should experience in a single lifetime. The last dirty river Sam had me diving in was full of crocodiles and electric eels. That river was a nightmarish diamond project in Venezuela.

Without visibility, there was no way of knowing for certain what was on the bottom of this deep river! I’m not talking about the gold; we can figure that out through careful sampling. I’m talking about the critters!

When I initially evaluate a tropical river for a potential dredging project, the second condition that I evaluate after water clarity is whether or not there are life forms present that are potentially dangerous to me or my helpers. I do this mainly by visual observation. First, I look to see if the local people are working, washing, bathing and swimming in the water. If they are, and they appear healthy; I generally assume that the river is alright to dive in. Although, locals always have a stronger resistance to higher levels of bacteria in their local rivers. So our standard medicine kit on these projects always contains a supply of the best antibiotics to prevent serious types of internal or external infections.

I also ask the locals about sickness and dangerous critters. However, the problem with asking about critters in the water lies with the interpretation. You cannot depend upon only one inquiry or interpretation. For instance, I will never forget the size of the alligator I saw along a river in Borneo several years ago. This was after assurances from our local jungle-guides that alligators did not even exist there. We had been dredging the river several weeks when I suddenly encountered an alligator which must have been 18 feet long! It turned out that these man-eaters were being called “dragons” (not alligators) by the local village people! So I have learned to frame the most important questions in numerous different ways, and I keep asking them over and over again to different locals as I am trying to find things out about a new area.

A lot of local natives were in the river where Ernie and I wanted to sample, so it was probably safe — at least in the shallow portion. You never really know what might lurk deep down in the depths of a muddy, tropical river…

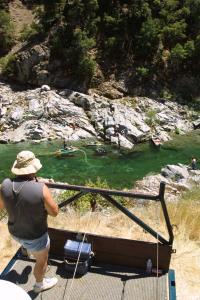
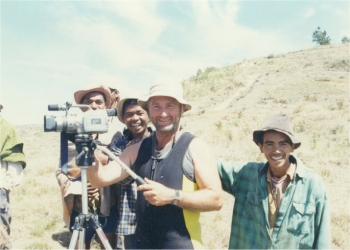
Ernie and his team capturing a little video…

I have accomplished quite a few dredge sampling projects in dirty water. It is a very scary and difficult business. The work involves going down into deep, pitch-dark, frightening places “in the blind,” with no visual assistance. I know that there are live creatures down there that do not appreciate my intrusion into their territory (unless they intend to eat me). To move around cautiously, I have to feel my way by sticking my hand or foot out into complete darkness, feeling around for what is there. Most of the time, before going down, I don’t even know how deep the water is. Sometimes I have to find out by shimmying down the suction hose, reaching out tentatively with one leg at a time to see if I can touch bottom. I am in a state of heightened awareness, desperately hoping that I am not going to touch something that is big and alive. All the while, I am wondering, “How far am I going to have to go this time?”

It is one thing to read about this in the comfort of your computer within a safe environment and feel like you can do it. But you are not exactly the same person when you are dangling dangerously in the dark. You might be the same basic identity; but other parts of you (like terror) get switched on at full volume. I suppose you would really have to go through the experience to fully-appreciate it. Until you do; take it from someone who is used to living on the edge: Diving down in deep, muddy, tropical rivers is not easy!

Muddy water creates total darkness about three feet beneath the water’s surface, sometimes less. So, all you can see down there is what is in your imagination. Do you remember those terrifying nightmares that you had when you were a kid? They still lurk in your subconscious. When going down into deep, dark, terrifying physical places, memories of nightmarish dreams are brought immediately back to life. If you are someone who doesn’t think you are afraid of anything, you ought to try diving in deep, muddy, tropical rivers! You will find there that your deepest fears are just below the surface of your normal, everyday life.

Let me try this a different way: Do you know that feeling when someone startles you at just the right (wrong) time and frightens the heck out of you? Just for that split second, you feel a deeply-seated fear; right on the edge of a panic attack? That is exactly what you experience when you go down into the deep darkness of a tropical river; especially on the first dive.

Nevertheless, over time, I have learned to deal with dirty water. This does not mean that I am not still afraid. I am! It means that I have worked out a way to proceed. Dredging in dirty water is a much slower process. Everything must be done by blind feel, and therefore with care. The process is all about taking control over a single space in the darkness. You get to know every rock in the hole and every obstruction which defines the space. Sometimes, there are submerged trees or other obstacles that you must be very careful around to prevent your airline from becoming snagged. You must dredge alone in dirty water. Otherwise, you cannot toss rocks or roll boulders out of the excavation without a good chance of hurting someone else down there that you cannot even see.
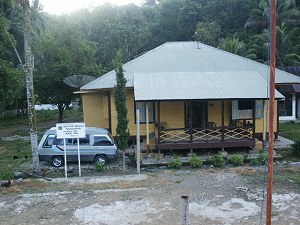
Base camp

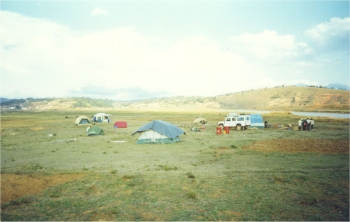
Several years ago, my lead diver on a dirty-water sampling operation in Cambodia had a portion of his ear bitten off by a fish. One quick bite and it was gone! That created lots of blood and drama to slow the job down! After that, none of the other guys that I had brought with me wanted to dive. Who could blame them? But we still needed to complete the job; that’s what we do! Surprisingly, it was the lead diver who had to continue the diving on that particular job. I did a little, too; but, that was mainly to show the other guys that I would not ask them to do something which I personally was not willing to do. We wore full dive hoods and dive helmets to protect ourselves from the biting fish, whatever it was. We never saw the creature that took the bite! And as it went, just a few more dives to finish the job proved-out one of the richest gold locations I have ever discovered. But underwater, we couldn’t see a thing!

The primary consideration in assessing a dirty river is how much more time we need to allow ourselves to get the job done in an underwater environment where the divers cannot see anything.

This is one main factor which nearly always undermines the commercial viability of a sizable dredging operation. Who is going to go down and run a 10-inch dredge in zero visibility, 6 hours a day, for a living? The gold deposits will have to be very rich to support this kind of program. I have found several underwater gold deposits that are moderately rich, but they are protected by dirty water conditions. The deposit that we found in Cambodia, for example, would make a dredging operation a lot of money if the diver-visibility problem could be overcome.

People often ask why we need to send divers down in the first place to conduct a gold dredging program. They want to know why the excavation cannot be managed from the surface using mechanical arms. The reason is that sizable rocks along the river-bottom must be moved out of the way of the suction nozzle. Otherwise, one oversized rock (too big to go up the nozzle) after another gets in front of the suction nozzle, blocking further progress until it is moved out of the way. Because of this, with few exceptions, there is no other effective way to proceed without putting divers down into the depths.

These two articles explain the underwater process in detail:

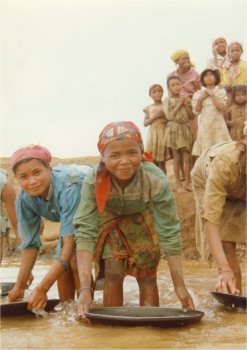
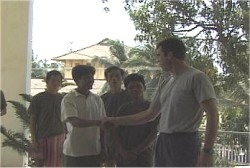
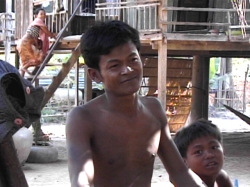
When Ernie and I first started watching the local gold miners on this particular river in Madagascar, we relaxed our fears; because even their small children were bathing and playing inside the river. This was a good break for us!

Now it was just a matter of deciding where to do our sample holes. Ernie and I used a two-pronged strategy that we have developed over the years for these situations. First, we dredge sample holes near and in line with where the local miners are actively achieving positive results. Most high-grade gold deposits follow a common line down along a waterway. For example, see how the following important video segment shows how the many local digging operations inside the river are following a common path. If you look closely, you can see tailings remaining from previous digging activity right on the same path. To get our own sampling operations off to a good start, we usually begin along the same path in the river where most of the local miners are working:

Secondly, Ernie and I offered financial rewards to the local miners for each place they showed us to dredge where we could find lots of gold. Such places are usually in the deeper areas where locals cannot gain access using the gear at their disposal. A “grande” reward goes to the person who shows us the place where we find the most gold. Wow, this incentive sure got Malagasy miners talking; and we started to find a lot of gold!

We moved our sample dredge in direct line with where local miners were doing well working out of dug-out canoes using long-handled shovels. This got us into rich gold right away!

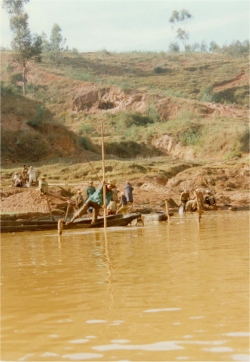
Since we could not see how deep the water was in this dirty river, and because we had already established that there were some deep deposits of sand and loose gravel along the bottom that we wanted to avoid with our 5-inch dredge, before doing dredge samples, we used a long steel probe to find areas along the established gold path where the water was not too deep for us to reach bottom, and where we could reach hard-packed streambed without having to go through a deep layer of sand first. The following video segment shows how we performed this important pre-sampling process:

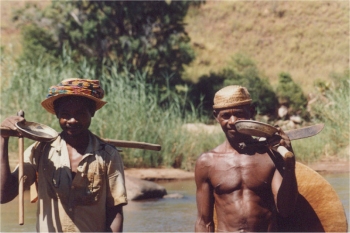
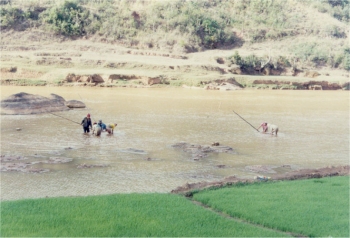
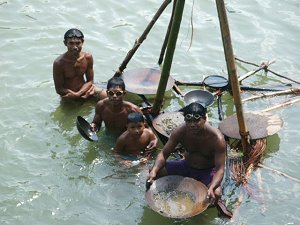
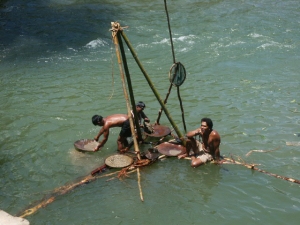
In one location, I decided to sample directly underneath a native “boat-mining” operation. I did this because I noticed the natives were working the location very aggressively. This is always a good sign! They were using long-handled shovels, about 20 feet long, from anchored boats well out into the river. The water was at least 12 feet deep! These shovels were especially designed to bring gravel up from deep water. The natives were very good at it. Have you ever tried shoveling material from underwater? Nearly all the material washes off the shovel before you can get it to the surface. Not with the Malagasy boat miners, however. They were bringing up full shovels every time. The material was being panned at the surface.

The following video segment provides a firsthand look and explanation of the boat-mining which we saw when we first arrived at this river. Seeing this type of active mining along the river by local miners was very encouraging, and immediately helped shape the sampling plan which Ernie and I would follow:

As it turned out, local miners from the boat-mining operations had plenty of gold to sell! They were anchoring their boats out in the river by driving hardwood poles deeply down into the streambed material, and then tying their boats off firmly to the poles at the water’s surface. The boats needed to remain stationary to allow the miners a firm platform from which to work the hard-packed streambed material along the bottom of the river. Consequently, we could look along the river and see many stakes remaining from earlier mining activity. Unsurprisingly, most of the stakes followed a common line down the river as far as we could see. We still needed to confirm it by sampling, but Ernie and I had a pretty good idea where the high-grade gold line was located in this river even before we unloaded our sample dredge from the truck. This was good!

The following video segment shows how we went about our sampling program. Notice the wooden poles out in the river? Because there was zero visibility underwater, you will see that Ernie had to keep jumping up to peak his head above water to steer himself and the dredge out in line with the poles. Where the water was too deep for that, we had to shimmy up the suction hose to have a look. Sometimes, it was so difficult to find our way in the dark, that we first positioned the dredge out on the river using ropes, and then shimmied down the suction hose in the dark to take a sample:

Ernie and I felt it was important to get one sample directly under one of the active boat-mining operations. This was so that our clients could estimate the value of gold deposits that local miners were developing in the river, and to see if they were excavating all the way to the bedrock. I was the one to dredge that particular sample. To accomplish this safely, we paid those particular boat-miners to stop digging for a few hours while I was under their boat.

As we had to drive our dredge out past the middle of the river to reach their hole on the bottom of the river, it was quite a challenge to find their hole in the pitch dark. When I finally found it, I was amazed to discover that they were actually penetrating deep into the hard-packed streambed material with their long-handled shovels. This must have presented them with a substantial challenge, because the cobbles were tightly interlocked together. At the bottom of their excavation, I found that their shovels were touching on bedrock, but that there was no way for them to take up the highest-grade material which was resting directly on bottom. They also were not able to clean the natural gold traps inside of the bedrock where most of the gold should have been. Too bad!

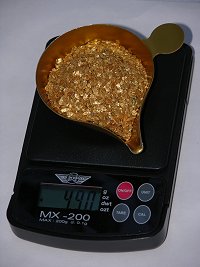
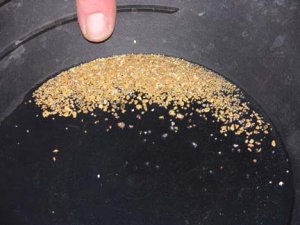
Being mindful that I was dredging in a high-grade deposit that had been previously located by other miners, I did not stay under the boat-miner platform any longer than it took to dredge up about a cubic meter of the hard-packed pay-dirt off the bottom. The material was only around four feet to bedrock; an easy place to dredge even in the dark water. We recovered a lot of gold proportionately to the volume of streambed that I processed. My estimation is that the river could produce 5 ounces of gold per day in dirty water using a 5-inch dredge.

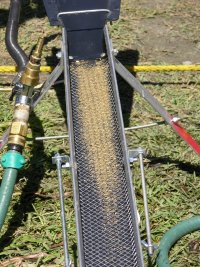
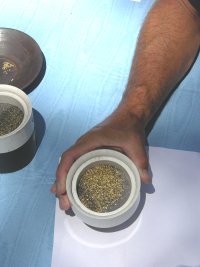
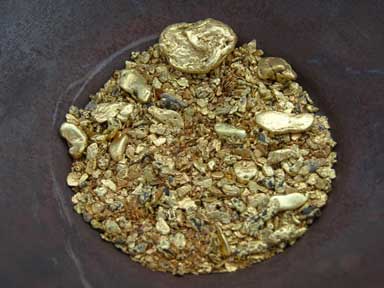
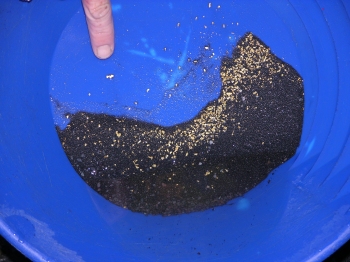
The following video segment shows the gold we recovered from this sample, and captures my summation of what we needed to do to complete our preliminary sampling program on this part of the river:


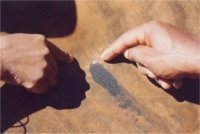
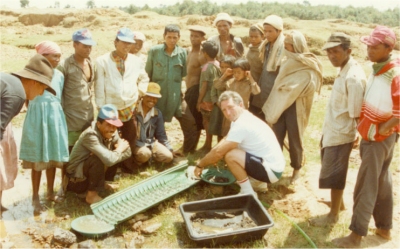
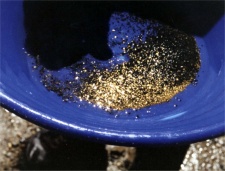
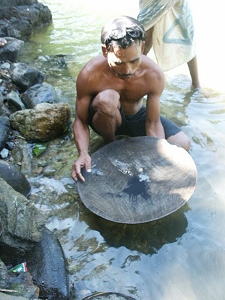
The gravel being brought up from the river bottom by local miners was panning out very well!

As it turned out, the local miners were greatly impressed and worried by our dredging machine. They watched the volume of gravel wash across our sluice box, while they were bringing it up one small shovelful at a time. Prior to our arrival on the scene, they were the biggest and the best miners around! They could put two and two together, however. After our test under their boat, they began 24-hour boat-mining operations in that location. You could see their campfires down by the river (for light) burning all night long. Within a few days, there were a dozen boat-mining operations going full blast, 24 hours a day. They were worried we were going to return and dredge up all their gold. As good as their discovery was, we were not going to do that. Our sampling thrust thereafter was to determine if the high-grade streambed material extended downstream; and if so, how far?

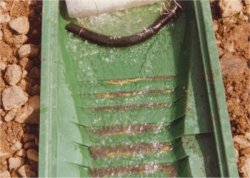
There was certainly high-grade gold at the bottom of the river!

I’ll never forget Ernie’s first deep, dirty-water dredging dive. I could see that he was pretty nervous about taking the dive, so I offered to walk (crawl) him out into the river for the first time. He agreed to this. After everything was up and running, I took Ernie by the hand and crawled alongside of him in total darkness out to the middle of the river. It was a long way out to where Ernie was going to help finish the sample that I had already started. We grabbed onto the suction hose and dragged the dredge out into the middle of the river, instructing the dredge-tenders to allow the dredge to follow our bubbles. The water was about 12 feet deep in the middle of the river. I could tell that Ernie was having a difficult experience by the way he was gripping my hand. He was holding on for dear life! Finally, Ernie had enough and he began giving me the signal that he wanted to go back to the shore. I got the message immediately from the way he was grabbing me with both hands and jerking me toward the dredge. After we returned to the surface, Ernie told me that he was just “not up to it.” He had that look of panic in his eyes, a feeling I personally know very well! There is no use in trying to push anyone into doing something while they’re in a state of fear and panic. As I have said, it is not easy diving in dirty water! We all have a limit, beyond which we are not willing to go!

Instead, I urged Ernie to do some initial sampling in shallow water so he could get a feel for it. He could work standing up, with his head out of water, if he needed to. Ernie was up for this and immediately went to work closer to the shore. We needed to get some samples over there, anyway. A few minutes later, on his own determination, Ernie went bravely out into the middle of the river and was taking samples from the particular area where we really needed them; in line with where the locals were getting the most gold for their effort. Dirty water dredging is an experience you really have to ease into at your own pace. Ernie adapted quickly, and was soon working efficiently. I could tell this by the continuous gravel which was washing across the dredge’s sluice box.

Locals observing Ernie do a final clean-up


Each of us has our own personal limits. Would you walk a tight rope suspended a thousand feet in the air between two tall buildings? Most of us wouldn’t! What would it take to get you to do it?

It takes a lot of personal courage to go well beyond our normal comfort zone into the realm of personal terror. The type of work I do often allows me the opportunity to watch others confront their own personal limitations. In defining this particular character trait of an individual, it is unfair to make your judgment based upon where the initial limits are. True courage is tested when a person is confronted with the need to go beyond personal limits, no-matter where the limits are! I was very honored that day to be present when Ernie overcame very personal and serious fears, and went out into the middle of the river to help accomplish what we were there to do.

On one occasion, Ernie came up the suction hose in a real hurry! I saw the dredge bob up and down as he pulled himself up the suction hose. As it turns out, Ernie was walking around on the bottom of the river (total darkness), and he stepped off into a “bottomless hole”. When he got to the surface, Ernie said that it all had happened within a split second. He suddenly found himself dangling like fish bait from the end of the 20-foot suction hose directly over the “depths of hell.” Luckily, the weight of his body did not pull the suction hose free from the power-jet. I have had the same experience happen to me in dark water. So now, I am careful to take only small steps, feeling my way along the bottom slowly to avoid frightening surprises!

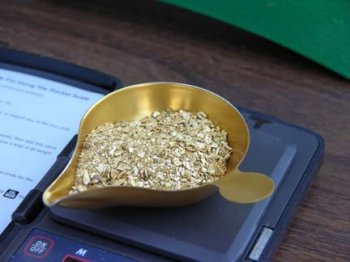
One of the most important things to do in any sampling program is test the efficiency of the recovery system that is being used. To do a proper job of it, you must establish how much of the target mineral (gold, gemstones or whatever) that your recovery system is not catching when processing the raw material from each sample. You cannot just assume the recovery system being used is providing 100% recovery. You have to make regular tests of your tailings using other recovery equipment that can provide the most accurate results possible. During a preliminary sampling program, this usually means careful panning of random tailing samples.

On this program, since we had plenty of very experienced local panners giving us support, whenever possible, we directed our dredge tailings over near the riverbank where our helpers could pan everything that passed over the dredge. They would then show us what we were losing from the dredge.

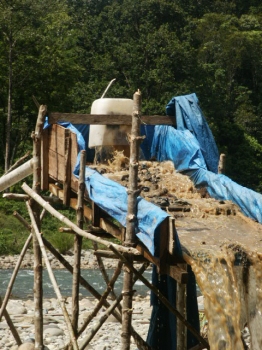
Since our most important samples were dredged out in deep water, Ernie and I ended up building a wooden box that we were able to suspend from its own floats and catch all the tailings from our dredge. After each sample was complete, while we processed the dredge concentrates through our special concentrator, local miners would carefully pan all our tailings for us.

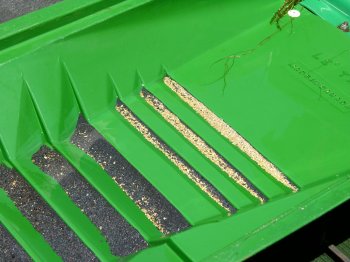
As it turned out, our losses from the dredge initially were quite substantial. This river had a lot of fine-sized gold that was just passing through our recovery system into tailings with sand. Within the limitations of the tools we had available to us in the field, Ernie and I tried different ideas to improve the dredge’s recovery system. Ultimately, Ernie came to the conclusion that the classification screen needed to be raised further away from the riffles in our sluice box. This allowed more water flow to help the riffles to concentrate. Working this out in the field gave us important insight into what would be needed in the recovery system on a commercial dredge in that area.

The following video segment shows the process we were following to work out how to recover the substantial amount of fine gold we were finding in the river-bottom deposits on this river:


video subscription graphic

By Dave McCracken

“Planning to Get it Right the First Time”

Dave Mack

Planning for a mining program largely involves the following elements:

1) Legal
2) Location and accessibility of the project site
3) Politics with government and local people
4) Timing
5) Operational considerations
6) Shelter and living-support
7) Specialized equipment
8) Supply of food, fuel, supplies and other needs
9) Security
10) Medical and/or emergency support
11) Communications
12) Personnel

All of these elements are vitally important and each must be managed well to make a mining program successful. I’ll just briefly discuss each element in general terms.


Sometimes, it is necessary to construct your own road into a remote location.

Because every project is different, relative levels of importance will change depending upon local circumstances. To give you some idea about this, I encourage you to read several articles about the challenges we have faced on different types of projects from our own past experience. Reading through the stories will give you insight into why good planning in advance vastly increases the potential for success in any project:

Legal

The serious part begins with acquisition of the legal right to pursue a mining project. While this is always important, the need to protect your own interest increases in proportion to the magnitude of your investment. It also increases in proportion to the potential for valuable success. My best advice would be to make sure your legal rights are secure during the very early part of the development-stages in your mining program.


Because gaining the legal rights to a mineral property can sometimes require substantial investment in itself, it is not uncommon to perform the preliminary evaluation, or even a preliminary sampling operation, before negotiation of legal rights are finalized. In this case, it can be wise to negotiate the final terms in advance, pending the outcome of your preliminary evaluation or sampling.

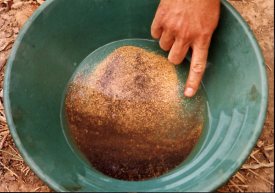
In other words, you might not want to buy or lease a mineral property until you are certain for yourself that a commercial opportunity exists for you there. And you also probably will not want to invest the resources to prove-out a deposit unless you are certain you can develop a project if something valuable is found. Balancing these two needs is a challenge that must be overcome.

Note of caution: In the event that you will invest your own resources into some preliminary field-work to evaluate a property before final negotiations are completed, some consideration should be given to keeping the results of your initial observation and results confidential. This is so that the information does not undermine your position in the negotiation. While this is not always appropriate (depends upon your agreement with the property-owner), it is definitely something that should be considered during planning.

The bottom line is that you will want to make sure that your investment into a project is going to be secured by legal agreements in advance.

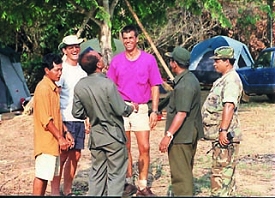
In some countries, dealing with the officials can be the biggest challenge to your project manager.

Another note of caution: One has to be particularly careful when negotiating agreements with private parties and/or government officials in developing countries. Sometimes corruption will undermine the rule-of-law. Under these circumstances, legal agreements may not be enforceable. The U.S. State Department usually publishes a brief risk-assessment about doing business in most countries.

In any event, if you decide to proceed, it is wise to secure the services of competent legal professionals residing in the country where you will do business.

Location and Accessibility


The location of your potential project site(s) will substantially affect the cost and difficulty of pursuing a mining program. Equipment, fuel, supplies and personnel must be transported to the site, and withdrawn when the project is complete. This will need to be accomplished either over land (using roads or trails), by water (using boats) or by air (using airplanes or helicopters).

“Remoteness,” these days, often has more to do with the cost of transport, than the distance things need to be moved. For example, a project site that is accessible by a 2-day river trip on a sizable transport-boat can be much-more easily accessible, than a site that is much closer to civilization, but requires everything to be transported via a 45-minute helicopter ride.


As every situation is different, important consideration and cost-analysis must be given to how you will move gear, supplies and people to and from your project site.

The more remote the location, the higher-grade the mineral deposits will need to be to justify a mining project.

Politics with Officials and Local People

Any mining program will find itself interacting with government officials and people who reside in the area where the activity will take place. The politics involved with these various relationships is important to maintain, and always will depend, in large part, upon good judgment and emotional flexibility by the project manager. This is even more true when local people will be hired to help support the mining project.

Environmental considerations fall into this element. Not just the true environmental consequences; but just as importantly, the perceived potential impacts that local people, various NGO’s and government officials worry about — even if their perceptions are not based upon reality. You have to manage the real environmental considerations, and you also have to respond to the way people are reacting to your mining program.

Managing relationships with officials in developing countries is a very challenging and risky business.

Because each situation is entirely different, no matter where you do your mining, the best advice I can give concerning this important element is to make sure you have a level-headed project manager that has some vision and understands that every action will have a consequence.


Timing

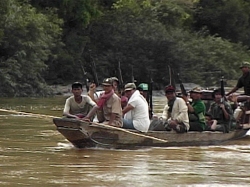
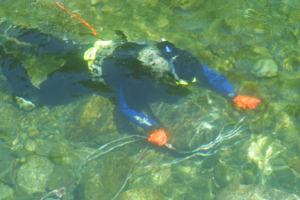
It takes very specialized people to recover good samples off the bottom of a muddy river.

Effective dredging operations require underwater visibility. Visibility is necessary to execute a planned excavation of a dredge-hole, and also for more than one diver to work underwater in the same excavation.

Muddy water turns visibility to pitch black just inches below the surface. Submersible lights do not help, because they will not penetrate through suspended sediments. So a dredger’s progress in dirty water is reduced to whatever he can or she do by feel. It is a very slow process, and safety-margin for the diver is radically-reduced.

Many mineral-rich areas on the planet have distinct wet and dry seasons. It is important to look into this. Because waterways most-often flow at higher, faster levels during the wet periods – and can also run with poor or no underwater visibility.

More often then not, Rainy seasons create conditions that prevent dredging operations from being effective. It is very wise to plan your sampling and production programs to begin at the beginning of the dry season.


Besides making dredging conditions nearly impossible, the rainy season can also turn road-access into a nightmare! As an example of this, check out the following video sequence that I captured on a road in Cambodia during the rainy season:

When operating in developing countries, unanticipated delays can often delay start-up times by weeks or months. So it is better to time such programs to have all the legal matters resolved, important relationships in good order, and equipment ready to go well in advance of the dry season. While this may sound obvious, more often than not, our Pro-Mack Team has been called in to help with dredging programs just as the rains were beginning and the river was turning muddy. The water was so dirty in the following video sequence, that it was pitch dark only inches below the surface:

Starting a dredge-sampling or production program during the rainy season is near to creating a mission-impossible scenario for the project manager. And your divers, no-matter how enthusiastic they are in the beginning, are likely to lose some of thier motivation to continue once they experience the nightmare of a dark and mucky river-bottom..

Still, sometimes you are forced to do preliminary sampling when conditions are not ideal. In this case, it is important to make safety the primary concern and also realize that results will only be a fraction of what can be accomplished under more suitable conditions.

Project operational considerations

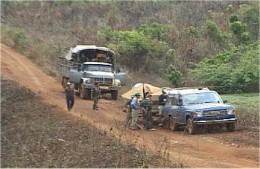
This is all about how you are going to do the sampling or production-part of the program. This is the mission-plan. What are you going to do? Where? For how long? Exactly how are you going to accomplish it? Who is going to participate? With the use of what gear and supplies?

Are you going to need a boat to move your equipment, fuel and people around on the river, or are you going to use roads or trails? Will your access to different places along the river be challenged by extreme fast-water areas, or water that is too shallow to float the dredge?

Are you going to set up a single base camp and return there at the end of each day? Or are you going to move the camp as you make progress sampling along the river?

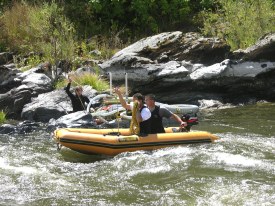
How deep is the water and streambed material? This will affect the type and size of dredge you will need to accomplish the job, how much dredge-power you will need, and how long the suction hose and air lines need to be.

Will you be dredging in fast water areas? This might require you to bring longer hoses to extend your reach while keeping the dredge tucked into slower-water pockets along the edge of the river.

Are there any critters in the water, or along the edge, that you have to defend against? What special gear is needed for this?

In some places, equipment to move big rocks is even more important than the dredge you will use. Are their big boulders that will require special winching gear to move?

Will you need to bring along special tools to cut a trail or to build living platforms in the jungle?

How are you going to recover the gold (or gemstones)? This is a big question that should be resolved as well as possible during the preliminary evaluation, and entirely confirmed during sampling. If a specialized recovery system or process is required, you will need to bring the gear and supplies along with you so you can perform those tasks.

Shelter and living-support

How you will feed and shelter the people who are part of your project largely depends upon the nature of the people involved, how dangerous or uncomfortable the environment is, and how long they will be there.


Generally, you will find that helpers from the local village have their own way of providing shelter for themselves and the food that they eat along the river. Sometimes, they don’t require much more from you than a plastic tarp and some rice. I have been in a lot of jungle environments where the local help either brought along their own hammocks and a cooking pot, or already had small shelters set up along for themselves the river.

It is important to address the needs of the local help (which are usually not much) during the preliminary evaluation, and not impose conditions (or food) upon them that they are not comfortable with.

Bringing specialists into a harsh environment from the comforts of civilization requires careful planning. While this may not be true everywhere, it is my own experience that while local helpers are somewhat amused by the special requirements of westerners, they usually do understand that we are not jungle-dwellers like they are. However else they may feel, there is always respect (and desire) for the nice toys and tools that we bring along.

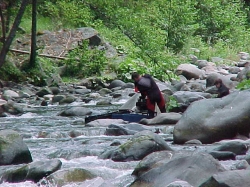
Sometimes, the most important part of shelter is to get off the ground.

The bottom line is that you must bring along whatever is necessary to shelter your personnel from the dangers and any severe discomforts of the environment. Every place is different. A tent goes a long way to keep bugs and (smaller) critters separated from people. Sometimes (often) it is necessary to set up camp off the ground, even when tents are being used. This may require bringing along some wooden boards to put up a platform. Sometimes the platforms already exist, made out of lumber, bamboo or small trees. Sometimes they can be constructed from materials that are present on site. For example, the following video sequence shows a preliminary base camp where tent platforms were constructed from hardwood lumber sawed out of trees on site (with a chain saw):

The locals will know what you need to do to keep your personnel safe from the more serious threats. You will have to use your own judgment how to provide people with support that will keep them reasonably comfortable under the circumstances. It is important to figure this out during the preliminary evaluation.

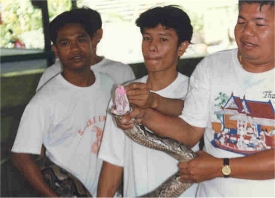
On many of the projects that I have been involved with, we hired several helpers from the local village that were also good at hunting and fishing. This reduced the amount of food that we needed to bring along.
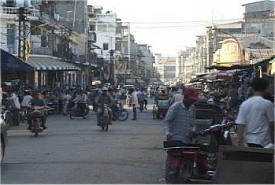
A word of caution: When hunters bring dogs, it is wise to avoid making very much contact with them. These jungle dogs are loaded with critters that would much-prefer a human host! Hunting dogs generally increase the need to reside off the ground.

Another word of caution: When living with jungle-dwellers, you must be especially vigilant at imposing strict sanitary measures with anything to do with the food and water that you will consume. This is not easy; because your jungle helpers will not understand, and it is near-impossible to overcome normal routines that are part of their life and culture.

There is a lot to be said about bringing along a special cook who will look after the food and water-needs for the personnel on the team that come from non-jungle environments. This must be a person who already understands basic sanitary principles; and ideally, who normally resides within an environment where such measures are practiced. We have found from past experience that it is too late to try and teach sanitary measures to someone (who will prepare your food) after you arrive in the jungle. And since you cannot watch everything that is done to prepare your food, you can find yourself with a whole crew of sick (sometimes seriously) people even before you hardly get started!

The bottom line is that you have to plan on providing food and water that will not make your people sick, and it is important to provide them with a reasonably comfortable, safe environment to sleep at night.

Specialized equipment

As we have discussed equipment needs in other articles, I will not go into them here. The main point is that you must bring along the gear that will allow you to accomplish the mission.

When accurate samples are required where special recovery equipment is needed, and the sampling must be accomplished with portable dredging equipment, it is sometimes necessary to dredge the samples into special, floating catch-containers. Then the samples can be carefully processed on land.

Here is where you can buy Gold Prospecting Equipment & Supplies.


Supply of food, fuel, and other needs

It is important during the preliminary evaluation to establish where you will acquire fuel, food and other supplies to support your program. There are many primitive areas in the world that do not have structures, services and supplies like we do in the west, so you cannot just assume operational needs will be readily available. For example, the following video segments show areas where we have had to supply mining projects where even small corner food markets are not present, much less Safeway or Albertsons:

Sometimes, access is such that you can plan for a continuing supply of essentials and other needs as the program moves forward. Sometimes, difficult access requires that you bring everything in at the beginning, or plan on occasional deliveries. To keep costs down, deliveries must often be arranged by local boat traffic or by cart over primitive trails. The following video sequence was captured on a project we did in Madagascar, where local deliveries were made by ox cart:

Occasional or regular deliveries increase the need for dependable communications and financial arrangements so that you can better-coordinate with those who will provide the support from a distance.

As there is no refrigeration in the jungle, it is usually true that hunters will need to come up with something every day to keep meat or fish on the table. Even if local help will provide a local supply of protein, we have found that it is a good idea to bring in a supply of freeze-dried meals or canned goods – just in case the hunters have a dad day. Being hungry is hard on morale!

Security

Security is always a concern on a mining operation, on multiple levels. There is the gear out on the river, the gear and supplies at the base camp, the personnel involved with the operation, and the product that is being accumulated. Understandably, every situation is different; so flexibility and good judgment is required.

Under a lot of circumstances, many security concerns can be resolved by investing some advanced-effort and goodwill into the politics with the village(s) in the surrounding area, and with the local people that are hired to help you. A good manager will strive to find the balance between helping a little with the needs of local people, with getting the job accomplished that he is there to do within the budget he has to work with.

One of the first key people to hire in a mining program is a good interpreter. This must be a person whose politics are not in conflict with the local villages. It is important that you enquire about this, because sometimes there are politics going on that you cannot see on the surface.

One of the first priorities during a preliminary evaluation is to pay a respectful visit to the village chief or elder(s). Bringing along a bottle or two of whiskey to present as a gift (unless it is a Muslim community) is almost always a great inroad, and eliminates the requirement that you drink the local brew (which can make you sick) when making friends.

I always make a strong effort to bond with the leaders of the local village(s). For the most part, it is accurate to predict that politics with the local people will go just about as well as you have made friends with the local leaders. Here is a place where a little time can be invested well.

When visiting with local leaders during the preliminary evaluation, I look around to see what I might bring as meaningful gifts that can be shipped over with the sampling gear if we decide to take things to the next level. I am not talking about spending a lot of money on gifts. Flowers don’t cost very much, but look how much they are appreciated when you present them in a meaningful relationship! Thoughtful gestures go a long way in a new relationship, especially when there is a wide gap between the cultures and the toys being played with.

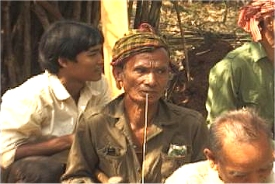
Being thoughtful in advance can be far less costly than the loss of key gear or equipment by theft, once you are committed to a sampling program.

Some mountain-river environments have very limited access, and not very many people or traffic are moving around. These communities can be rather small, and there are not many secrets. If the general consensus amongst the local people is to support you and/or leave you alone, you will usually not have very many problems with security.

Sometimes you have to resign yourself that there will be a continuous audience of onlookers watching the mining activity along the river. This is mostly because local people have never seen anything like that before. So it may be necessary to work out some reasonable boundaries with the village elders.


Whenever possible, we set up camp some distance away from the local village. This is good practice for a number of reasons. But mainly, it sets up a natural boundary (by distance), creating some degree of privacy. I have never been on a project where local villagers did not respect the privacy we created by setting up our camp some distance away.

I have also found that bringing along some small gifts (like extra pocket knives or Leatherman tools) goes a very long way with the most productive helpers. Although, I keep those out of site, and only pass them out after I have managed some initial bonding with some of the helpers. Special rewards to the most enthusiastic supporters can help build productive relationships.

Generally, we have found that if you treat them with respect and kindness, helpers from the local village understand that we are not the same, have special needs that are different from theirs, and possess desirable belongings from another world – which belong to us. If something turns up missing, I usually make an issue of it right away. This can cause the item to turn back up a little later and eliminate future problems in this respect.

Places where your personnel are in danger from other human beings will require site-specific security measures. Some mineral-rich areas have ongoing civil wars, separatist groups or insurgencies to worry about. Some places have people or groups that kidnap outsiders and hold them for ransom as a means of supporting themselves and their political movements. Needless to say, these are concerns that are important to discover during the preliminary evaluation. Such concerns will almost always be outlined within the State Department’s information about the country. The following video segment was taken in Cambodia on a project where it was necessary to maintain our own local security force:

Increased security problems raise the level of cost. Therefore, the mineral deposits must be richer to justify the risk.

Some careful thought needs to be given to how you will secure money, gold or gemstones, sample results and the other valuable possessions during a mining project. This should probably involve a security safe during an extended production program.

During a sampling program, it just might be that the project manager needs to keep the valuables in his personal possession. Waterproof bags are good to have along for this.

A word of caution about this: If you are making payments to others in the field during a project, it is unwise to pay directly from the source of where you are keeping the valuables. For example, opening up the day-pack where you are keeping all the valuables to pay a vender in the village. Because secrecy is the only security you have protecting those valuables, it is better that outsiders do not see where they are being kept. Keep the bigger money-stash a secret from anyone who does not need to know. In a private place, pull out enough to pay for things, holding that money in a pocket, wallet, belt-pack, or whatever.

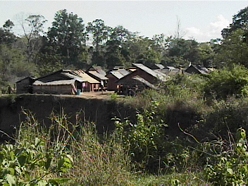
This secrecy-concept also extends to the gold you recover on a mining program. Especially during production! We always set up the final processing structure well away from local traffic, and only allow those near that should or must be involved. The product is never shown or advertised around. It is also hidden like the money, if there is not a well-anchored security safe where it can be locked up.

Showing large amounts of money or other valuables (relative to local levels of income and wealth) is a sure-way to increase security-risk on any mining or sampling operation.

As long as we are on this subject, you also should be careful with your valuables in hotel rooms within developing countries. Keep valuables out of sight, locked up in a suitcase, on your person – or sometimes the hotel provides a safety deposit box. You have to use your own judgment what is the best way to keep things safe. It can be a big mistake to assume the hotel staff, or even the manager, will not go through your room and belongings when you are not present!


Medical and/or emergency support

When setting up a mining program, it is important to establish how and where your personnel are going to receive medical care if they need it, and also emergency support if there is any kind of serious problem.

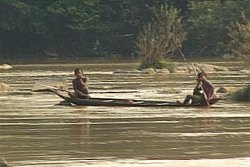
A lot depends upon how inaccessible the project site is. When there are villages nearby, you can sometimes find some local medical assistance for matters that are not of a serious nature.
The villages sometimes will have a method worked out to manage medical emergencies.

Sometimes you can locate an emergency-evacuation service from a larger town or city that will send a helicopter or small plane to recover someone who needs emergency medical care. It is a good idea to arrange this service in advance, and work out how you will communicate with them in the event that you need their help (at any hour). It is a good idea to arrange a medical-evacuation service, even if there are local medical services available. This is because medical care generally is better as you get to larger hospitals that provide service to bigger populations


There is also international emergency medical evacuation insurance available at relatively low cost. This service will send a medical team out to recover you in a medical emergency anywhere in the world when competent medical assistance is not available where you are located. We always require any and all personnel who accompany me on a project outside of America to obtain this type of insurance.

While there are probably many other options for this type of insurance, I have personally had good luck with Travelex Insurance Services (800 228-9792). They provide $50,000 in world-wide medical evacuation/repatriation insurance, plus other benefits, at a cost of around $260 per year. And I happen to know that they make good on it. One of my guys was critically injured in an automobile accident during a project in Madagascar several years ago. Local medical care was poor. So the insurance company immediately arranged to send an airplane with a medical team on board. They evacuated my guy to La Reunion Island (France), where they proceeded to save his life. As soon as he was safe to move again, they repatriated my friend to a hospital in San Francisco. He survived only because of this insurance.

The type of work, and the environment where we perform it, is already dangerous enough. Preventative measures are the best way to avoid medical emergencies. The more remote the location, the more careful everyone has to be.

During preparation for a project, one of the first things we do is have all my helpers go into the local county health department (America) and bring themselves up to date on every inoculation that makes good sense for the location where we will do the project. Because we work in the water, it is important that my guys are up to date on their hepatitis, typhoid and tetanus shots. In addition, county health departments have written guidelines (put out by the World Health Organization) for all areas of the world, listing other concerns (and preventatives) for specific areas.

The three primary ways to get into a medical situation during a project are:

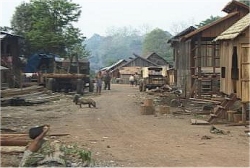
A) Accidents: While accidents do happen, they mostly can be avoided by planning things out well in advance and having responsible people involved who are being careful. Good management and responsible people can generally stay a few steps ahead of Murphy’s Law (Anything that can go wrong, will go wrong, at the worst possible time!).


No matter how good they are at what they do, we never include “wild and crazy guys” in projects where I am asked to participate or provide a team. The risks to the project are too high.

B) Critters: The local people will know what they are and how to deal with them. It is important to find out what the threats are, especially within the water-environment where we work.

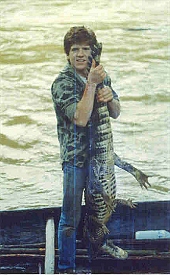
Because we dredge in the water during the sampling phase, it is vital to find out what the critter-problems are (if any) during the preliminary evaluation.

When I first visit a potential project site, one of the most important things I look for is to see if local villagers are bathing, doing laundry and swimming in the river (especially the children). It is always a good sign if they are. Life revolves around the water along these river-communities. So if you do not see people in the water, it is important to find out why.

There are plenty of things to worry about in the water – like snakes, flesh-eating fish, flesh-eating reptiles, electric eels, different types of aggressive mammals, and smaller critters that make you sick in different ways. The local villagers will know about them all (if any). They will also know how to avoid danger. When talking to the locals about the potential dangers to divers in the water, I cannot over-stress the importance of having along a really good interpreter – who will take his time and do his absolute-best to establish some dialog and understanding on this important subject.

If there are local villages within the vicinity of where we will do a project, during the preliminary evaluation, I try and visit each and every one of them. Besides the other things that I do during these visits, I also try and find out if there are sick people in the village – and what they are sick from. In addition to gaining an idea if the sickness might be something that could impact upon our project, it also creates an opportunity to return with medical supplies to help the village if and when we follow up with a sampling program. Helping the sick people in a village is a sure-way to make friends.

C) Sanitation: During my visit to the local villages, I also look to see what they are doing for toilet facilities. If they are going right out into the river, we will need to bring along our special full-face dive helmets to reduce exposure to dangerous bacteria.

Often, the primary sanitation-concern is inside your own base camp. Not to get too graphic about this; but it is common practice all throughout the developing world (especially in the remote areas) for people to wipe themselves with their hand, not wash well (if at all), and then go directly into food-preparation. Locals normally can drink water (with apparent impunity) from the river (or a well having ground water exposed to unsanitary conditions from the village); water that would put an outsider into a good hospital for a week (and there probably won’t be a good hospital around under those circumstances)! They use that water for drinking and cooking. Because these are practices everyone does in their community, and they are part of their everyday world, it is nearly impossible to have locals do food preparation for you without substantial risk to your personnel.

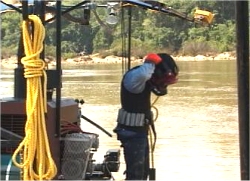
The best way to avoid continuous problems with sanitation (can be very serious), is to set up your own camp some distance away from local communities and bring in your own cook. This can be someone from the same country who lives in an environment where sanitary-measures are a normal way of life. Then, your cook must insist that he or she is the only person that comes in contact with the food that you will eat and the water you will drink (and that will be used for cooking). This can be a little tricky when there are hunters or fishermen involved, but it can be worked out.

When initially setting up a base camp, it is important for the project manager to walk through and review all the vital elements that will affect sanitation. How and where are the toilet facilities set up? Does everyone know where to go? Is there tissue paper — and will people actually use it? Is there a place to wash up (with soap)? Where is the drinking water coming from and being stored? Is that being kept well-separated from unsanitary water? Do all your personnel know where to find the good water? How about the cooking water? Where are the cooking and eating-utensils being cleaned up and then stored? Who is cleaning game animals, how and where?

We also always bring a medical kit along. Besides the standard items included in an emergency medical kit, here is a list of items that we also include:

Aspirin
Anti-Rash powder/spray
Domeboro-ear preventative
Ear antibiotics
Eye wash
Hydrogen peroxide
Antibiotic ointment
Pain pills
Internal antibiotics for wounds
Antibiotics for respiratory-infection
Diarrhea antibiotics
Lip balm
Salt tablets
Thermometer
Malaria medicine
Alka Seltzer
Tums (anti acid)

While all of these items can be purchased over the counter in many places outside of America, it is wise in today’s world to obtain a doctor’s written prescription for any items that would require it during international travel.


Communications

Several levels of communication are necessary in a mining operation. Communication is usually necessary between project personnel and local helpers, between the different personnel involved with the project, and between the project and the outside world.

For communication with locals, I cannot overstress the importance of finding someone who knows each of the languages very well, who is honest, helpful and genuinely interested in your project. This is just as true when dealing with government officials.

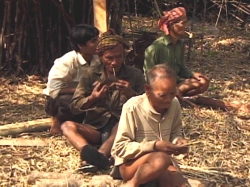
An enthusiastic interpreter will dig for the information that you want to obtain. When communicating with local people on the river, sometimes it is necessary to ask many questions in different ways, to different people, to bring them around to the same concepts that you are trying to express. When you work with people from different cultures who have radically-different backgrounds, often you find that they just do not conceptualize things the same way that you do. A good interpreter is able to bridge this gap and help you get the information you want with some degree of accuracy. He will also help you avoid misconceptions or misunderstandings that can build up stress with locals along the river.

There are plenty of low-cost weatherproof walky-talkies available today which can be very helpful in a field environment where personnel are separated by relative short distances – like between the base camp and where some mining or sampling is being done along the river.

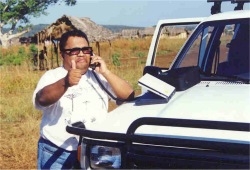
Longer-range radios are often used between the base camp and civilization. Although atmospheric conditions sometimes make this mode of communication unreliable.

Satellite phones keep getting more portable and easier to use as time moves forward.

The cost of satellite telephone systems has come down dramatically during the past few years, and is probably the best solution for a remote base camp’s link to the outside world. Many satellite systems will allow a laptop computer to be connected for data-transfer. This is particularly useful for sending progress reports and images. It is also useful for sending supply lists to whoever is supporting the operation. A satellite telephone is very valuable in dealing with emergencies!

Personnel

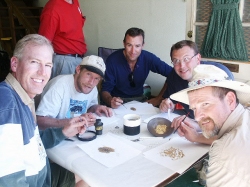
I saved this section for last, because it is really the most important. If you study all of the material on this web site, you should realize over and over again that it is the personnel on your project that determine the final outcome. They are the key factor that makes it all happen.

Mining projects are not easy. There are many challenges to overcome. Every decision made by the manager and others involved with your project will move the world in a direction that either contributes or subtracts from the momentum necessary to reach key objectives. Ultimately, the people you choose to play in your band will determine exactly how the music sounds. I have discussed this very important element in other articles:

There are so many details that must be put in their proper place and managed correctly to accomplish a successful sampling program, or a production mining operation, that there is little chance of ultimate success unless the program is managed and implemented by experienced, responsible, enthusiastic people that are strongly motivated to make it all come out the right way.


video subscription graphic
This story first appeared in Gold & Treasure Hunter Magazine
Sep/Oct, 1998 on Page 4. This issue is still available! Click here.

By Dave McCracken

“Discovering a King’s Ransom of incredibly rich blue stones in Madagascar!”

Dave Mack

sapphireI am writing this on my laptop computer from a comfortable and well-equipped base camp in the remote reaches of northern Madagascar, where the natural resources are very plentiful but almost completely undeveloped. The country was under control of a dictator until just a few years ago. Now, like many other mineral rich countries free from the iron grip of communism, and eager to catch up with the western world, this country is allowing mining exploration companies to locate and help develop its very rich resources.This country is verypoor; especially in the rural areas, where much of commerce, and even people, are still being transported around on wooden carts being pushed or pulled by barefooted men:

The 
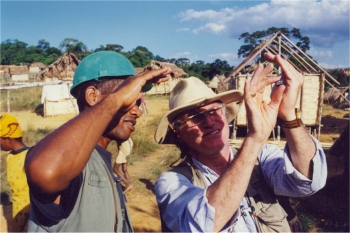
weather here is very, very hot. Blistering! I am sure to lose the skin off the back of my neck from several hours of exposure today, even with my safari hat on. The natives work directly in the hot sun all day, every day. It does not seem to bother them.

This country has never been explored for mineral resources with the use of modem technology. Most of the natives are not even using shovels! Most often, they use small metal salad bowls to excavate the sapphire-rich gravels from their digging holes. The gravels are loaded into burlap bags and carried long distances to the nearest water for processing. Sometimes water is miles away. Some miners process less than a cubic foot of gravel per day. Yet, they have bags of rich blue sapphires to show for their effort.

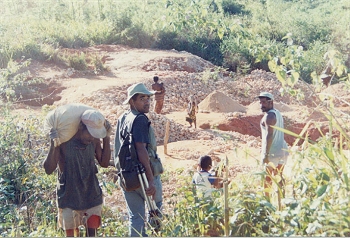
This morning, our guide took us out to a small digging area close to this camp. There has been a substantial rush of Malagasy miners into this area because of a very recent sapphire discovery of huge proportions. As the discovery continues to be defined and developed over the coming months and years, it will likely evolve into one of the largest sapphire finds in history.

We are fortunate to be here right at the beginning. No other western mining companies are here, yet. There are presently an estimated 10,000 (and growing) Malagasy hand-miners working in the field. But, the deposit is so large, they have not even scratched the surface. And because the truly-rich stones come from deep diggings, these hand-miners will need to settle for the surface deposits, which by themselves, are enormously rich.

Here follows an explanation of the commercial potential by my longtime personal friend and mentor, Sam Speerstra:

The small area we went to this morning was being dug by hand-miners less than a meter below the surface. They were turning up lots of nice blue stones, some of them large in size. The excitement was felt everywhere. Even young children were digging and pulling blue stones. It was explained to me that it only takes one good stone to support a local family for a year or longer. Such stones are being found every day by hand-miners. A truly good stone can set a family for life. These turn up often. But the best stones are found deep, where only heavy equipment can go. The largest sapphire found so far was discovered near here only several months ago! The native who found it, and all his heirs, are set for life!

Check out this video sequence that I captured during one expedition we made into the sapphire area. It shows how these simple and friendly people are pulling so much wealth from the earth:

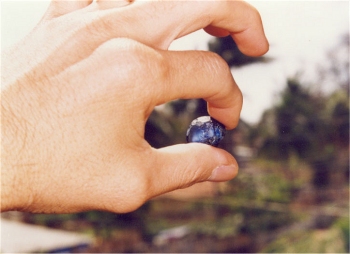
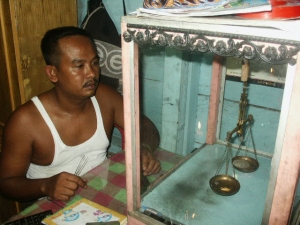
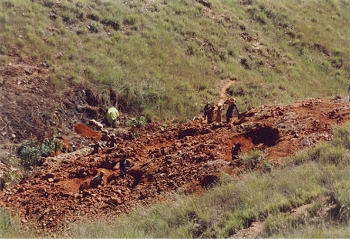
While they also do the mining activity right alongside the men, it is usually the woman that are selling gemstones to local buyers (who are also mostly women). Clearly, the women in these remote reaches of Madagascar have the most business savvy. I captured the following video sequence of a short buying transaction. Watch how firmly this woman holds to her (high) price of $4 for a beautiful blue stone, despite the fact that she probably had to sell it at any price to feed her children that evening:

My client is the person who owns the commercial rights on a lot of this property. The local hand-miners are providing a very valuable service, even though they are removing millions of dollars worth of stones from his properties. Where local miners are finding great value at the surface, mechanized equipment will turn up a treasure trove of the highest-quality material upon bedrock, several meters below. One small mechanized operation has been recovering as much as 50,000 carats of sapphires per day along the bottom in just one area.

My clients expect to recover 370,000 carats of gem-quality sapphires out of just one small dig over the period of about a year. That is a conservative wholesale value of 15 million dollars for one small dig. Yet this is only a drop in the bucket. They are planning to launch several simultaneous operations; but they admit that they will never be able to effectively cover the vast rich deposits located on their concessions. The deposit is estimated to cover at least 100 square miles!

This afternoon we visited a boom town that has recently sprung up in this area. I would estimate this one town contains at least 5,000 people. The entire community has developed during the last several months solely around the sapphire mining. Hustle and bustle and excitement are everywhere. Big trucks and small vehicles of every kind and shape are flowing into the town from other locations to bring necessary supplies to support this activity. A lot of people are getting rich here, and are displaying their wealth. Gold jewelry is almost unheard of by the working class in Madagascar, where the prevailing minimum wage is less than ten cents per hour. But there is a lot of gold jewelry in this boom town; it is around people’s necks, on their arms, at shops along the very crowded marketplace, which is nothing more than bamboo and rattan huts by the thousands. Fortunately, I had my video camera with me and was able to capture the following sequence:


I saw one man tied to a tree with his arms fastened to his sides in the central part of the boom town. I assume he was caught stealing or jumping someone else’s claim. Justice is dealt out harshly and swiftly here. It is a good place to stay out of trouble!

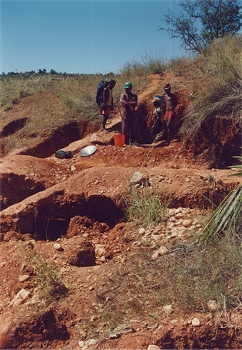
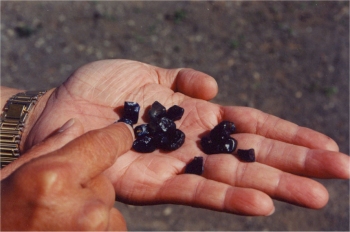
Sapphires were being shown and traded everywhere in this boom town and elsewhere. In fact, I have not gone anywhere during the last week where people have not flocked to me, asking if I want to buy sapphires. Because we are white, and presumably rich, people are literally attacking us with their sapphires; handful upon handful of rich blue and green stones. I saw some the size of cherries, and am told they are being found much larger. Today, I could have bought buckets full! At one point this afternoon, I thought there was going to be a riot, or that we would be crushed by the sheer force of people trying to sell us these beautiful stones for pennies on the dollar of their actual worth. I was told to not take any money out of my pocket, for fear of a stampede. Sapphire buying under these conditions could be dangerous!

Some of the sapphires shown to me were absolutely breathtaking. They are like nuggets of blue, radiant, transparent beauty. Mesmerizing or hypnotizing, these stones are really getting to me. I have felt gold fever in my previous exploits. I was struck with treasure fever a few years ago on a dig in Central America when we uncovered a hoard of pre-Columbian gold treasure. But sapphire fever is something else altogether. Maybe it was a combination of a number of factors — perhaps the high excitement level of all those people pushing these incredible stones at me. But the way the sapphires radiate a sea-blue color when held in the light creates a captivating lure which is very hard for me to overcome. Every uncut stone is different, each with its own radiant life-light and individual character. Short of actually being there to experience it directly, this following video sequence is the best I can do to demonstrate how beautiful these stones are:

Since I am here at the bequest of clients, I have behaved myself and focused on capturing some of the experience with my camera. I have to close now because we are getting ready to plan tomorrow’s events, which, I am certain, will be every bit as exciting as today. Tomorrow we will visit a place where several thousand hand-miners are digging their fortunes with nothing more than salad bowls!

****** Following day:

Tonight, despite my exhaustion, I cannot shake the excitement from what we witnessed today in the sapphire diggings.

I thought the last few days were blistering! Today, to get to this new discovery, it was necessary to hike several miles up a rather steep incline to the top of a mountain plateau, where literally thousands of hand miners are working a newly-discovered shallow sapphire deposit of enormous proportions. It must have been 120o F in the shade! Unfortunately, there was little shade to cover our ascent of this mountain.

We were traveling light, though, compared to the hundreds of local supply couriers who were hauling materials up the mountainside to support the extensive mining activity happening at the top. I saw people carrying huge loads, mostly of food and basic supplies. Even the younger, stronger couriers were sweating today.

At the top, we found yet another sizable boom town of at least a thousand people. There were restaurants and shops of all sorts. Three weeks ago, there was almost no habitation here. This shanty-town has been erected along both sides of the trail, just on the down mountain-side of a big strike. Excavation pits are everywhere, all throughout the town, and even along the narrow trail. My first thought was to make certain to be off the mountain before dark. Some of the excavation pits had no bottom in sight. What a shock to fall in one of those pits at night while looking for the bathroom! What bathroom?

I captured the following video sequence, which was taken at a water (mud) hole where women and children are processing the sapphire-rich gravels that are being packed in from miles away on the backs of miners:

We did not nearly reach the top before local miners started approaching us with their stones. Local stone buyers were around everywhere, as this is where stones can be purchased at the lowest price. The miners came to us in hopes of receiving more money for their labor. So we were slowed down a great deal by the scores of miners who wanted us to have a look at what they had found. This did not conflict with our mission, though, because we went there for the exact purpose of seeing what the local miners are finding. There is no doubt the local miners are finding impressive volumes of rich blue sapphires!

I captured the following video sequence of even children wanting to sell us handfuls of beautiful stones:

The diggings were so extensive that we could have easily devoted an entire week up on that single plateau and not see it all. We picked only one erosive canyon to explore on this day, and it kept splitting off over and over again, with mining going on up every split that we saw. So we only touched upon a small portion of the diggings.

Most of the excavations were small in size, with a bottom in sight. I think the reason for this is that the dirt and gravel must be packed out of the holes. At the point where the hole becomes deeper than three meters, the material needs to be taken out in buckets on ropes. This takes additional helpers. I am assuming the miners must have decided that it is more efficient to dig out of shallower holes. And digging they were, everywhere we went!

This arrangement makes my clients very happy, since the pothole method assures less than a third of the surface deposits are being worked, and almost none of the deep deposits, where the truly rich stones lie waiting. I say only a third of the surface deposits; because in their haste, the local miners shovel their tailings and waste material over about two thirds of the ground while digging their pits. Then, rather than dig through their own tailings again, they move on to a new location once an excavation pit becomes too deep to work efficiently. There is no shortage of new places to work. People were digging everywhere, with everyone we saw having sapphires for sale.

Here follows just one of many buying sequences that I captured on video today. It shows world-class gemstone specialist, Tom Banker, pay a local miner the price he was asking for a rich, blue stone:

The upside for my clients is that they can follow up in the abandoned diggings of the hand-miners with near certainty of making an easy fortune using mechanized earth-moving equipment. Here, Sam Speerstra explains how the geology of the area has caused the sapphires to form rich concentrations:

We did, however, see several deep digging operations today. One had miners down in a very deep hole, using buckets and ropes to get the dirt and gravel to the surface. We were told the excavation was over 30 meters deep. This group had the biggest and highest-quality stones we saw all day.

Here follows a video sequence showing Tom checking out one of the largest sapphires we bought today. I paid the full asking price of $100 for this stone. Tom says it will weigh 7 or 8 carats after it is cut and polished in Bangkok:

I saw one miner going into a deep, narrow hole with a lighted candle in his hand to illuminate his work area. He was smiling. Going down into that small, unsupported crawl-hole, I would not have been smiling no matter how rich the sapphires! My clients asked if I wanted to capture the underground diggings. But fortunately, the batteries for the light to my video camera were not charged. Too bad!

Another larger group of hand-miners had apparently tapped into some kind of natural cave system, saying that they were excavating several kilometers into the earth. They also had very rich stones to show for their effort.

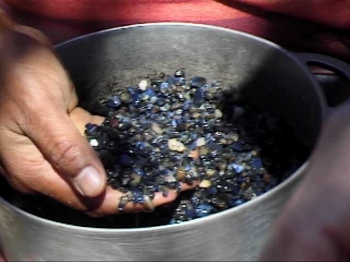
Man, did we see sapphires today! Handfuls! Bucketfuls! And some big ones! Beautiful, radiant sea-blue. I love sapphires! I never paid much attention to them before. Now I want to have some for myself. Big blue ones that radiate that special magic feeling…Check out this following video sequence, and I think you will understand what I mean:

I am told this new area we visited today has sprung up over the past three weeks. My clients surveyed this area a month ago, and say there were only just a few miners, and no town existed there before. Now the place is crawling with people. I am told this very same thing is happening all across a very large geographical area.

This adventure is just beginning, and I look forward to future visits to follow the development of this magnificent find.


video subscription graphic
This story first appeared in Gold & Treasure Hunter Magazine Nov/Dec, 1991 on Page 29. This issue is still available! Click here.

By Dave McCracken

It is nearly always important for a prospector to target his or her sampling efforts to reach the bottom of hard-packed streambeds.

Dave Mack


Successful mining in streambeds is generally accomplished in two steps: (1) prospecting and (2) production. This is true on any scale of operation. First, you need to find a gold deposit, usually a pay-streak. Once the deposit is located, then you can concentrate on a production program to recover the gold from the deposit.

Prospecting generally consists of digging or dredging sample-holes in different locations, then comparing the results of the different samples. Through trial and error, the positive signs are then followed into high-grade gold deposits.

In a waterway, the first effort should be to locate the common path along which most of the gold typically travels. Sampling is then performed along that path to find the pay-streaks. This system is thoroughly outlined in Gold Mining in the 21st Century, and Part 1 of Advanced Dredging Techniques.

Dave’s Books & Videos

The following video clip also demonstrates this very important principle:

When you are sampling, you should nearly always be looking for hard-packed streambed material. “Hard-pack” is created at the bottom of waterways during major flood-storms.

Generally, a winter storm, even a large winter storm, will not create enough turbulence and force within a river, creek or stream to redeposit the compacted streambeds that are already in place along the bottom.

Flood-storms of the magnitude to redeposit streambeds do not occur very often.

For example, on the Klamath River in northern California, where my own team dredging operations take place during the summer months, we believe the last time that a substantial amount of hard-packed streambed was formed was during the 1997 flood. An even larger storm took place in 1964. In many places, a 1964 flood-layer was laid down on top of a much older, harder-packed, virgin streambed — one formed perhaps thousands of years ago.

To give you an idea of the magnitude of storm that it takes to create hard-packed stream-beds, take a look at the following video sequence I captured just down river from Happy Camp during the flood of 1997:

So, it takes a major flood storm to move and lay down a hard-packed streambed. And, it takes a super-sized major flood storm to create enough force and turbulence in a river to break up ancient streambeds and redeposit them as newer hard-packed streambeds along the course of the waterway. This happens only very rarely.

The reason that hard-pack is important to a prospector is because gold nearly always concentrates at the bottom of hard-packed, flood layers. Therefore, it is nearly always important for a prospector to target his or her sampling efforts to reach the bottom of hard-packed streambeds.

The following video sequence shows exactly what hard-pack looks like. I captured this video during a Group Mining Project in a location where we were recovering a rich gold deposit from the bottom of an ancient streambed layer resting on bedrock:

Gold is about six times heavier, by volume, than the average weight of the sand, silt, and rocks that make up an average streambed. Because of this disparity in weight, when streambed material is being washed downriver during a major flood-storm, most of the gold will quickly work its way down to the bottom of the streambed material that is being carried along by the raging flood waters.

In the following video segment, watch how fast the gold penetrates average streambed material once it is placed into suspension. The second video segment provides a visual demonstration of this very important point:

Because the gold is so much heavier, it will work its way down along the river-channel more slowly than the other streambed materials. During major flood-storms, most of the gold moving in a waterway will be washed down across the bedrock, or across the surface of hard-packed streambed that is not being moved by the storm. At some point during the storm, gold becomes trapped out of the turbulent flow by dropping into irregularities, cracks and holes that are present along the surface over which it is traveling.

Placer Geology

As shown in the following video segment, other heavy materials, like lead and old iron objects, also travel and deposit in the same places as gold. These other materials can sometimes lead you right into a rich gold deposit:

Because of its enormous weight, gold also deposits much earlier during the course of the storm than the streambed material which eventually seats itself on top of a pay-streak. As the storm begins to taper off, and the water-forces begin to slow down, particles of gold will start dropping out of the flow. Along the path where most of the gold is traveling in the waterway, traces will be deposited, with more substantial pay-streaks forming within the larger, low-velocity areas. These gold deposits are being laid down even as the (much-lighter) rocks and gravel are still being washed down river with the storm flows. Streambeds form later in the storm, when the water-turbulence tapers off enough to allow the rocks, gravel, sand and silt to drop out of the flow and form a seated bed along the bottom (over top of the gold).

Streambed material that lies in on top of a pay-streak will nearly always be hard-packed. The reason for this is that if there is enough force and turbulence to move substantial amounts of gold in the waterway, then there is also enough force to create a naturally-formed streambed on top of the gold as the same storm tapers off.

How do natural streambeds form? First, the storm needs to be powerful enough to rip up the streambed material, put it into suspension, and wash it down the waterway. This process is similar to gravel washing through a sluice box, only on a much larger scale. During the later course of the storm, as the water-force and turbulence starts slowing down, natural obstructions or traps along the river-bottom will allow certain key rocks to become lodged or seated. An example might be a flat rock that drops into a bedrock indentation, with the forward edge of the rock pointing slightly downward into the flow. The water-current then holds the rock to the bottom. With this rock in place, new locations are formed for other rocks to become lodged. Smaller rocks, sand, gravel, and silt will fill every gap and crevice in a manner similar to the mortar used to cement layers of brick. More rocks then fall into place. More filler then packs the spaces created between the rocks, and the bed forms.

Hard-packed streambeds form mostly with the flat rocks lying horizontally and slightly tipped downward against the direction of the current. The way in which streambeds form during major flood storms leaves the bed-material seated and compacted together, much like a mechanical structure. In dredging, we call this structure “hard-pack.” Most of the gold in present waterways is covered over by hard-packed streambed. So it is very important to know what it is. The following video segment shows you exactly what to look for:

For substantial amounts of gold to move within a waterway, it requires a major flood-storm with enough power to blast up some of the pre-existing hard-packed streambeds. This is because most of the existing gold in the waterway is trapped below existing hard-packed streambeds.

It is the abrasive action of the streambed material (more like a huge band-saw), as it is being washed down along the bedrock during major flood-storms, that causes bedrock channels to cut deeper into the earth over geologic time. When such a storm tapers off, new hard-packed streambeds will form over top of the gold deposits.

“Loose-packed” material consists of sand, silt, rocks and gravel which possess little or no natural structural cohesiveness. When you dredge a hole down through loose streambed material, it keeps sliding in on you. Digging through loose-pack can be like trying to dig down through a pile of sand or gravel. The material keeps slipping into the hole. This makes for a much more difficult sample hole if the material runs deep.

Sometimes, loose material is resting on top of a hard-packed streambed and must be moved out of the way first, before the hard-pack can be properly sampled.

When you dredge a test hole through hard-pack, the streambed will generally hold up the wall surrounding the hole. In fact, many of the old-time operations tunneled underneath hard-pack. This was/is called “drift mining.” Sometimes they even tunneled directly under active rivers!

It is also important to be able to identify tailings. Tailings are easy to identify, as long as you understand how streambeds are mined. Tailings do not look either like hard-pack or loose streambed material.

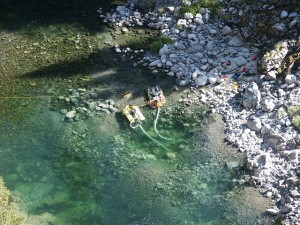
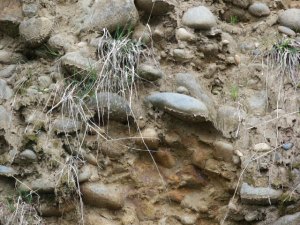
When hard-packed streambed is being mined, the cobbles and boulders (i.e., rocks that are too large to pass through the recovery system) are tossed back onto a pile behind the production area. As the production area moves forward, piles of boulders and cobbles are left behind in place of the original hard-packed streambed. Sometimes, sand, silt and gravel that is processed through the recovery system is dropped on top of the cobbles. Later, winter storms also wash sand, silt and gravel across the top of the cobbles. The sand, silt and light gravel then filters down and fills in most of the space between the cobbles. Therefore, tailings usually end up as loose stacks of cobbles with sand, silt or light gravel filling the spaces.

A large flood-storm may wash the tailing-cobbles away at a later time and redeposit them into a newly-formed hard-packed streambed. Or, as in the case of the 1964 flood in northern California, rather than wash away all of the cobbles, many of the piles were leveled off by the storm, and a new layer of hard-packed streambed was deposited directly on top of the loose cobbles. When we dredge sample holes in those locations, we usually find a hard-packed streambed on top of the tailings (loose cobbles). If gold traveled in that part of the waterway, we find it concentrated at the bottom of the hard-pack, sitting on top of the tailings. Underneath, we find loose cobbles with sand and silt between them. These usually go all the way to bedrock. We find very little gold on bedrock, because it has not yet been directly exposed to a major flood storm since being mined.


Some waterways will have several different natural streambed layers, each with its own concentration of gold resting on top of the layer or bedrock below. Different streambed layers usually exhibit a different color and compactness. The “contact-zone” between the layers is generally pretty easy to spot. Within the contact zones between layers, and on top of bedrock, is where you will find most of the gold concentrations. Those areas, then, should be the target of your sample holes.

As shown in this following video segment, sometimes the highest-grade deposits will be found up on top of a layer of hard-pack in the streambed:

Seldom will you find rich pay-streak gold deposits associated with loose streambed material. However, it does occasionally happen. These occurrences are almost always the result of winter storms, and the resulting run-off, eroding away a hard-packed streambed along the bank — which washes the gold down into the waterway to rest with the loose material.

There are areas in Africa where streambeds consist entirely of loose gravels – sometimes which carry substantial amounts of gold and/or gemstones. But this is an exception to the rule.

Effective sampling is the key to a successful mining operation. And, when you are sampling, you should be looking for hard-packed streambed layers. Watch for the gold concentrations along the bottom of these layers, because that is where you will usually find them.

 
video subscription graphic
This story first appeared in Gold & Treasure Hunter Magazine May/Jun, 1997 on Page 8.
This issue is still available! Click here.

By Marcie Stumpf/Foley

“Boulders and huge logs slammed into homes, filling the insides and building up against walls until they caved in. Windows were blown out with the force…”

At the crest of flooding the Klamath River cut a wide swath along its banks, taking away scores of trees and anything else in its path. Flooding was especially devastating from Horse Creek to Happy Camp, a distance of 35 miles.

Many new creeks fed the rampant river as rainwater sluiced off the thoroughly saturated ground of every mountainside, raising the river up to even greater heights. As the runoff increased, hillsides along Highway 96 began giving way, as did mountainsides across the river. Rich red soil prevalent to the area was swept along with the river, creating a huge, churning mass of “chocolate milk.”

As the rains became heavier during the last few days of 1996, the situation became even more serious. A forecast of heavy rain for two more days, along with a large, forced release from Iron Gate Dam on December 31st, finished setting the stage for a disaster.

For the residents who live up Indian Creek and along the Klamath River, the last few days and nights of the year were so different, that many had a feeling of impending disaster and began to prepare for it. Leroy Hardenburger, a resident living along Indian Creek, reported that he could not even sleep for several nights before the flood, because the sound of huge boulders thundering down the creek became increasingly louder.

For residents living along the Klamath River, the roar of the river could not be quieted even by closed windows and doors. The rain kept coming in greater and greater amounts.

When warm rain melts snow, and rainwater exceeds predicted levels, the operators of Iron Gate Dam reach a point where they must release a great deal of water or risk losing the dam altogether, which would create a disaster of greater proportions. As in many cases in the west, there is no forewarning of dam releases in this area.

In Happy Camp, our first indication that the situation was becoming critical is when a report came over the scanner early in the evening of December 3lst that a motor home was stranded in 2-1/2 feet of water on the highway near Granite Point. This is a low area along the highway several miles upriver from Seiad Valley (about 25 miles upriver from Happy Camp).

Shortly thereafter, homes near the mouth of Indian Creek began flooding, and water and debris from a falls about 4- 1/2 miles up Indian Creek swept over the road.

Further news was spotty as it became impossible for Sheriff’s deputies to travel upriver further than Fort Goff. Slides along Highway 96 downriver from Happy Camp and on Indian Creek Road cut the town off by road from the outside world.

The river continued a steady rise through the nighttime hours. As light came with the first day of 1997, the rapid rise of water from an emergency release from the dam arrived along the mid-river area where Happy Camp is located. Many local residents did not sleep on that night of December 3lst. Every few minutes, cars were seen pulling into the nearest close view of the river (at my home) to check its level. Then, with the coming of daylight; the people of Happy Camp began showing up at homes which were located alongside the river. Uncalled and unasked, they brought trailers and trucks and pitched in to help, leading farm animals to higher land, removing furniture and belongings in the driving rain and rapidly rising waters.

It was all over within a few short hours, because the water quickly rose too high to proceed further with salvage from homes or property alongside of the river. Residents could only watch as the river swept away bits and pieces of their lives to join what looked like several forests full of trees that filled the middle of the river, racing with the swiftest current at the speed of a runaway freight train.

One of our members, Larry Ogborn, got stranded down by Independence for several days while successfully keeping his jet boat from being washed away by the storm. His is a very interesting story. Dave McCracken captured the following video segment during the early part of this storm, just before Larry got stranded down there. The video shows how much force Mother Nature can muster when she decides to:

All of the debris cleared under the local bridges near Happy Camp, however, and the rain began tapering off as New Year’s Day came to a close. The river reached its crest at approximately 1 a.m. on the morning of January 2nd, and residents were pleasantly surprised to find that the river and creeks had already subsided a great deal by daylight. While the river was not yet back into its channel, it had receded from most of the homes.

With Happy Camp completely cut off and the community’s water supply shut down because the pumps had been submerged, residents continued to help one another get through the first difficult days of the aftermath. Those on high ground with springs and good water supplied water for the many residents who were without. Other residents again began showing up at damaged homes with food, drink, crowbars and hammers, and helped remove ruined carpet and flooring as tons upon tons of wet mud was removed from homes. A local Americorps crew offered help in a great number of areas.

Many residents with riverfront property began the very substantial job of clearing the huge mounds of uprooted trees, logs and debris left behind by the rampaging river. California-Transit crews began work in more than a dozen critical areas along Highway 96, working long hours and bringing in extra equipment and trained personnel to repair the highway and access to it so that normal traffic could be restored.

Roads into Happy Camp were not open at all for almost a week, but the one remaining market and the restaurants continued to operate during that time, having food and other supplies flown in as necessary. The Community Services District set up a temporary system to provide water for Happy Camp, and samples were flown out for testing to make sure the water was safe for consumption.

It was several days before the community was even aware of the devastation to the Klamath River canyon and to homes further upriver. Because the highway was still closed on January 3rd, Jay Clark, Happy Camp’s postmaster, adventured a hair-raising four-wheel drive ride on primitive roads over the mountain crests to pick up and bring in around 5,000 pounds of mail. This was to help deliver much-needed income to local-area residents. That was the first mail the community had received since December 30th!

During the storm, one of the bridges across the Klamath River at Horse Creek was completely washed out. Further downriver, every small creek (O’Neil, Portuguese, Fort Goff, and Tim’s Creeks, just to name a few) became a torrent, carrying huge trees (sometimes as many as 20 or more) crashing down through the raging water, driving boulders and mud across Highway 96 along with them. At Portuguese Creek (as just one example), the drain pipe beneath the highway quickly filled and was blocked by trees and boulders. Buildup of material then began across the top of the highway. Soon, the roadbed was covered with 2-to-3 feet of mud, rocks, boulders and trees, and then covered with another 2 feet of water, for a distance of more than 300 feet of roadway.

In low areas such as Granite Point, the river eventually rose 10-to-15 feet above the Highway 96 roadway, peeling up the guardrail that bordered the highway around the curve and rolling it into an upward curl for more than 30 feet. One lane of the highway there was completely undermined.

Small creeks crossed the highway in many places where none had been before.

One of the homes bordering Walker Creek just upstream from Seiad Valley attests to the force of the creek at flood stage, which completely filled this home with debris and mud.

The most severe destruction to homes occurred in Seiad Valley where homes bordered Walker Creek. This creek roared through the canyon, sweeping aside all that came before it until it reached the homes along its banks and near the Klamath River. Boulders and huge logs slammed into the homes, filling the insides, and building up against walls until they caved in. Windows were blown out with the force of the deluge, and big logs were thrust through the sides of some homes.

The houses on the river-side of the highway were flooded at Fort Goff. The highway there was covered with a buildup of material from both the creek and the river, and the campground there was heavily damaged.

At savage Rapids, the corkscrew curves of the river forced the water to come up onto Highway 96, allowing water force to veer into the mountainside. It then swooped back around the curve and returned to the riverbed. An entirely new bed for the river was formed on the river-side of the road at the head of savage rapids, where the New 49’ers have a campground. There is now a forested island in the center of the river there

The access road is completely gone at the Seattle Creek River Access! You can make part of the first turn of the road that led down to the river, and then the access road ends in a huge mass of silt and sand.

Huge piles of jumbled trees at the mouth of Thompson Creek attest to the force that came down the creek. California-Transit crews have, been working for weeks to level off the piles of boulders and debris at its confluence with the Klamath River.

Anderson Campground has massive piles of trees which piled up against the few trees that remained standing in the campground. One camper that was left in the campground during the storm was tossed and battered around like a Tonka Toy. It finally came to rest wedged between trees near the lower-end of the campground. The camping area there was heavily damaged.

After crossing Cade Mountain and descending into the valley where Happy Camp is located, you find that the former New 49’ers headquarters building was under several inches of water. The mobile home located on the property had four feet of water inside. Our property (mine and my ex-husband Bill’s) had more than three feet of water and mud in the family room, and just over two feet of muddy water throughout the rest of the house.

Most houses located along Indian Creek near its confluence with the Klamath River were all flooded. More damage was done to other homes further upstream, because Indian Creek raised high enough to cross the road in a number of places. There was also damage done to homes on the far bank of the Klamath River below the mouth of Elk Creek.

Dave McCracken captured the following video sequence at the mouth of Indian Creek during the storm. Isn’t it hard to believe that is the very same quiet creek that we swim in during the summer months?

The river flowed up and through Curly Jack Campground (just downstream from Happy Camp) and damaged it.

The Klamath Inn Motel just downstream from Happy Camp was also flooded.

As the waters receded, I saw people rowing around in boats trying to salvage their firewood before it floated away. Many of us lost almost all of our firewood.

Residents who lived more than 6-1/2 miles up Elk Creek Road were “marooned” in their homes for 4 or 5 days, because the road was extensively undermined up there. A temporary detour has since been constructed, but there are a number of other areas of this road that have been damaged. The Club’s mining claim just above the Five-Mile Bridge has changed greatly. The camping area has been replaced by sand, mud and debris right up to the level of the road!

Elk Creek Road is in such unstable condition, that the USFS has installed a locked gate just above the Five-Mile Bridge until further repairs can be made. This is because they are concerned for the safety of the public.

The Club’s Chambers Flat camping area was completely underwater during the storm. Several feet of water also crossed Highway 96 there, causing the road to be closed at that point until just a few days ago. Further downriver in the canyon, slides and sinkholes are being worked on by California Transit. Although the road is passable, pilot cars are escorting traffic in several places.

Entire gravel bars along the Klamath River have been moved, leaving only boulders in their wake. Large deposits of sand and silt have been deposited in other areas where none existed before the storm. Bedrock is now visible in many locations where it was not present before. Some of the large bucket line dredge tailing piles located upriver have been either washed away or partially moved by the flooding. The river has been completely changed!

Several large gold nuggets have already been located in the Happy Camp area since the flooding. They vary widely in appearance, from rough and jagged, to one very smooth heart-shaped nugget that a local prospector showed me that was 8 pennyweights in size.

Members are reporting that it is a joy to prospect the banks of the river, because nearly all the blackberry bushes have been washed away. They are now able to get into bedrock crevices for sniping (and doing well) that they previously were unaware even existed. I saw one bottle almost full of nuggets and large chunks which one member found sniping along the banks of the river and creeks.

Jim Swinney, a local area nugget prospector, reports that it should be a great year. He usually finds about 20 ounces in gold nuggets each year on his time off from work. But he has already found more than 50 ounces this year with his metal detector!

Although this flood did not exceed the water levels of December 22, 1964, it came very close. It exceeded all other floods along the Klamath River since 1927, which was the earliest year that records were kept.

Since the flood waters receded in that first 24 hours, the river has been dropping a small amount each day. We have had a lot of calm and clear weather since the flood. There has been some rain and a few inches of snow the rest of the month; but as of mid-February, it has not caused additional problems.

There is no way to predict what the rest of this season has in store for this area; but even if no other rain should fall, the events that ushered in the new year have already made it a year that will go into the history books.

Note: Although our California-Transit crews have accomplished a great deal in a short time, there are still several areas along Highway 96 where some problems remain. We expect our efficient California-Transit crews will have those under control before long.

We are now looking forward to a great summer, with lots of fresh gold to be found!


video subscription graphic

By Dave McCracken

“When to do a clean-up”

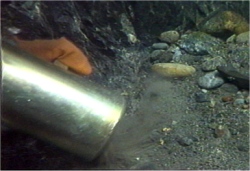
Some miners like to “clean-up” their sluice boxes after every hour of operation. Some prefer to do clean-up at the end of the day. Others will go for days at a time before cleaning up. This is all a matter of preference and seldom has much to do with the actual needs of the sluice box.

More commonly these days, a dredger only cleans-up the “high-grade” section of riffles in his or her dredge after each sample or at the end of a production day. That is a special small section of riffles which catch most of the gold near the head of the sluice. The full recovery system is usually only cleaned-up when enough gold has accumulated to make the effort worthwhile, or it is time to take the dredge out of the water.

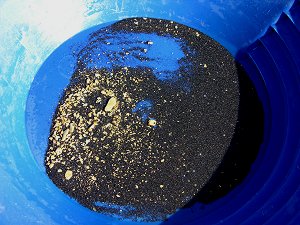
There is a method of determining when a sluice box needs to be cleaned up, so that you can keep it operating at its utmost efficiency. If the majority of gold is catching in the upper-third section of the sluice box, then the recovery system is working well.

After a sluice box has been run for an extended period of time without being cleaned, the riffles will be substantially concentrated with heavy materials behind them. Sometimes an abundance of heavily-concentrated material in a sluice box can reduce the efficiency of the riffles. This is not always the case. Much depends upon the type of riffles being used and how they are set up in the box. The true test of when a set of riffles is losing its efficiency because of being loaded down with heavy concentrates is when an important amount of gold starts being trapped further down the length of the box than where it normally catches. When this occurs, it is definitely time to clean up your box. Otherwise, clean the box when you like.

Expanded-metal riffles, being short, will tend to load up with heavy black sands faster than the larger types of riffles. Still, a large, visible amount of black sand being present is not necessarily a sign that you are losing gold. Gold is about four times heavier than black sand. As long as there remains fluid action behind the riffles, the black sand might have little or no effect upon gold recovery. The best way to evaluate your recovery system is by direct observation of where the gold is being trapped.

DUMPING OFF

The concentrates which have accumulated in a sluice box can be removed by unsnapping the riffles, carefully removing the carpet underlay, and washing everything into a washtub or bucket. The contents can easily be rinsed out of the carpet underlay inside the washtub.

A medium-wide plastic putty knife can be very helpful in removing lingering concentrates from the high-grade section of a sluice box when that is the only place in the recovery system being cleaned-up.

The concentrates can then be screened into another wash-tub or into a bucket, depending upon what type of screens you are using. Classification of the concentrates into several sizes will allow you to process each more efficiently. The size-classifications that you want to use will depend largely upon how you will process the final concentrates. No matter how you process the final material, you almost always want to begin with a ½-inch or ¼-inch screen, just to eliminate all the larger-sized material from your concentrates. The following video segment demonstrates this preliminary screening, reminding you to carefully remove any gold nuggets which stay on top of the screen before discarding the larger-sized material:

There are several types of final clean-up devices on the market which can help you process the final concentrates, including different kinds of wheels, bowls and miniature sluicing systems. They all work pretty well when set up properly. Here is a video sequence demonstrating the use of a gold wheel to facilitate final clean-up:

Each device has its own instructions about the proper classification-size of concentrates for optimum performance. So you will want to buy or make your screens accordingly. The following video sequence demonstrates a second screening through a common sieve about the size of window screen – which is about normal for splitting concentrates into two sizes:

In my own operations, when we accumulate more than just a small amount of concentrates to clean-up, we have had very good results by first running the concentrates through a plastic Le Trap Sluice. First, though, we screen the concentrates through 8-mesh or 12-mesh screen to remove larger material. The following video sequence shows the Le Trap being used to help with a final clean-up:

Or, rather than use a special device (wheel, bowl, etc), you can work your concentrates completely or nearly down to the gold with the use of a gold pan. In this case, I would suggest that you first classify the material through 8-mesh (8 openings per linear inch) and then through 20 mesh (20 openings per linear inch) screens to break it up into three sizes: 1) the material which stays on top of the 8-mesh screen; 2) the material which passes through the 8-mesh screen but stays on top of the 20-mesh screen; 3) and the material which passes through the 20-mesh screen.

Under normal circumstances, the larger two classifications of concentrate will pan down to gold by themselves quite fast. Because of this, even a final clean-up device is usually only used in the field on that material which will pass through the smallest classification screen.

I have thoroughly demonstrated the panning process in a separate article, so I won’t repeat that here.

FINAL DRY SEPARATION

These final clean-up steps can be done at camp, preferably in a dry environment, where the wind is not blowing much and where there is a table top or some other flat surface available to you for a work space.

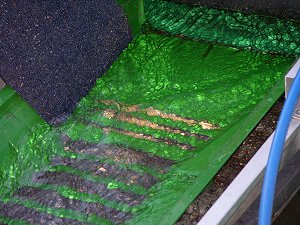
Important: Before you do the first step of this process, it is best to work your concentrates down as far as possible, to remove all of the black sands that you possibly can. The more black sand you can remove while the material is wet, the less you have to deal with after it is dried. Sometimes you can remove more black sand with the careful use of a finishing pan (small steel gold pan about 6-inches in diameter) inside of a small wash tub.

A Gold Extractor will allow you to work all of your gold down with no loss, and only about a tablespoon of black sands remaining.

Important Note: The best finishing device I have ever seen for working concentrates down to only about a tablespoon of remaining black sand, with zero loss of your gold, is called a “Gold Extractor.” Once your final concentrates are worked down to a very small amount of black sand remaining, you are ready to go on to the next step.

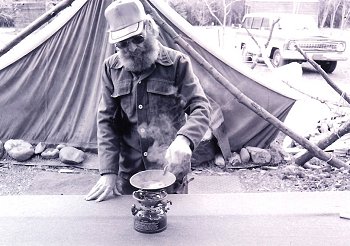
STEP 1: First dry out your final concentrates. This can be accomplished by pouring them into a small metal pan (finishing pan is best) and slowly heating them over an open fire or gas stove-whichever is at hand.

Dry out the concentrates.

CAUTION: Heating the concentrates from a gold mining program should not be done inside of a closed environment. Heating should be done outside and/or in a well-ventilated location, where any and all vapors given off by the various steps will be swept away from you and other bystanders.

You do not want to heat the concentrates too much at this stage. This is because they may still contain some lead. Excessive heat can melt the lead onto some of the gold within the concentrates. Pay attention to heat just enough to thoroughly dry out your concentrates. Be careful that boiling or bubbling during heating is not allowed to spatter gold out of the pan. The following video segment demonstrates this step:

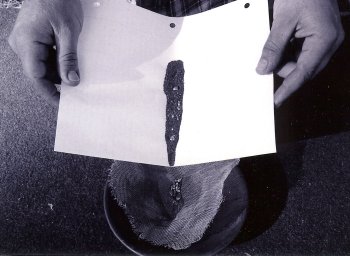
STEP 2: Once the concentrates have cooled enough that they can be handled, they should be screened through a piece of window screen (about 12-mesh). A small piece of window screen, about 6-inches square, is handy to use for this purpose.

STEP 3: Take the larger-sized concentrates (the material which would not pass through the window screen), and pour them onto a clean piece of paper. If there is a lot of this sized concentrate, this step will have to be done in stages, handling a little at a time. Once the concentrates are poured onto the paper, it is easy to separate the pieces of gold from the impurities. The impurities should be swept off the paper and the gold should be poured into a gold sample bottle. This is where a funnel comes in handy.

STEP 4: Once the larger-sized concentrates have been separated, the remaining concentrates can be classified through a finer-mesh screen. A stainless steel, fine tea strainer (about 20-mesh) works well for this. Tea strainers can be found in just about any grocery store.

STEP 5: Take the larger classification of concentrates from the second screening, pour them onto a clean sheet of paper, and separate the gold from the impurities in the same way that it was done with the larger material in Step 3 above.

Use of a magnet on each size-classification of concentrates can be very helpful to remove those impurities which are magnetic.

Some prefer to use a fine painter’s brush to separate out the non-magnetic impurities. Separation can also be accomplished by using your fingers. This step goes faster if you only do small amounts of concentrate at a time. Pour the gold recovered in this step into the gold sample bottle.

STEP 6: Take the fine concentrates which passed through the final screening and spread them out over a clean sheet of paper. Use a magnet to separate the magnetic black sands from these final concentrates. The magnetic black sands should be dropped onto another sheet of clean paper, spread out, and then gone through with the magnet at least one more time. The reason for this is that some gold can be carried off with the magnetic black sands. They tend to clump together. Once the magnetic black sands have been thoroughly separated from the gold to your satisfaction, pour them into your black sand collection. There may still be some small gold values left with them which can be recovered by other methods at another time.

NOTE: There is a really nice set of final clean-up screens on the market that are made just for the purpose of separating your final concentrates into the ideal size-fractions for final dry separation. I highly recommend them, because they separate your final material into multiple size classifications which make the final dry process go even faster.

STEP 7: Now, all that should be left is your fine gold, possibly some platinum, and a small amount of non-magnetic black sand. These final black sands can be separated by blowing lightly over them while vibrating the sheet of paper. Since the sand is about 4 times lighter than the gold, it will blow off the paper a little at a time, leaving the gold behind. Once all the black sands are gone, you can pick out the pieces of platinum if present, and separate them from the gold. Pour the gold into the same gold sample jar used in the earlier steps.

This dry process (Steps 1-7) goes very quickly if an effort was made during the final wet stages to get as much black sand and other waste material as possible separated from the gold.

CLEANING GOLD

Sometimes placer gold just out of a streambed is very clean and shiny. If this is the case with your gold, after the final dry cleanup procedure is completed, your gold is ready to be weighed and sold or displayed or stored away in a safe place.

Sometimes, gold will come out of a streambed with some impurities attached to it. When this happens, it will be necessary to perform a final cleaning process to make the gold’s natural beauty stand out.

If your gold is not clean and shiny, and you want to get it that way, place it in a small non-breakable water-tight jar about half full of water and add a little dishwashing liquid. It does not seem to matter what kind is used. Fasten the top on the jar and shake the contents vigorously until the gold changes to somewhat of an unnatural glittery color. Sometimes this happens quickly and sometimes it takes a little longer. This mostly depends upon how much gold is in the jar. The more gold, the faster the process. This is because it is the friction of gold against gold which facilitates the cleaning process. Once the gold is glittery, rinse the soapy water out of the jar, pour the gold into a small (metal) finishing pan, and heat it up (outside and down wind) until the gold takes on a deep, natural, shiny luster. It is important to make sure that all of the soap has been rinsed away from the gold using clean water before you dry the gold.

Gold has a tendency to turn a dull color after having been stored in an airtight container for an extended period of time. For this reason, some gold miners and dealers store their gold in water-filled jars, and dry it out just before displaying it or making a sale.

If you should happen to store your gold in an airtight container and notice that its color does not seem to be as bright as it once was, wash it with soap and water and re-heat it, as in the above steps. This process will bring back the beautiful color and luster of the gold.

The best time to weigh your gold to get the most accurate measurement is after you have completed all of the final cleanup steps.

SELLING GOLD

There are numerous markets where you can sell your gold. Refineries will pay you for the fineness (purity) of the gold itself and subtract a few percent for refining charges. In this case, you will receive a little less than the actual value of the gold. Refineries usually will
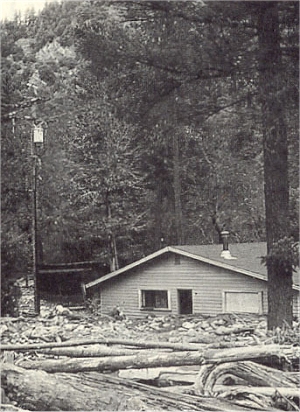
 not pay for the silver and platinum contained within your placer gold unless you are delivering it in large quantities. Refineries prefer that you bring your gold to them in large amounts. They will often charge less for refining, and sometimes pay just a bit more for the gold, when it is brought to them in larger quantities.

Flakes of gold and nuggets have jewelry value on a different market. If marketed to the right buyers, flakes and nuggets can usually bring in more than a refinery will pay-or sometimes even much more.

If you are in gold country and ask around, you can nearly always find someone who is buying placer gold from the local miners. These individuals usually pay cash. Unless the fineness of the gold within the area is lower than normal, there is no reason to settle for less than 70% of the market-value of the gold for that day. This means that the gold is weighed and the buyer pays you for the weight of what you deliver. Impurities are never calculated into this type of deal. If you enquire around, you can usually find someone who is willing to pay 75% of weight. Sometimes you can find an 80% straight-out buyer-which is good.

There are also people out there who are ready to gyp you out of your gold if they can get away with it. It is wise to bring your own pocket calculator along when dealing with a new buyer.

If you go to a dealer who starts figuring a certain percentage of the fineness, and his final figures end up lower than a straight out 70% of the bulk weight of your gold as it is, go find another dealer. This is not to say that 70% is the going rate. You can do better if you look around. Although, you should never have to accept less than 70% of the going market price for your gold. If a dealer starts to tell you all sorts of reasons why your gold is not worth what you want for it, go find someone else. There are plenty of gold buyers around who will at least admire your gold. So there is no reason to hang around and listen to someone who is trying to steal it from you.

Local miners will know who pays the most! Or go up on our web forum and ask. Someone there is sure to turn you onto a good deal!

Cleaning your gold well before you take it somewhere to be sold can help a lot.

Sometimes dentists will give you a good price for your gold, and a phone call or two can pay off. Also, some lawyers and businessmen like to invest in gold. Sometimes you can get up to 100% of spot for your fines (fine gold) when dealing with them.

Some jewelers will pay well for your flakes when they have a demand for them. It is not uncommon to get as much as 90% or better when you make such contacts.

The best way to get top dollar for your gold is to do a lot of inquiring, always with the intention to find more and better markets. Then, when you need some cash, you can sell to the buyer who pays the most.


video subscription graphic

By Dave McCracken

Always set up a dry-washer downwind of where you are working!

Dave Mack


Deserts consist of huge deposits of sedimentary material which have been affected by ancient ocean tides, ancient rivers, glaciers, floods, gully washers and windstorms. They are literally a gold mine of placer deposits.

There is also an enormous amount of gold-bearing mountainous dry placer ground which has remained relatively untouched by large-scale gold mining activity because of the scarcity of water required in those locations to support wet recovery methods.

Generally speaking, dry methods of gold recovery are not as effective or as fast as wet recovery methods. Yet, dry methods do work well enough that they can produce gold well if the ground is rich enough. Recent developments in dry washing equipment have made it possible for a one or two-man operation to work larger volumes of dry placer ground without water, and obtain good results in gold recovery.

Dry processing recovery systems generally use air flows to do the same job that water does in wet recovery systems. Under controlled conditions, air flows and mechanical motion and vibration can be made to effectively get rid of lighter, worthless materials. This causes a concentration of heavier materials similar to what occurs in wet processing.

SETTING UP TO WORK AN AREA

Sometimes a road can be bulldozed to your spot. Sometimes you can drive right in with a 2 or 4-wheel drive truck. In these situations, you might consider screening pay-dirt into the back of a truck and hauling it to a wash plant to be processed elsewhere. Actually, this is just slightly more difficult than shoveling directly into a wash plant. The hardest part is breaking the material away from the streambed and classifying it. It takes a little more time to haul the material to the wash plant, but that depends upon the distance and the condition of the road. It is also more difficult to shovel up into a truck. Some small operations use a portable conveyor belt to lift the material into their truck. Feeding the material from a truck into a wash plant is not as difficult, because it is usually down hill. An average one or two-person team should be able to move the equivalent of a pickup-sized load of screened pay-dirt and process it through a wash plant at another location in the period of a full day’s work-perhaps even two truckloads, depending upon the distances involved. If the material is paying well, they could do well at it, too.

DRY-WASHING PLANTS

If conditions do not allow you to truck the pay-dirt to a nearby water site to be processed by wet methods, you will have to consider processing the rich material by dry-production methods.

While dry-panning and winnowing do work, and have been broadly used as a means of production during the past, they are not normally as effective as some of the modern dry-washing plants which are available on today’s market.

Dry-washing machines use an air blowing fan or bellows-type device to blow a controlled amount of air-flow up through the dry material that is being processed. Air flows help blow off the lighter materials and allow the heaviest particles and gold to collect.

Dry-washing plants are available which can either be operated by hand or by lightweight engine and air-fan assemblies.

“Non-motorized dry-washing unit”

A hand-operated dry washing plant usually includes its own classification screen as part of the unit. Raw material can be shoveled directly onto it. The bellows air-blower is usually operated by turning a hand crank, which is often conveniently located so that one person can both shovel and alternately work the bellows at the same time. Under ideal conditions, two people working together can process up to a half-ton of gravel per hour by taking turns, one person shoveling while the other works the bellows.

Some units also have a 12-volt electric conversion kit to allow you the option to either hand-crank in the field or connect to a 12-volt battery for automatic bellows operation.

Various gasoline motor-driven dry concentrating units are available on the market which utilize static electricity and high-frequency vibration to help with gold recovery. Most commonly, there is a high-powered air-fan which pumps air through a discharge hose into the concentrator’s recovery system. The air currents which pass through the recovery system are adjustable so that the proper amount of flow of lighter materials through the recovery system can be obtained-similar to a sluice box in wet-processing. The purpose of the steady airflow is to “float off” the lighter materials through the box. Heavier materials like gold will have too much weight to be swept through the recovery system by the flow of air.

The bottom matting in this type of concentrator is usually made up of a specialized material which creates an electrostatic charge as high velocity air is passed through it from the air discharge hose. Fine pieces of gold, while not magnetic, do tend to be attracted to surfaces which have been electrostatically-charged, similar to the way iron particles are attracted to a magnet. So the bottom matting in these concentrators often attract fine particles gold to itself and tends to hold them there.

Some motorized dry concentrators also use a high-frequency vibrating device to keep the entire recovery system in continuous vibration while in operation. The way to get gold particles to settle quickly down through other lighter materials is to put the materials into a state of suspension. The vibrating device on this concentrator helps fine particles of gold work their way down through lighter materials that are being suspended by air-flows.

Here follows an excellent video demonstration which shows exactly how motorized dry concentrators work:

A motorized dry-washing machine is excellent for the production demands of a one or two-person operation. Under ideal conditions, it is able to process up to about a ton of raw material per hour, which is the equivalent of what a medium-sized wet sluicing operation can produce. This is as much or more than one or two people can usually shovel at production speed when working compacted streambed material. Most motorized dry-washers do their own screening of materials and almost everything else automatically. This leaves the operator free to produce at his or her own comfortable speed.

Total weight of the average motorized dry-washer is about 75 pounds, but the units do break down into separate pieces which can usually be carried around by a single person. So the electrostatic concentrator can be carried to a hot spot if it is worth a few trips to do so. They usually get about 3 hours to the gallon of gasoline.

SETTING UP A DRY-WASHER

There is no fixed formula for setting up the proper air flows and downward pitch on the recovery system of a dry-washer. A lot depends upon the nature of the material that you are processing, how heavy it is, whether or not the material is angular or water-worn and the purity (specific gravity) and size of the gold being recovered. Each of these variables is likely to affect how you must set your recovery system in each different place that it is operated.

The main thing to remember is that the machine needs to separate the gold from the lighter, valueless materials. If you only have a small amount of air-flow running through your dry-washer, then you will need more pitch on the recovery system-and you may need to feed the material slower. Too much air flow can also be a problem. Normally, you would compensate by adjusting to a lesser pitch on the riffle board.

Watch how the material flows over the riffle board. You should see the dirt rise up in an orderly fashion and flow over top of each riffle. It looks an awful lot like water. It is best to keep a steady feed of material going through a dry-washer at all times. The riffles should be filled about half to three-quarters, with a steady flow moving from one riffle to the next. The material in the riffles should have a fluid look to them; they should not be packed solid.

This following very important video sequence demonstrates how to set up and operate a motorized dry-washer, and it shows exactly what you should look for while making flow adjustments to obtain optimum gold recovery:

It is a good idea to shovel lower-grade material into your dry-washer while adjusting for the proper air flows and pitch. Once set, you can shovel in the pay-dirt.

One thing about dry-washing is that because it is generally slower than wet methods, the pay-dirt must have more gold. High-grade areas in the deserts certainly do exist! This is all the more reason to make sure your recovery system is set properly before processing pay-dirt. Chances are that you will not see any gold that might be discharged into the tailing pile through a dry-washer recovery system.

Another thing about setting up a dry-washing production program is that you always set up a dry-washer downwind of where you are working!

Once gold falls into the dead air space within the riffles, it will usually stay there. The air-flows are generally not strong enough to push gold out of there. There is a limit to this, however. Just like a water recovery system, a dry-washer will concentrate the heaviest materials which it processes. After some time, the heavier concentrates may require stronger air flows or a steeper pitch to keep them in suspension. At this point, it is probably time to clean up the recovery system and start all over again. If you are keeping a close eye on your recovery system, you can see when it is time to clean up. The fluidity of the material inside the riffles becomes more concentrated and slows down.

DRY-WASHING AND CLAY-LIKE MATERIALS

Material to be processed must be thoroughly dry to get the best results out of any dry-washing plant. Sometimes you will run into moist clays when out in the dry regions-just like you do in the wet streambed areas. It is also possible to find a pay-layer associated with the clay. Clays make dry-washing procedure more difficult, because they must be thoroughly dried out and broken up before being processed effectively by dry methods.

Sometimes this means the material needs to be set out in the sun to dry for a full day or more before anything further can be done with it. Sometimes it is necessary to dig clay a couple of days ahead of the processing stage. You can alternate spending a day digging and laying out material to dry, and then a day processing dried material. Sometimes, the dried clay can harden into clumps, which then must be broken down into dust and sand before you can recover the gold out of it. When necessary, all of these requirements require more time and energy. But if a good pay-streak is involved, you will find yourself doing whatever is necessary to recover the gold out of it.

It may be necessary to use rock-crushing machinery to break up hardened clay-like material and crush it down on any kind of a production -scale.

The clean-up of concentrates from a dry-washing plant is accomplished best by wet-processing methods. Usually, if you have room-enough to haul around a dry-washing plant in your vehicle, you will also have room for enough water to pan down your final concentrates, too. The following video sequence demonstrates how and when to perform a final clean-up during dry-washing:

If water is not available to you out in the field, the clean-up of your dry concentrates can sometimes be accomplished quite effectively by running them through your dry-washing plant several times. Final cleanup procedures can then be done to separate the gold from the last bit of remaining valueless material.

DESERT PLACER GEOLOGY

The chances of finding a hotspot out in the desert, or in some other dry region, are probably just as good or as your chances of finding a hotspot in the watersheds of the gold-bearing mountainous areas. These chances are pretty good, providing that you are willing to spend the time, study and work that is necessary to implement a good sampling plan.

Probably your best bet is to start off with a “Where to Find Gold” book and study the geological reports which apply to the area(s) of your interest. There has been some small-scale mining activity out in the dry regions. Much of it was lode mining, but some placer activity took place, as well. A good portion of prior activity is recorded information today. It can be of great value to you to know where gold has already been found. It is almost a sure thing that the areas which were once worked for gold at a profit were not entirely worked out. They might be worked again with today’s modern equipment at a profit. Any area which has once proven to pay in gold values is a good generalized area to do some sampling activity to see if additional pay-dirt can be found.

The desert areas were pretty-much left alone by the large-scale mining activities of earlier times because of the accessibility problem. Often, during earlier times, there was not enough water to sustain life, much less to process gold-bearing material.

But desert prospector should not limit him or herself to only the once-proven areas. Most of the desert regions have gone pretty-much untouched by past (effective) sampling activity because of accessibility problems, lack of water, and not having adequate equipment to do the job up until recent years. So the desert prospector has access to a lot of ground, and there are not that many competitors to worry about.

A single large rain or wind storm can change the entire face of the desert in just a few hours. There is very little undergrowth in these areas to prevent a good-sized rain storm from causing an incredible amount of erosion. And so you hear all the old-timers’ stories of finding bonanza-sized gold deposits, marking their position, going out after tools and supplies, and then returning to find the desert entirely changed and the bonanza apparently gone. Undoubtedly, some of these treasure stories are true. After all, many of those old-timers had gold to go along with their stories. Many of them spent the rest of their lives looking for their “lost gold mine.”

All of the placer geology concerning wet areas also applies to desert placer deposits (most which were developed during wet storm events). The same remains true of eluvial deposits-which is the gold that has weathered from a lode and been swept some distance away by the forces of nature. Eluvial deposits in the deserts (called “Bajada placers”) tend to spread out much more widely, and in different directions. This is because they are usually not eroding down the side of a steep mountainous slope. Therefore, they are sometimes a little more difficult to trace back to their original lodes. But it can be done. The answer is to do lots of sampling.

History has shown that one of the best locations to look for gold is where the hills meet the desert and fan out. This is where the water slows down during flood storms and drops gold in the gullies and washes. There also are likely to be more gold traps further up the hillside.

When doing generalized sampling in the desert, concentrate much of your activities in the washed-out areas, where natural erosion has cut through the sediments and created a concentration of heavier materials. Dry-washes, dry streambeds and canyons are good for this. Get an eye for the terrain, looking over the high points and the low points to get an idea of where the water flows during large flood storms. Areas where the greatest amount of erosion has taken place are areas where the highest concentration of gold values might be found. Remember that we are looking at many thousands of years of erosive impacts.

Bedrock will be exposed in some low areas, as in canyons and dry washes. These are ideal places for you to get into the lowest stratum of material-where the largest concentrations of gold values are often found. Large and small canyons have been formed by many years of erosion and are likely spots to find paying quantities of gold.

Caliche is cement-like false bedrock which is commonly found in desert placer areas.(photo USGS)

The desert and dry areas also commonly have a “false bedrock” layer specifically called “caliche.” Sometimes (often), this caliche layer is only a foot or two thick. In some areas, gold is concentrated along the caliche, just like on top of bedrock.

After a storm in the desert, in some places you can find small pockets of gold in the gravel traps, under rocks and under boulders which rest on top of the caliche. Sometimes the gold is pounded directly into the caliche and needs to be removed with a pick or crevice tool. Caliche layers which are close to the surface allow small-scale dry-washing operations to be economically feasible, because of the lesser amount of gravel and material which needs to be shoveled off the gold deposits.

Streambed material can be recognized by the smooth water-worn rocks. Anywhere in gold country, where streambed material is present, is a prime area to be doing some preliminary sampling. Such material indicates that it has been exposed to a substantial amount of running water. This means concentrating activity took place with those same materials. It is possible that the material was once washed out of an ancient river.

However, gravel and material does not need to be water-worn to carry gold in the desert areas. Rough and angular gravel, which has not been greatly affected by water, also sometimes carries gold in volume amounts. Testing is the key.

Sometimes it can be worthwhile to do some sampling in the different layers of desert material when they are present and exposed. Gold concentrations in and between flood layers can happen even more in the desert. This is because of the flash floods which can occur there.

Sometimes substantial gold concentrations can be found just beneath boulders which rest upon bedrock, or up in a layer above bedrock.

When you find a gold deposit in a dry area, whether on bedrock or the caliche, you will want to thoroughly clean the underlying surface upon which the gold is resting. Seldom will you visually see gold in dry placer material-even when there is a lot of gold present. Use a whisk broom or vack machine to clean all of the loose material. Sometimes, it is also productive to break up the surface of the caliche or bedrock with a pick or other crevicing tool.

Occasionally, in dry washes, you can actually see stringers of black sand along the bedrock or caliche-especially directly after a storm. You can sometimes do exceptionally well by following these stringers and digging out the concentrated gravel traps. Do not forget to test the roots from trees and other vegetation in such areas. Vegetation requires a certain amount of mineralization to grow. Roots can grow in and around high-grade gold deposits. I have heard of single roots which have been dug up and produced as much as three ounces of gold!

Some electronic prospectors use their metal detectors to trace concentrations of black sand. Then they follow up by testing the areas which produce the strongest reads from their detectors.

Some desert areas, like Quartzsite, Arizona, also have gold just lying around anywhere-even on top of the ground. Such places are excellent for electronic prospecting and dry-washing. The deserts of Australia are famous for this. I have a number of friends who have been very successful in the Nevada deserts, using metal detectors to recover large numbers of nuggets, some very large, directly off the surface of dry desert ground.

If you find a piece of gold on the surface of a dry placer area, it is likely that there are more pieces of gold in the immediate area. Electronic prospectors call these areas “patches.” Gold generally does not travel alone-unless it was dropped there by mistake.

Sand dunes in the desert are usually not very productive. This is because they mainly consist of lighter-weight sands that were deposited there by the wind. However, sometimes the wind can blow off the lighter-weight sands from a particular location, leaving the heavier materials exposed behind. This is similar to what happens after a big storm at the gold beaches. This is something that should be watched for.

When prospecting around in the dry areas, when you encounter tailing piles from past dry-washing operations, it might be worthwhile to do some raking of the tailings and scan around with a metal detector. Sometimes old tailing piles can be productive enough to run them through a modern dry-washer.


video subscription graphic

By Dave McCracken

“A Preliminary Evaluation”

Dave Mack

Note: This is the non-proprietary portion of an initial report from a preliminary evaluation of a potential suction dredging project in Northern Sumatra (Indonesia). The opportunity to do something with this prospect still exists. The evaluation was done in April of 2005. The gold values have been modified to reflect gold prices in mid 2010.


This project is located on the island of Sumatra in Indonesia, directly to the west of Singapore. I arrived there by flying to Singapore, and then by taking a 1-hour boat-ride to Batam Island (Indonesia). From there, I caught a flight to Padang. Padang is the capital of Western Sumatra. At the time, this was a better connection than trying to fly directly to Padang from Singapore.

A representative from the company that hired me was waiting at the airport in Padang. We then drove 2 hours north to a place called Bukittinggi where they have a home and office. The company manager was already up at the base camp. They had arranged for a driver to bring me up there on the following day.

Bukittinggi is a lot like the towns we have in the West. In fact, as shown in the following video segment, if it were not for the different language on the signs, this city could easily be mistaken for almost any town in America.

The roads and other infrastructure in western Sumatra are pretty darn good. The people seem nice. Things are relatively inexpensive. English is not spoken very much, but the people are forgiving and do their best to help figure things out.

The location of this project was situated about a third of the way north to Medan (from Padang). Medan is the capital of northern Sumatra. It is the second-largest city in Indonesia.

There is a good road that leads to the project-area and follows alongside the river. So accessibility to the river is generally very good.The following video sequence was taken as we were driving north to the project site. You will notice that they drive on the left side of the road in Sumatra:

The river is about the same size as the Klamath River in northern California, but will reduce in size as the dry season progresses. The river is flowing with clear water. Although, visibility can be lost during the afternoons if local miners are sluicing upstream (more on this follows).

During my visit, the river was ideal to sample using a 5-inch dredge. Productiondredging or volume sampling could easily be accomplished using 8-inch dredges or larger.

There are regular access-points to the river from the road along the river. And there are small villages along the road where local miners and other laborers or helpers and various services and supplies are available at relative low cost. Power and land-line telephone appear to be present along the entire road.

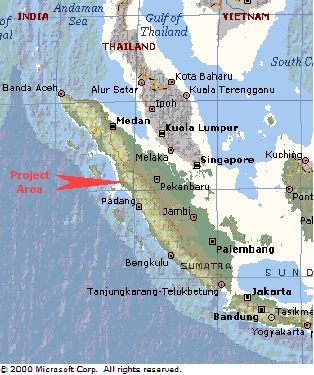
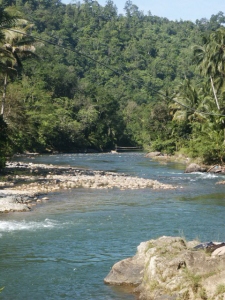
As the speedometer was not working on the vehicle that we were using, I did not get an exact mileage-count on the amount of river that is available to this project. But it is safe to say that there is at least a 20-mile stretch of readily-accessible gold-bearing river where local small-scale miners are actively recovering gold.

Our client has hired a local administrator from the main town along the river. The local administrator has arranged permission to temporarily set up a base camp in a vacant house which is owned by the government. The house and property are ideal for a base until other arrangements can be made. There is a small store and restaurant on the property. There is some storage. The house has several comfortable bedrooms, electric power, bathrooms and a dining room. The local cook does a good job. It is a comfortable setting. The base camp contains all of the basic structure needed to support a gold dredging project.


Local communities are generally Muslim. Friendly. I did not detect a single bad feeling from anyone during the entire time that I was on the river. There was actually a lot of friendly interest, because white folks are not often seen in these parts.Here is a video sequence I captured in a nearby, larger-sized community:


It will be important to be mindful of possible cultural differences, though. Any westerners brought in to assist with this project will need to be careful to not disrupt local tranquility. Hiring a good, local administrator will be important so that we can facilitate communication in a positive way. Interpreters will be important in key places where local labor is being directed or managed by outsiders.

Our client has done a great job putting the basic support structure in place.

My client is a mining engineer from Europe who settled in Sumatra and has devoted the past 20+ years locating and developing mineral opportunities there. We have worked together on several projects in the past, two which were located in Borneo (Indonesia), another in Cambodia.. He has been involved with numerous different types of projects which I will not go into here. He is very experienced at working in Sumatra. He understands the culture(s) and he speaks the languages.

One interesting thing at the moment is that my client has also recently located an important iron-ore discovery in the same area. He is in the process of quantifying the deposit with a company of consulting-geologists that are based out of Jakarta. I was fortunate to meet the Director of this consulting-group during my visit. They are doing exactly what we have in mind: They are mapping and certifying reserves of proven mineral deposits in a manner that the final documentation can be placed on a bankable balance sheet.

While pursuing the iron-ore program, my client observed that the locals along the river were actively sluicing for gold. So he asked me to come over for a look. This was my first trip to this particular area of Sumatra.

Local Mining Activity

I observed three different methods of active gold mining occurring along the river:

1. Panning gravels from the gravel bars alongside the river.

2. High-banking the river gravels from the gravel bars in and alongside the river (description follows).

3. Panning river gravels that are being extracted from the bottom of the active river by divers (referred to in this report as “dive-miners”).

I could also see the telltale signs of past high-banking activity in placer diggings alongside the river not far downstream of the main town. My client’s local administrator told me that he believes the richest area along the river is upstream of the main town. That portion of the river extends away from the main road. I did not get a look at it on this first visit. He says that gold nuggets as big as several kilograms in size have been found up there. But, because local miners have no means to deal with the larger boulders, they mostly do their mining further downriver where we saw them operating.

I observed a of dozen or so active panning operations along the edges of the river where locals are panning surface gravels.


I also observed around a dozen active high-banking projects. Most of these projects are being accomplished with the use of two motorized pumps. One pump is used to suck ground-water out of active excavations, lowering water levels so that workers can excavate bottom gravels. The other pump is used to create suction through a 4-inch PVC (plastic) suction pipe. Material is washed down to the intake-pipe at the bottom of the excavation, sucked up and directed through a primitive (very) sluice box that rests on stilts out of the water. These pumps allow gravel-material up to (approximately) 3-inches in size to be passed through the pump.

Local miners are building wing dams, which allow them access to gravel out in the active waterway.

Local miners are actively wing-damming (building a barrier to direct the water around an open excavation) around shallow places in the active river where they want to mine. They then pump the excess water out of open excavations, while processing gravels out of them. Whole teams of local miners (as many as 20+ people) are working together in these high-banking projects.

The downside is that tailings-water from some of the high-banking projects is allowed to flow back into the active waterway. This eliminates water visibility for some distance downstream. Depending upon where you go, underwater visibility can be lost by mid-afternoon. But even in those places, there remains an opportunity to do underwater work starting early in the morning – or possibly doing night operations with the use of flood lights from the surface. Or by dredging upstream from active high-banking operations.

Dive-miners on a floating platform

I also observed some mining activity where local divers are bringing up gravel from the bottom of the river and panning it at the surface. These divers do not have access to the right kind of air compressors for underwater breathing, so they are free-diving (holding their breath while diving down under the water) to excavate bottom-gravels from the active river. Because of this, their production-capability is severely limited. All of the dive-miners I observed were bringing gravels to the surface with the use of metal cooking pots.

As the purpose of my first visit to this river was to confirm the existence of potentially-viable gold deposits within the active river, these dive-miners are the ones we decided to spend some time with.

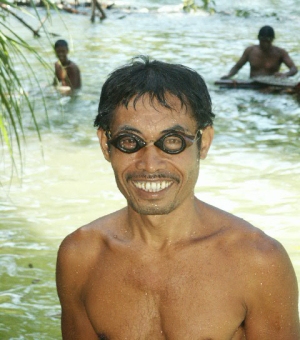
Local dive-miners carve their diving goggles out of hardwood or bone from some kind of big animal. Lenses are made from glass that is glued onto the goggles with epoxy. The goggles are attached to a diver’s face with a strap cut out of a piece of tire-inner tube rubber. There is no face-seal, and there is no way to equalize pressures inside the goggles. This creates a natural limit to how deep dive-miners can go beneath the water’s surface.

Nevertheless, local dive-miners are diving down to around three meters and bringing up gravel. And the gravel contains a lot of gold in proportion to the volume of gravel that is being processed. The local gold-buyer told us that around 5 kilograms of gold are being bought every day from local miners along this river. The going price is around $44 per gram. If the gold-buyer is telling the truth, that amounts to around $220,000 in gold.

To put this in perspective, a 10-inch dredge in experienced hands, with some underwater visibility, should be able to process about as much volume as all of the mining activity combined that I observed along the river.

All of the local miners we spoke with agreed that the richest gold is located in the deeper-water areas of the river where they are not able to reach using their methods. While divers can get underwater, they do not have the technology to excavate the deeper-gravel deposits that exist down there. A person can only get so much accomplished using a cooking pot on a breath of air!

So unless they are lucky enough to find rich deposits in the shallow spots along the edge of the river, existing technology available to local miners generally does not allow them access to the higher-grade areas located along the river-bottom. For the most part, local miners are working average gravels along the edges.

Confirmation

All of the images of the mining activity that were initially sent to me by my client showed high-banking activity that was taking place outside of the active river.

Sometimes, there can be high-grade deposits being mined alongside the river; but local conditions (deep gravel, dirty water, etc.) do not allow for a viable dredging opportunity within the active river. Therefore, the main purpose of my first visit to this area was to establish if there are high-grade gold deposits inside the active waterway, and to assesswhether or not we can perform a production dredging program there.


Approximately 5 miles downstream from the main town, we found a company of around ten local dive-miners who were swimming down to bring up gravel from an underwater excavation. We observed that they were recovering a substantial amount of gold in proportion to the small volume of gravel being processed. As this was an excavation project inside the active waterway, my client and I made a quick plan to complete our initial confirmation while working with this group of dive-miners.

After spending a little time getting to know these dive-miners, one of their leaders offered to take us on a short tour and show us some of the richer areas where they had done some dive-mining along the river. He showed us several places where he said their team-program had recovered as much as three ounces of gold per day at times. Each place he showed us was consistent with the types of areas where we find high-grade pay-streaks on the Klamath River in northern California.

According to our guide, the combinations of water-depth and/or gravel-depth usually prevent dive-miners from pursuing the richest deposits in the river.


This river is very similar to the rivers that we dredge in California. There are regular directional changes, a steady drop, and fast-water areas in the river, which create the natural diversity required to form high-grade pay-streaks. There is plenty of bedrock showing and deep water pools.

Our guide told us that the river gravels pay in gold-values starting from around a foot below the surface, all the way to the bedrock. He said the richest gold is often on the bedrock, and sometimes they can see gold inside the cracks when they are able to get down that far. He said that 1 and 2-gram gold nuggets are not uncommon. He said the biggest nugget he personally found was 10-grams (32.1 grams to the troy ounce).

In anticipation of the eventual need, several years ago, I shipped a T-80 air compressor, a dive-regulator and the required air-fittings over to this client in Sumatra from California. He arranged to mount the compressor with a small Honda motor. We brought that diving gear along with us on this trip.

So after getting to know our guide on the river, we volunteered to use the compressor to help his company of dive-miners excavate gravels from the deepest part of their ongoing excavation. I offered to allow them to keep all the gold we found, as long as we could buy it from them at the going price. They readily agreed. The purpose of this was to allow me the opportunity to get a direct look at the streambed conditions from which we would recover the gold, and to allow me to measure the amount of gravel that we would process so we could place a relative value on the raw material.

It did not take long to get me into the water, where with the use of a cooking pot as a digging tool, I started filling a wash-bucket with gravel from the bottom of their ongoing excavation. Filling up buckets with material underwater is a pretty slow process. It required three gold-panners to keep up with my progress.

The existing excavation from this company of dive-miners was pretty substantial, considering that progress was being accomplished using cooking pots while free-diving down to around three meters of water. They had worked down a face of bedrock along the edge of the river to around 6 or 7 feet into a semi-hard-packed streambed material. They had not yet reached where the bedrock bottomed-out (where the highest-grade material should be located). Even so, I did see some gold flakes in the bedrock along the face that they are following.

According to the dive-miners, they have been working that specific excavation for 2 months, and had so far recovered around 2 kilograms of gold ($80,000.00). To put the size in perspective, we could open an excavation that size in about half a day using a 10-inch dredge. Opening an excavation is much slower than continuing one that is already opened up. Conservatively, the local dive-miners had recovered 2 kilograms of gold in about 25% of a day’s ongoing production using a 10-inch suction dredge.

The local gold buyer weighed the gold recovered from our 20-bucket sample and offered to buy it for approximately $25.00 (US) in local currency based on the daily price of gold on April of 2005.

Since I was able to stay deep using the compressor, I extracted gravel from the bottom of the hole. I brought up 20 buckets of material, which were carefully panned by several helpers from the local mining team. In all, we recovered 1.1 grams (around $48.00) from my sample. This amounts to approximately $2.40 (US) per bucket at current gold prices. This was a typical medium-sized wash bucket. A single 5-inch dredge would excavate the volume of material contained in a wash-bucket in several seconds. A 10-inch dredge would scarf it up in the flash of an eye!

The thing that makes this so interesting is that the gravel I brought to the surface, for the most part, was material which had been sliding down into the bottom of the hole from the upper-side of the excavation. Although I did get some material that adjoined the bedrock on one side of the hole, I was forced mainly to extract gravel that was sliding down into the hole from further up in the excavation. The nature of scooping samples with a cooking pot underwater is that you take whatever you can get. Unlike dredging, you do not have an option to move top-material out of the way to get down to more productive stream layers located deeper in the river.

At the same time that I was taking samples from the deeper part of the excavation, the other dive-miners from the local company were bringing up samples from shallower streambed material. While I did not add it up, I did observe that their pans seemed to have just as much gold as we were getting from deeper in the hole. Most of the material I brought to the surface slid in from the shallower area where the other dive-miners were working.

While it still remains to be confirmed from a more organized sampling program using a suction dredge, this preliminary indication, along with the information given to us by these miners, indicates that the average gravels in this river almost certainly do contain commercial gold value.

More often, we are accustomed to finding that average river-bottom gravels carry non-commercial gold values, and that it is necessary to locate the high-grade gold deposits which usually form in the contact-zones between flood layers or on top of the bedrock. The existence of commercial gold-value in average gravels likely means that the pay-streaks will be even higher-grade.

We have confirmed that commercial gold deposits can potentially be dredged from this river. The next step is to follow up with a preliminary dredge sampling program.

Recommendations

First: I am suggesting to my client that he follow-up to see if exclusive commercial rights can be obtained for mining gold along this river. If so, I am advising him to arrange it as soon as possible. If the client is looking for a partner to develop the prospect, as long as the cost is reasonable, we can help arrange the financial resources to help pay for concession-rights.

Whether or not acquisition of exclusive rights (not excluding local mining activity) to develop the gold deposits along the river will affect the way we should proceed:

A. Quantification and marketing the proven reserves: If we can obtain the exclusive commercial rights, we should look hard at the concept of implementing a sampling program in concert with credible consulting-geologists to confirm and certify the existence of proven reserves. The purpose here would be to market the reserves to a larger public-traded mining company. In this event, we are prepared to help provide the funding and expertise to perform the sampling program. A good start would be to consider contracting with the same firm our client is using on the iron-ore project to perform the geological functions required to map and substantiate proven reserves.

B. Mining high-grade gold deposits: In the event that exclusive commercial rights on the river are not available, or a preliminary dredge-sampling survey convinces us that average reserves are not marketable, based upon what local miners are recovering from the river using primitive methods, it is a near certainty that money can be made using dredges to target high-grade gold deposits.

A preliminary dredge sampling program will be necessary whichever way we move forward with this project.

There would be several objectives in the preliminary dredge sampling program:
1. Determine if the average gold-values in the river will support a quantification program (outlined in A above) with the purpose of marketing proven reserves to a larger mining company.

2. Establish the value of high-grade deposits to get an idea how much money can be made from going right into commercial production.

3. Work out what recovery equipment will be needed to pursue either step A or B above.

4. Work out how we will harmonize a dredging program with local miners, general populations along the river, and others (government officials) who will take an interest in what we are doing.

It would be wise to allow no less than a month for the preliminary dredge sampling. To keep costs down until we confirm a commercial opportunity,if possible, I suggest we use the client’s existing structure as much as possible — meaning vehicles, local staff and the existing base camp.

To perform the preliminary sampling, we would need to hire several local dive-miners. I would like to choose them.

If possible, I would also like to hire an assistant/interpreter person who can stay with us throughout the project to help facilitate communication and coordination with locals. This might be someone that the existing geology-firm could provide. Having someone who is sincerely dedicated to projecting our intention and goodwill during the sampling project will go a long way to facilitate steady progress in the field.

Therefore, the next step is for us to find out:

A. Can we obtain exclusive commercial mining rights on the river? If so, at what cost?

B) Can we obtain permission to proceed with a suction dredge exploration program? If so, at what cost?

Pumps
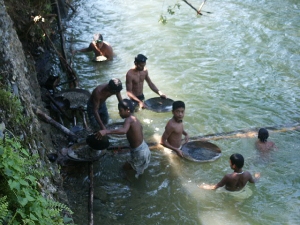
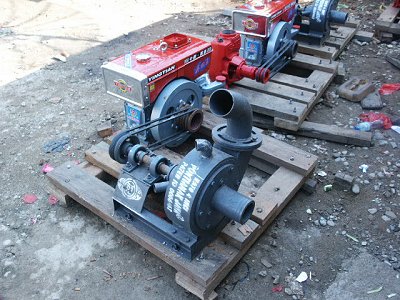
Pumping systems used to support local high-banking operations.

If gaining permission to use a suction dredge is going to delay the project, we also have the option of proceeding with a system like what the locals are using in their high-banking operations. Just by adding an air compressor and an extended suction hose, we can adapt a sluicing operation (like what locals are using) to an underwater dredging program. In this case, we should allow a week to fabricate an improved recovery system. If we go this way, with just a little instruction, we can hire locals to do all or most of the work. So, for the most part, this would just be another local mining operation.

Having said that, using a floating dredge would be much more efficient for moving the gear around to each place that we want to sample. A 5-inch suction dredge in experienced hands will also out-produce one of those sluicing outfits about ten times over! Still, if necessary, we could get the preliminary sampling job accomplished using (for the most part) local equipment.

Dave McCracken
Underwater Mining Specialist

 
video subscription graphic

By Dave McCracken

Gold is extremely valuable and probably the most sought after of all the valuable metals found on earth.

Dave Mack


All things of the physical universe which can be sensed by man are made up of one or more chemical elements. An “element” is a basic simple substance which cannot be further broken down by chemical means. Elements are the basic building blocks of the material universe in which we live. Scientists have discovered over 100 basic elements, and have laid them out in order according to their atomic structures on the “periodic table of elements”.

Gold is one of the 92 naturally occurring elements found on earth. There is no known natural substance that can destroy gold. It can be dissolved by chemical means, but even then it remains as gold-only in a more widely dispersed state.

For eons, man has dwelled upon where gold might originally have come from-that is, its native source. Scientists have recently discovered that gold can be artificially produced by the atomic bombardment of lead, which is another basic element. However, the process is very expensive, more so than the monetary value of the resulting gold. So gold is not artificially produced on a commercial scale. However, this discovery has brought on the theory that the gold being found on our earth might originally have been manufactured in the nuclear furnaces of stars which have long since vanished, our planet being part of the remaining debris.

The scientific symbol for gold is Au. It is number 79 on the periodic table of elements. Gold is not magnetic, but it is an excellent conductor of electricity. Its melting point is 1945° F. Gold is not corroded or tarnished by moisture, or oxidized (rust) by the effects of oxygen and water, or affected by ordinary acids, as most other metals are. Deposits of gold that have lain inside a mountain or under a streambed or even on the ocean’s bottom will remain there and be rather unaffected until moved by the natural forces of the earth-or taken by man.

Gold is a very soft metal, being 2. 3 on a hardness scale of 10, which is one of the factors giving gold its tremendous malleability-meaning that it can be pounded, twisted, rolled and/or squeezed into all kinds of different shapes without breaking apart. In fact, the yellow metal can be pounded so thin that it is translucent, and yet still remain intact as a solid sheet of gold. It has been said that such sheets of gold can be produced so thin that it would take a quarter of a million of them stacked one on top of the other to make a pile just one inch tall! Thin sheets of gold such as these have the distinctive quality of allowing sunlight to pass through, yet they will reflect off a large portion of the sun’s infrared rays (heat). For this reason, thin layers of gold are now being used in the window glass found in many of today’s modern skyscrapers to help save on the tremendous costs of energy necessary to keep the interior of such buildings cool during the hot summer months. Similar films of gold have also been used in the face shields of helmets used by astronauts to reflect off much of the increased bombardment of infrared rays which occurs out in space.

Watch what happens to gold when it is pounded by a hammer in the following video sequence. This is the reason why most gold found at the bottom of a waterway is pounded flat and smooth:

Gold is extremely ductile-meaning that it can be drawn out into wire or threadlike forms without becoming brittle and breaking. It is said that gold can be drawn out so thin that a single ounce could be made to stretch a continuous length of 35 miles. That would make the thread very thin indeed, but that is exactly what is needed in today’s electronics industry, where entire circuits are being placed in chips the size of a pinhead. Because of its high electrical conductivity, its extraordinary resistance to deterioration and its ductile qualities, gold is in great demand by the electronics industry. So it is not uncommon to find gold being used in the circuits of many of today’s common everyday electronic devices-like TV’s and calculators, not to mention in some of the more sophisticated electronics of today’s world.

Gold is also commonly used by dentists and is widely used to make jewelry.

Gold’s use in the making of coins has greatly increased within the past few years.

Gold has another distinctive quality, which is perhaps most important to the prospector (other than its value) and that is its weight. Gold is extremely dense, one of the heaviest of all metals. The specific gravity of gold is 19.6, meaning that it weighs 19.6 times more than an equal volume or mass of pure water. Iridium (one of the platinum group metals) is one of few metals that have a higher specific gravity than gold, being 22.6. Gold is around 8 times heavier than the quartz rock which it is commonly associated with when gold is found in hardrock form. A single cubic foot of gold will weigh approximately 1187 pounds. It is this quality of gold, having a superior weight factor over the other materials usually found along with it, that is used in most gold recovery methods. For example, watch in the following video segment how fast gold penetrates down through the lighter materials which commonly make up a streambed:

Gold is not the most valuable metal, but it is extremely valuable and probably the most sought after of all the valuable metals found on earth. At today’s market exchange value, that same cubic foot of pure gold would be worth in the neighborhood of 10 million dollars. A cubic inch of pure gold would be worth about 7 thousand dollars. So gold is valuable, very valuable indeed; and it does not take very much of it to accumulate a considerable amount of wealth.

There is one other distinctive quality of gold worthy of mention. In its natural form, gold is a very rich and beautiful substance to look at. In fact, this is so true that there is a saying among experienced miners, and those individuals who handle a great deal of the yellow metal, that it is not a good idea to look at any substantial amount of raw gold for very long at any given period of time. This is because it has a tendency to bring on a condition referred to as “gold fever.” This is true!

“Gold Fever” affects different people in different ways. While it might make one person want to buy the gold at almost any price, it could just as easily make another want to steal it-at any price. However, the “fever” tends to always make a person want to have the gold for him or herself, and more of it if possible, with the means of getting it depending upon the character of the individual. This condition, (gold fever) is something to take note of for anyone who is planning to get involved with mining or dealing with gold. This is nothing to laugh off, for it has been the cause of a great many deaths, failures, wars, enslavements, and loss of friendships. It has altered the course of a significant amount of history- much of it being worse for the others involved. It is true that for many, gold is the thing that dreams are made of. Therefore, gold has a tendency to strike below the social behavior in a person and bring out some of the stronger passions which lie underneath. It is well to keep this strongly in mind during the stage in which you are considering whom to take on as a partner (or as employees) in a gold mining venture of any size.

One common characteristic of a person who has been touched just mildly with a case of gold fever is that he or she tends to throw good business sense to the wind and dive in head over heels, much as a young child might do if he found a tub full of his favorite candy or ice cream. It is this very same factor that the con-man stirs up and plays off of. And if you think that there aren’t a few experienced ones in the gold mining field-think again. The majority of failures in gold mining ventures are the result of this same loss of good judgment which sometimes occurs when dealing with the valuable metal.

Perhaps the most successful precaution against being struck to any harmful degree with the “fever” is in honestly taking on the viewpoint that “anything worthwhile is worth lots of time and effort.” It is the persons who intend to get rich quickly without much energy output on their part who most often fail in the business of gold mining. If, upon examining your own intentions, you discover that you are interested in getting rich quickly, without having to work for it, it is almost a certainty that you have caught at least a touch of the fever. On the other hand, if you are interested in going out into God’s country to see if you can find some of the yellow metal as an adventure, and/or perhaps to see if it can be done as a viable business enterprise, you are probably on the right track and you are more likely to succeed. And who knows, maybe you will strike a big one; it happens! Just remember that the finding and recovering of gold is similar to any other business venture. It takes a fair amount of time and work to get consistently good at it. Take it on as such and you will have less trouble-and fewer losses.

SOURCE OF GOLD

When considering the source of gold on this planet alone, it is necessary to study the earth and take a look at some of its more recent geological history.

Scientists believe that the earth is an extremely solid mass, which grows more and more dense towards its center. It is believed that the gold which is found on the earth’s surface and in its outer crust was once deep down inside the earth’s molten mass and was carried up to the surface by the effects of volcanic activity.

In hardrock form, gold is generally found associated with quartz in the form of veins which protrude through the general mountainous rock–referred to as “country rock” by geologists. In the early days of gold mining, it was generally believed that these quartz/gold veins were once pushed up out of the lower bowels of the earth as volcanic magma. Upon this principal, it was thought that a vein should become richer as it was followed deeper into the earth. However, this was not always the case.

More recently, it has been discovered that most quartz veins were not formed during the same time period as the country rock that surrounds them, but later. The cooling of the earth’s outer crust (country rock) apparently caused many cracks and fissures from which the gasses and superheated steam could escape out of the earth’s molten interior. These water vapors also carried minerals with them through these avenues of escape, with one of the predominant minerals being silica–which forms quartz. The water vapors carried other minerals upward too, of which gold, silver, iron and platinum are just a few. Silica has distinctive characteristics of its own, one of which is that it tends to trap heavier elements when they are passed over and through it in a dissolved form. So while the water vapors pushed the heavier minerals upward towards the earth’s surface through cracks and fissures, they often combined with silica and formed vein-like structures.

Formation of mineral lodes.

Generally, gold is associated with quartz. However, quartz is not always associated with gold, because there are countless quartz veins that have no gold-or at least not enough gold in evidence to make the mining of the vein profitable. Veins which contain valuable minerals are referred to as “lodes.”

“Ore” has been defined as any deposit of rock from which a valuable metal or mineral can be profitably extracted.

When a valuable lode is found, in order to mine it, the ore is usually blasted out of the vein and is crushed down into a very fine powder from which the gold, silver and/or other valuable minerals can be extracted by any number of chemical or mechanical procedures. This entire process is called “lode mining” or “hardrock mining”.

Millions of years passed after the rich mineral lodes were formed, during which time a large amount of weathering was caused by heat and cold, animals and vegetation, rain and wind, snow and ice, glaciers and their resulting runoffs, earthquakes, and ocean tidal changes as great as 800 feet in elevation for each tide. That was due to the moon revolving closer to the earth during an earlier period. So, after the rich veins were formed, a tremendous amount of disturbance and erosion took place which washed many of the exposed rich mineral lodes out of the mountainous rock and into the stream and river systems which flowed during that time period.

The steady heavy flow of water over a streambed creates a continuous movement of the streambed materials, causing a natural sorting of the various minerals by their different sizes, shapes and weights. Gold, being extremely heavy in comparison to most of the other materials that end up in a streambed, tends to be deposited in common locations where heavier materials can become trapped because of their greater weight. Deposits of gold and other valuable minerals which have been washed away from their original lodes and redeposited by water in streambeds are called
“placer deposits” (pronounced like “plaster”–without the t).

Finding and recovering placer gold deposits requires an understanding of where heavy sediments will collect while being transported by the forces of water during large flood events.

Gold directly from a lode is crystalline in structure, and is usually referred to as “rough gold” because of the coarseness of its surface. Once washed from its original lode and swept away by the forces of nature, gold tends to become pounded flat and rubbed smooth.

Gold directly out of a lode is crystalline in structure. Gold tends to
get pounded smooth as it is being washed further from its original lode.

An experienced prospector can sometimes get a pretty good idea of how far a piece of gold has traveled from its lode by the degree of roughness on its outer surface.

PURITY OF NATIVE GOLD

In its native state out of a lode, gold is almost never 100-percent pure, but has a percentage of other metals along with it. These other metals contained with gold, whether of value or not, are called “impurities.” The impurities with gold most often consist of silver, copper and a little bit of iron, platinum and cadmium in differing amounts. The proportions of these other minerals change from lode to lode, which gives the gold coming from one location different colors, qualities and value from the gold extracted from another location.

When someone finds gold, either in placer or lode form, it is not uncommon to have the gold tested (“assayed”) to find out what percentage of impurities are present and exactly what they are. The actual gold content in native gold just out of a lode or placer deposit changes from location to location. But a reasonably safe average (at least in California) would be to say that 80% is gold and 15% is silver and/or copper.

Gold which contains 20% or more of silver is called “electrum.”

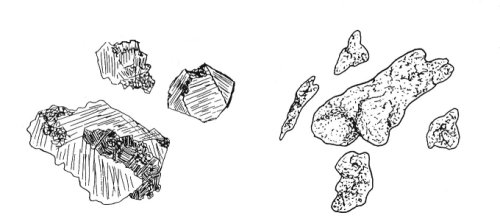
Pieces of placer gold, and those pieces which have eroded from a lode, are found in a wide variety of sizes and shapes, ranging from large pieces (“nuggets”) as great as 200 pounds in weight (very rare) to “flakes,” and smaller “grains,” and even smaller “dust,” down to pieces so microscopic in size that it would take perhaps 8 million particles combined in order to accumulate enough gold to value one dollar.

The following video segment demonstrates different types and sizes of natural gold which either originated from different lodes, or traveled greater distances from the same lode down along a waterway:

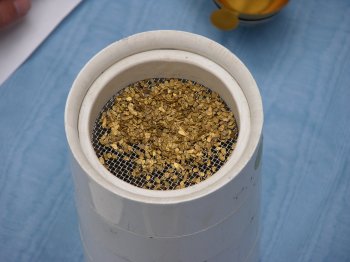
The system commonly used to classify the size-differences of gold is normally accomplished with the use of mesh screen. “Mesh” signifies the number of openings contained along a lineal inch of screen or wire cloth. For example, a screen labeled “10-mesh” would contain 10 openings per lineal inch, or 100 openings per square inch. “Twenty-mesh” would have 20 openings per lineal inch, or 400 openings per square inch, and so on.

Those pieces of gold which will pass through 10-mesh (1/16″ sized openings), yet will not pass through 20-mesh (1/32″ sized openings), are classified as “10-20 mesh.” Gold passing through 20-mesh which will not pass through 40-mesh (1/64″ sized openings) is classified as “20-40 mesh,” and so on.

Gold is often classified and labeled according to its size.

Various sized pieces of gold are labeled as to their different mesh sizes. “Coarse gold” or “nuggets” are agreed to be any pieces of gold which will not pass through a 10-mesh screen. Medium-sized pieces of gold, flakes and so forth, are of the 10-20 mesh range, of which it would take an average of 2,200 separate pieces (“colors”) to make up a troy ounce. “Fine gold” is of the 20-40 mesh size, of which it would take an average of 12,000 separate colors to make a troy ounce. “Flour gold” or “dust” includes all pieces which are smaller than 40-mesh, including the microscopic-sized particles.

Because gold is so malleable, as it is pounded, rubbed, and pushed along by the forces of nature, the gold will tend to hold together, while some impurities will be pounded out and washed free. So generally, pieces of gold become more pure as they are pounded and worked by the different forces of nature-especially in a streambed where it can be heavily pounded by rocks, boulders and such, along with the steady flow of water to help wash away the impurities. This pounding also has the effect of breaking the gold down into smaller pieces, from which more impurities can be washed free. And so it is generally found that smaller pieces of gold are of richer gold content than the larger pieces originating from the same source. For example, the fine and flour gold recovered out of many gold-bearing streams in the Western U.S. will be found to have a gold content greater than 90%.

Nuggets recovered out of the very same deposits can be found to have a gold content of less than 80%. At first glance, this might seem to indicate that fine gold has a greater value than the coarse gold, and this is true as far as the actual gold value is concerned. However, larger pieces of gold have “jewelry specimen value,” due to their own unique and natural characteristics. So they can bring in a greater monetary return than their actual gold value. Fine gold is usually sold to a refiner, who then melts it down and refines it into pure bullion form, to eventually be sold on the world gold market.

INDICATION OF GOLD CONTENT

There are two ways of labeling the gold content of raw and unprocessed gold which are commonly being used in the field today. The “fineness” or “percentage system” is used most often among miners and refiners. This system breaks down the purity into thousandths in order to label the “fineness” (purity) of the gold sample. For example, a specimen that contains 90% gold and 10% impurities would be labeled .900 fine; 88% gold content would be labeled .880 fine; 75% gold content would be indicated as .750 fine, and so on. In this system, “.999 fine” is used to indicate pure gold. The fineness system is often used among assayers to indicate the gold content in the samples which they test.

The other system sometimes used to indicate the gold content in your samples or specimens is the “carat system.” This method is most commonly used within the jewelry business, and is based upon a 24-point system with 100% gold content being 24 carats, 50% gold being 12 carats, 75% gold being 18 carats, and so on.

MEASURING GOLD BY WEIGHT

There are also two separate measuring systems commonly being used to weigh gold. The most commonly used is the “troy system” which is as follows:

24 grains = 1 pennyweight

20 pennyweight = 1 troy ounce

12 troy ounces = 1 troy pound

Scales having these measuring increments are usually available wherever gold mining equipment is sold. This troy system is most-commonly used by miners in the field and when gold is sold on the open market.

A troy pound is equal to .3732 kilograms, whereas a standard pound (avoirdupois) is equal to .4536 kilograms. So you see that they are not the same, a standard pound weighing considerably more than a troy pound. Also, please take note that there are only 12 troy ounces to a troy pound, as opposed to the 16 ounces it takes to make up an avoirdupois pound. The result is that a troy ounce weighs slightly more than a standard ounce.

The other system of measuring gold is by grams. Most triple beam balance scales measure in terms of grams instead of troy increments. So it is not uncommon to find a gram scale being used to measure gold. In this case the conversion scale is as follows:

TROY–GRAM CONVERSION TABLE

1 troy pound = 373.248 grams

1 troy ounce = 31.104 grams

1 pennyweight = 1.555 grams

1 grain = 65 milligrams

FOOL’S GOLD

It is not unusual for a beginner to wonder about the difference between gold and the other materials found inside of a streambed or lode deposit. Sometimes a beginner will puzzle over shiny rocks; and quite often, iron pyrites (fool’s gold) or mica are mistaken for the real thing. In fact, this is so much the case that there is a story of an entire shipload of iron pyrites having been shipped over to England from America during the 1500’s, the yellow stuff having been mistaken for gold. So you can understand where it gets the term “fools gold.”

One of the best ways to get beyond your own uncertainty of what natural gold looks and feels like is to get your hands on some of the real thing. Once you have experienced real gold, you are much less likely to make mistakes. Here is a link where you can buy a sample of natural gold.

Gold is a brassy yellow metal. Once you have seen a bit of it in its natural form a few times, you will no longer have much difficulty in distinguishing the real thing from the other materials that are commonly associated along with it. Gold seldom looks anything like rock. It usually looks like metal; gold metal. The following important video segment demonstrates what placer gold looks like in its natural form:

If you are just starting and have not yet had the opportunity to see much gold in its natural form, there are three easy tests which will validate your discoveries one way or the other:

Glitter Test: Gold does not glitter. It shines. Sometimes it is bright; sometimes it is dull; but very seldom does it glitter. The thing about fool’s gold (pyrites or mica), is that because of its crystalline structure, it tends to mostly be of glittery appearance. Take the sample and turn it in your hand in the sunlight. If it is gold, the metal will continue to shine regularly as the specimen is turned. A piece of fool’s gold will usually glitter as the different sides of its crystal-like structure reflect light differently.

Hardness Test: Gold is soft metal, like lead, and will dent or bend when a small amount of force is applied to it. Pyrites, mica and shiny rocks are generally hard and brittle. Just a little amount of pounding will shatter them. Gold almost never shatters! The following important video segment demonstrates this very important point:

Old-timers used to put specimens in their mouths and bite down to test if they were gold. This is another way of testing the larger-sized specimens. However, keep in mind that a larger-sized piece of gold is worth a great deal and the resulting tooth marks could lessen its value. If you find a true piece of gold big enough for you to bite on, I can assure you that you will have very little doubt that it is the real thing, simply because of its rich nature and its weight. But if you are still uncertain of your find, you might try using the sharp edge if a knife and gently press in on the specimen in a place which is less visible. If it is gold, an indentation can easily be made into the metal with the blade of your knife. You will not dent its surface if it is a rock or iron pyrites.

Acid Test: Nitric acid will not affect gold (other than to clean it); whereas, it will dissolve many of the other metals found within a streambed. Nitric acid can be purchased from some drug stores or prescription counters, and can sometimes be found where gold mining equipment is sold. If you question whether your specimen is some metal other than gold, you could try immersing it in a solution of nitric acid. If your specimen is gold, it will remain rather unaffected. If it is most any other kind of metal, it will dissolve in the acid. Nitric acid will not affect iron pyrites or mica (fool’s gold), but they are brittle and neither will pass the hardness test.

CAUTION: Nitric acid can be dangerous to work with, and certain precautions must be taken to prevent harm to yourself and/or your equipment when working with it. These, and mixing instructions, are covered in Chapter 7 of Gold Mining in the 21st Century.

The following video segment shows the negative affect that nitric acid has upon gold. But watch what the acid will do to nearly any base metal like lead:

PLATINUM

Platinum is an industrial metal, one of a family of six separate metals: platinum, palladium, iridium, osmium, rhodium, and ruthenium. These metals are frequently naturally alloyed among each other so that they are seldom found separately. Platinum is a valuable metal, its value ranging in the same neighborhood (or higher) as that of gold. It also has a high specific gravity, sometimes even heavier than gold, depending upon how much iridium is present.

Sometimes, platinum will be present in placer gold deposits, and so will become trapped in the same recovery systems which are used to recover gold. Sometimes platinum will be present in enough quantity that it can be worth a great deal of money for you to know what it looks like, so you do not discard it along with the waste materials.

Platinum is usually a dull silvery-colored metal, much like steel-only different, in that it is non-magnetic and is not affected by nitric acid like steel is. Platinum does not rust. Platinum usually comes in the form of large and small flakes, just like gold, and sometimes in the form of nuggets.

To help you understand what platinum looks like, the following video segment demonstrates some of the platinum that I have recovered in my own suction dredge operations:

Platinum does not have as great an affinity for mercury (quick-silver) as do some other shiny metals. However, it can be made to have affinity for mercury by the use of certain involved chemical processes, or by putting a negative electrical charge into the mercury.

Russia has been the world’s number one producer of the platinum metals for the last hundred years or so.

If at first you have difficulty in telling the difference between platinum and lead, remember that platinum usually takes on a dull shiny color, whereas lead does not shine at all-unless it is polished or covered with a coat of mercury. Lead (and mercury) are also easily dissolved by nitric acid, whereas platinum remains unaffected. Most other shiny, silvery-colored metals which will be found in the recovery system will be magnetic. Platinum is not.

SILVER

Most silver mining is done by the hardrock method of extracting ore from a lode and processing out the silver by chemical and mechanical procedures. The silver recovered out of most placer deposits is still alloyed with the gold and the black sands being taken out of the deposit.

Native silver has a specific gravity of about 10 or 11, so it is heavy. It will be trapped in most gold recovery systems if present as itself in a placer deposit-which is uncommon. Generally, silver in its native form does not look like shiny silver-like in silverware. It looks more like a silver-colored rock which is uncommonly heavy. Sometimes, native silver is so tarnished that it cannot be distinguished by color at all.


video subscription graphic

By Dave McCracken

There can be a lot of gold deposited under and around the boulders located within a pay-streak!

Dave Mack


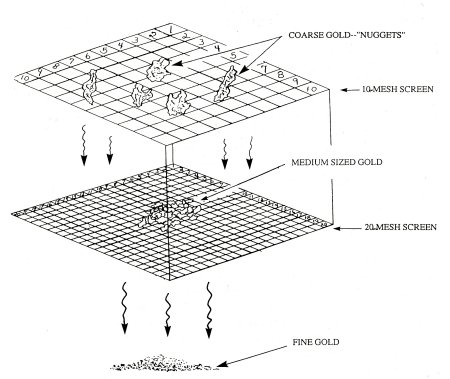
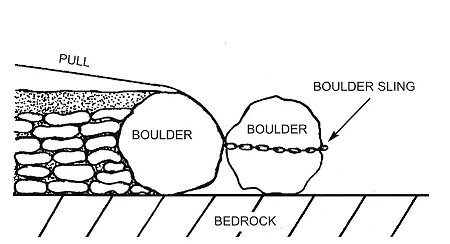
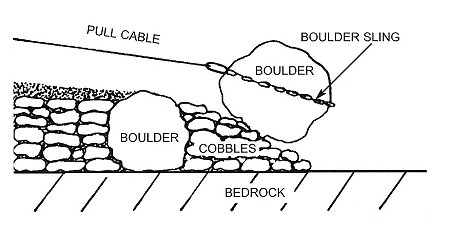
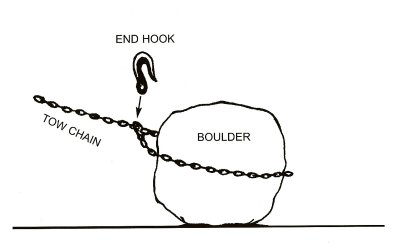
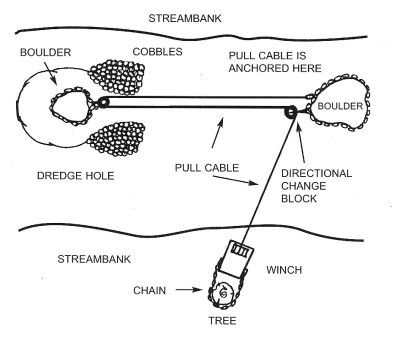
It takes an incredible force of water to move boulders in a river. Once they are moving in a flood storm, they can deposit in low-velocity areas, just like gold does. But, since boulders do not have a higher specific gravity, mass for mass, than most of the other streambed materials, they can be washed downstream just about anywhere in the river during a major storm. So you should not only use the presence of boulders to guide you in sampling. You would be much better advised to focus your attention on the boulders that have been deposited along the common path of gold’s travel.

In shallow streambed material, you can sometimes detect where important bedrock changes are located by noting where the boulders have deposited within the waterway. For a boulder, or a group of boulders, to be found in a specific location along the river’s path, there may be a sudden bedrock drop-off, a large crevice, or some other kind of lower-velocity condition in that area which caused the boulder(s) to be deposited there. Everything in the waterway happens for a reason, even if you cannot always see what it is!

If the boulder(s) is located somewhere along the common gold path, that would be a prime spot to do some sampling. In this situation, I suggest that you do not limit your sampling to the area just behind (downstream) of the boulder, though. Go around to the upstream side of it, as well. Look for any bedrock change which may have caused the boulder to stop there. If gold has moved through that area, that same bedrock change could also have caused gold to concentrate there. Finding the bedrock change that stopped the boulder, and following the bedrock change across the waterway, is a great way to locate the common gold path.

You do not always find boulders with every rich pay-streak deposit. But, it is not uncommon to find many boulders keeping company with a good pay-streak. When you do find them, most of them will probably have to be moved out of your way as you work forward through the deposit.

MOVING BOULDERS BY HAND

There can be a lot of gold deposited under and around the boulders located within a pay-streak. To get most of the gold out from under a boulder and into your suction nozzle, usually the boulder has to be moved at least a little bit.

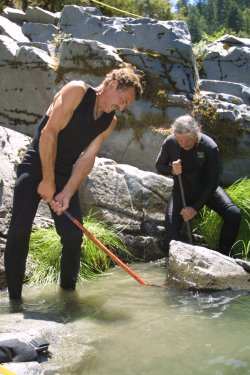
One of the most useful tools that can help a dredger move boulders is a 5-foot (or longer) steel pry bar. If a boulder is too large to be moved to the rear of the dredge hole by hand, it can sometimes be rotated around to one side so that you can dredge out from under part of it. Then, it can be rotated around the other way to access the remaining gold and material beneath. A long pry bar can be a big help to you in moving boulders around in this way.

The key concern while working around boulders is safety! Loose boulders in and around a dredge hole are the gold dredger’s greatest danger, especially when working alone. Boulders resting up in the streambed material are usually more dangerous than those resting on the bedrock. But, those on the bedrock can cause trouble, too, if they are loose and able to roll – particularly, if the bedrock has any slant to it.

As they are uncovered in a dredge hole, loose boulders should be moved and safely secured as a top priority. They should be placed at the rear of the hole, if possible. But, wherever they are placed, they should be positioned so they no longer pose any threat of rolling into the hole and on top of someone working there. You can place smaller rocks and cobbles under the boulders as necessary, to make certain they will not roll or slide.

If you start to uncover a boulder that is resting up in the streambed material, do not forget about it. Until it has been moved and secured safely, a loose boulder should be foremost in your mind. If it is not yet ready to be moved, and you still need to dredge around it to free it up some more, it can be useful to place an arm or a shoulder against the boulder. This way, you can feel if it starts to loosen up in the material. Do not place your arm, head, or shoulder near the underside of the boulder, however. Because, sometimes a boulder will loosen up and crash down very quickly, without much warning. Physical contact with the boulder is helpful when you cannot keep your eyes on it at every moment. The face mask limits your visual perception underwater – especially when you need to watch what is going up the suction nozzle.

The main concern here is to take all necessary precautions to keep yourself from becoming pinned or crushed beneath a boulder in your dredge hole. If a boulder pins any part of your body to the bottom, it may be difficult or impossible for you to get the necessary leverage to move the boulder enough to get out from under it. And, if you are working by yourself …? I know of two dredgers who ended their careers in just this way.

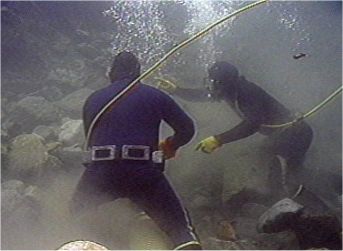
Also beware of fractured bedrock walls that tower over you. They can fall apart and drop in your dredge hole as you remove the streambed material that holds them in place. I got pinned once by a slab of bedrock that broke free of a wall as I dredged away the material that was holding it there. Luckily for me, it landed on my steel-tipped boot, and that I was dredging with another guy on that day!

The second greatest danger to a dredger usually comes from a cobble falling off the side of the dredge hole and hitting the dredger in some way — like on top of the head. This can finish off a dredger just as surely as a boulder. Or, it may cause some serious pain/injury. Fingers and other body parts can get smashed if you are not careful!

Most trouble with cobbles and boulders can be prevented simply by taking your hole apart with safety in mind. The proper method of taking a dredge hole apart has already been fully covered in my Gold Dredger’s Handbook, so I will not repeat it again here. But, as a point of emphasis, the fastest way to take apart a streambed also happens to be the safest way.

Production dredging goes very smoothly and quickly when you have some area of exposed (dredged) bedrock between the non-dredged material in front of you and the cobbles, boulders and tailings behind you. When you start uncovering a boulder in the material, you should immediately begin planning where you are going to move it, once it is ready.

If you run across an occasional boulder that you cannot move by hand, sometimes you can dredge the material (and gold) out from around and under it without having to move it out of the dredge hole. You accomplish this by moving other, smaller rocks out of the hole to make room for the boulder. In this way, if there are not too many boulders, you can keep moving forward on the pay-streak without the few boulders slowing you down very much.

But, if there are a lot of large boulders down along the bedrock, you will likely discover that at least some of them will need to be completely removed from your excavation if you expect to uncover very much bedrock with your suction nozzle. Some boulders will need to be removed to make room for other boulders as you move forward on the pay-streak. If you cannot remove the boulders from your dredge hole by hand, then you will need some mechanical assistance.

DIFFERENT TYPES OF WINCHES

COME-ALONG: A “come-along” is a portable, hand-operated winching device that can be of considerable help to a small-sized digging program. It can be used to move those boulders that are not huge, but which are too large to be moved by hand. Come-alongs range in size. I recommend a larger version of the better quality, rather than the really cheap, imported models. Come-alongs have a great accessibility factor, because you can carry one just about anywhere. Their operation is somewhat slow. But, they will give you that extra edge when you need to move just a few boulders, and you do not own or want to set up a power winch.

GRIP-PULLER: Several companies make a hand-winching device that rides along on a steel cable. There is a handle that you crank back and forth, similar to a come-along. Each time the handle is cranked in each direction, the device moves an inch or two along the cable. These units also come in different sizes. In my opinion, grip-pullers are a substantial step up from a come-along, both in pulling-power and dependability. I have used these units underwater, but find that the water resistance adds substantial work to the cranking action. Still, when you are working alone, having this device in the hole with you allows you to see what the boulder is doing while you are winching it

Where you can buy winching supplies

USING YOUR TRUCK AS A WINCH: If your vehicle can be driven to a nearby position, you can stretch a cable from the vehicle to the boulder. The proper direction of pull can be rigged up by running the cable through snatch blocks (heavy-duty pulleys) which can be anchored to trees, boulders or whatever is available. Then you can use the pulling-power of your truck to help move the boulders out of the way. Four-wheel drive vehicles work better for this, especially when they are carrying a load to increase tire traction. Suggestion: It is better to connect the cable to something on the vehicle’s frame, rather than just the bumper!

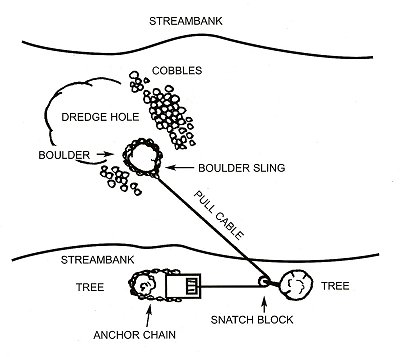
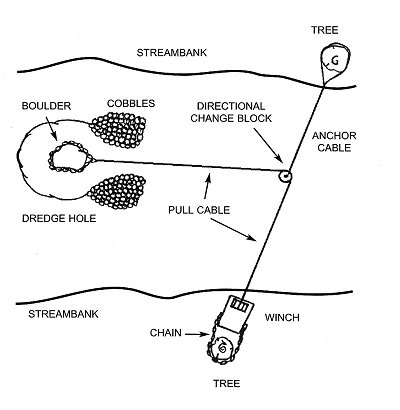
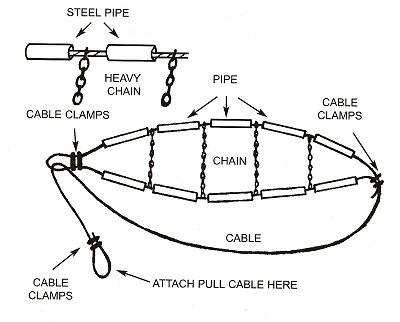
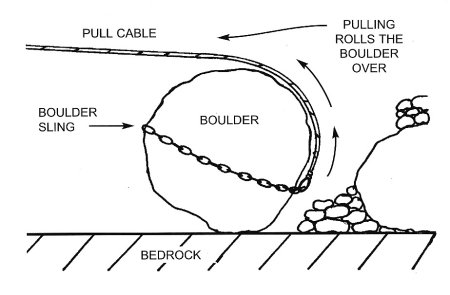
When conditions are right for it, using a vehicle to pull smaller boulders can be much faster than using a come-along. One person operates the vehicle, while a diver is in the water, slinging the boulders. Safety becomes a greater concern when more than one person is involved in the pulling and the slinging of rocks. Communication and coordination between the “puller” and the “slinger” are very important to prevent serious accidents. Suggestion: If you turn the truck around and pull in reverse, you can better-see signals from your partner, and sometimes you get better traction, especially on a 4-wheel drive vehicle. Another suggestion: It is better to keep your vehicle a respectable distance from any drop-offs (like into the waterway), just in case the boulder gets momentum in the wrong direction. I know of guy who got pulled over the side of an embankment by a boulder gone wild!

Larger-sized trucks, tractors, bulldozers, and other heavy equipment can sometimes be used to move bigger rocks with even better results.

AUXILIARY TRUCK WINCHES: Auxiliary automotive winches are also able to move small to mid-sized boulders for a dredging operation with excellent results. Some of those little winching units have a wondrous amount of power. A typical 8,000 or 10,000-pound electric winch will move a surprisingly-large boulder!

If you are going to be using an electric winch, you may want to consider installing dual batteries in your vehicle. It also helps to keep the engine running while you are winching, so the batteries can quickly regain their charge between pulls.

When using a truck-mounted auxiliary winch to pull boulders, it is a good idea to block all four wheels. This precaution helps to keep the vehicle from moving, rather than the rock you are trying to pull. The front tires should be blocked especially well. If there is an embankment to worry about, it is also a good idea to run a safety chain or cable from the vehicle to some additional anchor behind, like a tree or another truck. This will protect against losing your vehicle over the embankment if the boulder happens to roll the wrong way. Sometimes this added measure is necessary just to keep the vehicle from sliding during the pull.

Probably the best kind of auxiliary vehicle winch for dredging purposes is one that can be attached mechanically to the “power take-off unit” on your vehicle’s transfer case, if it has one. With this kind of winch, you can use the full power of your truck’s engine to pull rocks. Not only will this provide you with more pulling power, but you will not have to worry about your batteries running down.

There is also a lot of good to be said for the portable electric and hydraulic winches on today’s market. I know of many smaller-scale and commercial dredgers who use them. They are quite powerful! Portable electric winches can be framed up to (1) attach to a vehicle, (2) be taken out to the dredging site, or (3) even be floated on a platform, where there is deeper water. All that is needed is an automotive battery and a means of keeping it charged up. The portable hydraulic winches can be similarly effective. The winch controls can be extended out on a longer cable and even modified to work underwater, which can be very helpful!

LOG SKIDDERS: Most gold-dredging country is also logging country. So there are quite a few log skidders around that can be leased or hired to pull boulders for you. Log skidders are usually equipped with powerful winches. They can really do a job in pulling the larger boulders! Also, you can drive them into some pretty difficult areas. Hopefully, you can work out a deal that will be ideally suited to your operation; a deal perhaps, where you pay by the hour and have the skidder arrive at a certain time each day, or whenever you are in need of it’s services.

PORTABLE POWER WINCHES: Gasoline-powered, mechanical and hydraulic winches are available in all sizes. Generally, the larger they are, the more winching-power that they produce. But, the added size and weight also makes them more difficult to pack into some of the less accessible areas.

If you find a widespread, rich pay-streak with plenty of large boulders that need to be moved, you should set up on your dredging site the most powerful winch that you are able to haul in there. The more pulling-power you have available, the smoother and faster winching will go.

I never recommend that a dredger buy a portable power winch just because he or she will be dredging. It is probably better to wait until you know exactly what your needs are. I have worked many pay-streaks where no winching was needed at all. And, in many of the pay-streaks that did require winching, a number of the boulders were so large that the small, portable store-bought type of winch would not have been adequate for the job.

You can find some pretty heavy-duty used winches for sale at about the same cost as a lighter-weight, new portable unit. I advise waiting to see what you will need before putting your money into a winch.

Having said that, here is something to consider: Mechanical winches seldom have a control mechanism which can allow the operator to stand away from the machine where all the wrestling is going on (and in the line of fire if a cable breaks). While I have used some wonderful mechanical winches, there was never a time that we were pulling a big rock that I was not worried about something going wrong with all those tons of energy happening right next to me. There is a lot to be said about electric or hydraulic units that will allow you to step away from the danger with the controls in your hand.

WINCHING COBBLES IN DEEP MATERIAL OR SHALLOW WATER

As I have stressed in other articles about dredging, the main limiting factor to progress is in how quickly oversized material (rocks that are too large to be sucked up the nozzle) can be moved out of the ongoing excavation. In deeper streambed material, there can be so many cobbles that there is no longer any room directly behind the dredge hole to throw them. You can run into a similar problem in shallow water, where the cobbles must be lifted out of the water (where they become a lot heavier) to get them behind the dredge hole. In these types of situations, it is common to fill cargo nets with your cobbles and winch them out of your dredge hole in bulk. The following video sequence was taken in an operation where we were removing big lots of cobbles from a deep excavation in just this way:

SETTING UP A HOLE FOR WINCHING

Before you start winching boulders, it is a good idea to first make sure that you have located the lower (downstream) end of the pay-streak. You do not want to winch boulders onto any part of the pay-streak that you will be working at a later time. While the winter storms could possibly move some of the cobbles and dredge tailings which were placed on a pay-streak in error, it takes much more than a winter storm to move boulders from where you winch them. Believe me; it is much better to plan ahead, so you only need to move boulders one time!

BUILDING A RAMP

It takes a tremendous amount of winching-power to pull a boulder up and over another boulder from a dredge hole. The direction of pull is all wrong, and the second boulder will act like a barrier. The winching is much easier, smoother, and far less dangerous, if a ramp is built so the boulders will have an inclined runway to be pulled along. Cobbles can be used to make an effective boulder ramp. Therefore, an important part of setting up your dredge hole for winching is to construct a ramp/runway that can be used to easily remove the boulders, without them encountering difficult obstructions.

It can be really tough to pull a boulder out of a hole without a ramp.

Cobbles can be used to make an effective ramp for winching boulders out of a dredge hole.

One approach to setting up your hole is to dredge around a number of boulders as much as possible to free them up for winching. This way, more boulders can be pulled out of the hole once winching is begun. Then you can come back later to clean up the bedrock with your dredge.

To perform winching effectively, you will need plenty of air line attached to your hookah system. This is because it is necessary for the diver to sling each boulder and follow it to its final destination where he will disconnect it. Then, the sling and cable must be pulled back and attached to the next boulder. Since this process requires a lot of movement, depending upon the distance involved, you may need to attach an extension onto your air line to accomplish this smoothly.

FEASIBILITY OF MOVING BOULDERS

A dredging operation that requires a lot of boulders to be winched is going to move slower than if little or no winching is required. A winching operation almost always requires the involvement of at least one other person, sometimes even two or more. Those “extra hands” will usually expect to get something for their active participation in your dredging project. So you will find that when you need to use a winch, you will be moving slower through the pay-streak, and it will usually cost more to run the operation. Therefore, a pay-streak that has lots of boulders usually needs to pay pretty well to make the additional effort worthwhile.

The following video segment will give you a look at an organized winching program where multiple persons were involved:

Sometimes, you may discover an excellent pay-streak, but find that it lies beneath many boulders that have to be moved. Even though there may be plenty of gold under the boulders, after figuring the time and expense involved in winching, you may conclude that the gold recovery, though excellent, is still not sufficient to make the project economically feasible. Big boulders are not easy to move. Moving them takes time and money; more, sometimes, than the gold is worth. So, to avoid getting bogged down in an unworthy project, keep track of your daily expenses and your daily gold recovery. Then you will have some basis for calculating whether it is financially worthwhile to continue dredging in that specific location.

If your winching helpers are not full-timers on your dredging operation, and if the location is not too remote, you might arrange to have them arrive at a certain time each day to help pull boulders. That way, you can spend the morning setting up the hole to winch as many boulders as possible. Then, when your help arrives, the boulders can all be winched out of the hole at one time. After winching is completed for the day, you can let your winch helpers go, while you go back down and clean up the hole with your dredge. This way, you are not paying helpers to stand around with nothing to do while you are dredging. It can make a difference.

SETTING UP A WINCH FOR OPERATION

When you are using a portable power winch to move boulders in a dredging operation, the winch must be set up on a solid and stable foundation. It takes a tremendous amount of force to move a boulder. Sometimes, the boulder will move quickly. Or, sometimes, the sling will slip off the boulder, causing the cable to suddenly go slack. Maybe the boulder will loosen up and roll the wrong way, causing a sudden, heavy stress on the cable. When these things happen, and they do happen, you do not want your winch bouncing around or sliding off the platform. That could be extremely dangerous! The winch must be stable!

The winch also should be anchored to a solid object behind it which will hold its position much more securely than the boulders that are to be moved. A fair-sized tree, or a large boulder, directly behind the winch platform can work well for this purpose.

Also, the cable or chain being used to anchor the winch must be considerably stronger than the winch’s capability to pull. The last thing you need is your anchor chain or cable breaking while you are pulling a large boulder! This could cause the winch, and the winch operator, to be yanked off the platform, resulting in a serious accident. Undamaged, heavy-duty truck tow chains with the adjustable end-hooks are excellent for anchoring a winch. Make sure you get chains that are strong enough.

Your winch should also be anchored to a point which is lower than it is. If the winch is anchored from a low point, when boulders are being pulled, the winch will be held down more solidly onto the platform. If the winch is anchored to a higher point, during pulling the winch can be lifted off its platform. This can also be dangerous.

Sometimes, you will not be able to find a good location for your winch along the streambank. You prefer a location where the winch can be set up to directly face the boulders to be pulled, and which provides a level, solid foundation with a properly-located, fixed object from which to anchor the winch. But if that is not available, you can almost always find an acceptable foundation somewhere between two large objects along the bank. The platform may require a little concrete work to get it right. The winch can be anchored to one of the objects, while the other object can be used to attach a snatch block (heavy-duty pulley). The cable can then be run from the winch, through the snatch block, to the boulders that need to be moved. One advantage to this rigging setup is that if the cable does happen to break under a great strain, it will be less likely to fly directly at the winch and its operators.

Positioning the winch between two anchors on the bank,
because there is no easier way to get a straight pull with the winch.

When you set up a winch, it is usually best to position it so the boulders will be pulled as much as possible in the desired direction. The boulders will also need to be pulled far enough away from the dredge hole that they will not have to be moved again at a later time. Often, you will not be able to set up the winch in a position where you can directly pull the boulders in the desired direction. For example, you may want to pull them downriver, rather than toward the stream bank. This situation is most commonly corrected by using directional-change snatch blocks. A snatch block (pulley) can be anchored at a point from the exact direction that you want to pull boulders. The cable then runs from the winch, through the snatch block, to the boulder. In this way, you can usually move the boulders in any direction that you desire from a stable winching position along the bank.

Setting up the proper direction of pull by anchoring a snatch block directly downstream in the river.

Directional-change blocks for winching should be very heavy-duty. They need to be stronger than the cable being used, or the capability of the winch to pull. The best pulley is one that can be quick-released from the cable. This way, you do not have to feed all the cable through the block to get rigged for winching. Good winching pulleys are generally available at industrial equipment supply stores and at marine equipment shops. Directional-change blocks can be attached to trees or boulders with the use of additional cable, chokers or heavy-duty chain. You will find that a few extra tow chains (long ones) and chokers will come in very handy when setting up a winching operation. Chains which have the end-hooks on them are best, so you can adjust their length to meet your needs.

To minimize damage to the environment, you can place pieces of wood between the cable or chain and the trunk of any tree that you use as an anchor. When you anchor a directional-change block to a tree or boulder, you are almost always better off anchoring to a low point. This will reduce the chances of rolling the boulder over or pulling down a tree.

When you use a cable to anchor a winch or directional-change block to a boulder, set it up so that the pull will not cause the cable to become pinched (between two boulders or between a boulder and the bedrock) or be pulled into the material underneath the boulder. Otherwise, after the winching, you may have trouble retrieving your cable without having to move the anchoring boulder as well.

At times, you may need to set up a directional-change block, to pull boulders in a desired direction, but cannot find a downstream boulder that is large enough to use as an anchor. In this case, you can run an additional cable out from a fixed object further downstream on the opposite side of the waterway, and attach your directional-change block to the cable. Then, by increasing or decreasing the length of the cable, you can position the block right where you want it.

Setting up a directional-change block by extending it out on a cable from the other side of the waterway.

It is not a good idea to winch boulders with rope, even the smaller boulders being pulled by your truck or a come-along. When you use rope for winching, the rope stretches even if it is doubled-back multiple times for extra strength. And, it stretches. And, it stretches. Then, it breaks. Such breaks can be dangerous when working around boulders. Also, it can quickly exhaust your supply of rope. Rope is just not strong enough for the job. Steel cable is best. You might get a deal on good, used steel cable from the scrap metal yards. Call around to find out who has it when you need it. Scrap yards usually sell it at scrap prices, by the pound, even if it is in good condition.

The cable you use on your winch should always be considerably stronger than your winch’s pulling capacity. The last thing anyone wants to see is a bunch of out-of-control steel cable flying wildly back in his direction. Faulty or worn cable should be replaced immediately and never used thereafter for winching.

Winching boulders involves an incredible amount of force. So does hauling logs by cable. Similar cables are used in logging operations to pull trees to the loading area. I have heard stories of logging cables snapping, flying back, and cutting a man in two. You are dealing with a similar amount of force when winching the larger boulders in a dredging operation.

WINCHING SIGNALS

During a winching operation, it will be necessary to have a diver in the water to set the sling on the boulders. The diver will also need to remove the sling from each boulder after it has been moved, and then return the sling and cable back to the dredge hole for use in moving the next boulder. This process will continue until all the boulders for that stage of the dredging operation have been moved.

Unless the diver is slinging boulders and operating the winch (a very slow way to go, unless the controls to the winch are in the water with the diver), another person must operate the winch, truck or other device that will be doing the pulling. Once you have more than one person involved in the operation, communication becomes a critical part of the process.

If the winch is a smaller one, or if a truck is being used to pull boulders, and the pulling position is in sight of the target boulders, the job might be accomplished with only one winch operator. On the other hand, in a normal two-man operation, if the winch operator is unable to maintain constant eye contact on the area where the winching is taking place, perhaps a third person will be needed to help with the communication. Each situation will be different. Since this need for immediate and accurate communication is a safety matter which requires on-site judgment, you will have to decide how many people are needed to winch safely.

Sometimes a truck can be turned around to pull backwards, and the driver can directly see and simultaneously carry out the diver’s signals. The controls on an electric winch will often allow a second person to be positioned well enough to see what is happening where the rocks are being moved.

While a boulder is being moved, the diver can watch its progress and signal the winch operator to stop pulling and/or give slack on the line so the boulder sling can be adjusted, if necessary, to successfully complete the movement as planned. The main point is that the diver must be able to communicate to the winch operator quickly and without error. The greater the pulling-power and/or speed of the winch, the more important it is that these signals be accurately received and acted upon quickly. Imagine that you are using a powerful winch to pull a large rock with a heavy steel cable and solid anchoring objects. If your boulder gets jammed against something else in the dredge hole so that it will not move, and you continue pulling with great force, something is eventually going to give. And, it might not be the boulder! This uncertainty is what you want to avoid.

If you are using a winch that does not automatically feed the cable evenly onto the drum, the operator will sometimes need to manually guide the cable. Otherwise, on hard pulls, if the cable starts crossing itself and is allowed to pinch itself on the drum, it may become damaged and thereafter be dangerous for further winching. For this reason, the winch operator may need to focus some attention on the winch, rather than on the diver. In this type of situation, it is wise to include an additional person to help relay communication. Someone needs to be watching for the diver’s signals at all times.

Gasoline-powered winches make noise. So does a gasoline-powered hookah-air system supplying air to the diver. The diver also usually has a regulator in his mouth. With all of this noise present, and the diver having his mouth full, verbal signals are usually not very dependable – especially, if there is a substantial distance between the diver and the winch operator. For these reasons, I have often found visual signals to be more trustworthy, particularly when there is a person positioned at the winch to relay the diver’s signals to the winch operator.

In shallow water, hand signals can usually work pretty well. You really only need three of them: “PULL” , “STOP” and “GIVE SLACK ON THE CABLE”. I highly suggest you take a look at the standard set of signals that my partners and I use in our own dredging operation. These can be found in a special video segment included with an article I wrote about teamwork. Otherwise, create your own signals so that they can be quickly and clearly understood, and one signal cannot be confused with another. There is also a section on winching and signals in my video, Advanced Gold Dredging & Sampling Techniques.” You might want to check it out to get some ideas.

At times, you may be faced with the need to winch boulders out of a dredge hole located in deeper water. In this case, the diver will be heavily weighted down to stay on the river-bottom. He may also be some distance from the streambank. In this setting, it may be nearly impossible for the diver to surface to give timely signals to the winch operator. The process of getting up to the surface can simply take too long! When this is your situation, and if the water is not moving too fast, you may consider using a buoy, tied to a rope that is anchored near the dredge hole, to relay your signals. I personally have found the best and safest signals to be: (1) buoy underwater means, “PULL” (2) buoy floating at the surface means, “STOP PULLING” and (3) buoy bobbing up and down in the water means, “GIVE SLACK”.

This method of buoy-signals is relatively safe. If the buoy is anchored a short distance from the boulder, in order to pull the buoy underwater and hold it there, the diver would have to be away from the boulder on the “PULL” signal. If the buoy is floating, the diver can be anywhere, which is why it is the best choice for the “STOP” signal. You need to make certain, however, that nothing is allowed to snag the buoy’s rope (like the pull cable or an air line) which could pull the buoy underwater and cause a false “PULL” signal!

One other safety note:All divers must always watch their own hookah air lines during winching, to make sure an air line (or the signal rope to the buoy) is not snagged up in the cable or rolled over by the boulder as it is moved.

BOULDER SLINGS

When slinging boulders, try to make sure the pull cable will not rub too heavily or get crushed against other boulders. It is always best to protect the pull cable and let the boulder sling take the pounding. The boulder sling is going to be pounded anyway. Because of this rough duty, boulder slings should be replaced or repaired periodically.

One type of boulder sling often used out in the field is a long, heavy-duty tow chain with end-hooks which allow the chain to be quickly and easily adjusted to any length. This system gives you a fast set up. Just wrap the chain around the boulder in the proper place, connect the end-hook to give you the right fit, and she’s ready to go.

Tow chain boulder sling with end hook.

However, some boulders are smoother and rounder, which makes it more difficult to get a good “bite” with a sling made out of chain. Every time you start to pull, the boulder might move just a little and then the chain slips off. You can waste a lot of time working on a single boulder in this way; it can get quite frustrating.

Logging cable-chokers are also useful for making a cable sling that will tighten up on the boulder as you pull. This may improve the situation, but still not work problem-free on smooth, round rocks.

For round and smooth boulders, I have found the best remedy to be an auxiliary “boulder harness.” This homemade boulder harness consists of heavy cable, chain, steel pipe and cable clamps. It is very easy to construct. The sections of steel pipe slide onto the cable to protect it and to keep the cross-chains properly positioned. The harness is set up like a lasso. It pulls tighter around the boulder as stress increases on the line. And, it generally works well in pulling even the most difficult boulders.

How to put together an excellent boulder harness for winching.

PULLING BOULDERS

Some boulders come easy and some do not. A lot of the problem is in breaking the boulder’s initial suction/compaction in the streambed. If your winch does not have the power to pull a boulder the way you have slung it, sometimes you can break the boulder free by using a rolling hitch A “rolling hitch” is rigged by slinging the boulder backwards, then running the chain or cable over top of the boulder. This places the winch’s pulling-power along the most-leveraged position on the boulder. This will sometimes free a stubborn boulder by rolling it.

How to sling a rolling hitch.

When pulling boulders up and out of a dredge hole, you should pull them some distance away from the hole. Otherwise, if there are more boulders to be moved, they may begin backing up along your ramp and block the passage of any more boulders. This could require you to move them all again, which is a time-waster that you can avoid with proper planning in the first place. For example, take a look at the image at the beginning of this article. That is a top view of a winching operation we did on one of our Group Mining Projects a short while ago. See how we were pulling the boulders back well out of our ongoing excavation?

If you are dealing with relatively deep streambed material and a lot of boulders, you may want to set up an adjustable, directional-change block behind the hole. This way, the boulders can be winched out of the hole in several different directions. This will prevent them from backing up so quickly.

Setting up an adjustable directional-change block to pull boulders in several different directions.

Once the dredge hole has been opened enough, some of the boulders can be winched or rolled to the backside of the hole, rather than taking them up the ramp. Winching will start to go faster when you get to this stage. Depending upon the situation, it may be necessary to winch some of the boulders up the ramp and out of the hole to prevent too much jamming. Be sure to keep access to the ramp free and clear. Otherwise, you may get closed in with too many boulders in the rear of your hole. The more boulders that are jammed up, the more difficult it can be to clear them out of the hole.

Sometimes, when you have winched your boulder to its destination, it will end up on top and pin your sling underneath. If you are using a tow chain as your sling, you can usually just unhook it and have the winch pull it out from underneath the boulder. But, if you are using a sling made of cable, you may not be able to pull it out from under the rock without damaging the harness. For this reason, it is a good idea to have a second sling on hand to help move the boulder off the other harness when this happens.

DIVER’S SAFETY

A diver will be safest by staying well away from the area where a boulder is being winched, and the path it will be taking as it is being pulled. The forces involved in winching are more than enough to cause a very serious accident. Since the diver is underwater, the winch operator sometimes cannot see what is happening where the bolder is located.

What can happen down there, though, is when the diver sees the boulder getting hung up on things as it is being pulled along, he wants to move in and help it along with his pry bar. The less power that your winch provides, the more the diver will naturally feel the need to help the boulder along in this way. Never forget that your safety margin is considerably reduced when you get near a boulder while it is being pulled! A safer course of action would be to stop the pulling and reset the harness, or reset the direction of pull, or improve the boulder ramp, or find a stronger winch for the job. Or, you can increase the pulling power of your existing winch by double blocking…

DOUBLE BLOCKING

“Double blocking” is accomplished by attaching a snatch block to the boulder sling, running the pull cable through that block, and then back to the last directional-change anchor. This type of rigging will nearly double the amount of pulling force that can be exerted against the boulder by the winch and pull cable.

Double blocking back to the last directional-change anchor
will nearly double the winch’s pulling power against the boulder.

If even more power is needed, another block can be set up on the line to run the pull cable back to the boulder sling. The pulling force of any winching device can be increased by continuing to double block in this way. There is a disadvantage to all this rigging, however. It takes much more cable to pull boulders any significant distance. Also, it is equally more difficult for the diver to pull the boulder sling and cable back to the dredge hole after each boulder has been moved. With all that cable going back and forth, it can get pretty complicated – especially if you are dealing with a limited amount of visibility. Quick-release snatch blocks are a must when double blocking. This way, you can detach the pulleys from the cable without having to feed it all the way through.

Actually, one double block is not that hard to manage as long as you have enough cable. It is when you double block a second time that it starts getting difficult to keep track of which cable is going to where? But, this alternative is available to you if you need the extra pulling power to move a particularly large boulder.

Directional-change blocks, by themselves, do not give you an increase in pulling power. For a power increase, the cable must be doubled back so that the boulder is moved only half the distance that the winch is pulling on the cable.


Tags