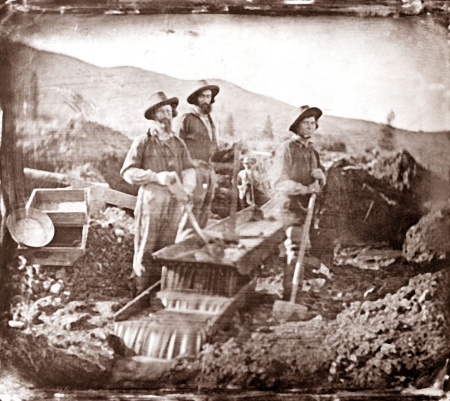
Specialized metal detectors will detect gold well-enough that they will sound-off on nuggets, deposits of smaller pieces of gold or even very small individual flakes of gold.
 There are many different kinds and models of electronic metal/mineral detectors to be found on today’s market. This is a guideline to give you the basic knowledge to help you choose the proper detector for your prospecting needs, and to help you use your metal detector as an effective prospecting tool.
There is a lot of electronic prospecting and gold nugget hunting activity going on at the present time. Consequently, there are different tools being used, along with several different popular approaches in how to properly-tune a detector and how to achieve the best results while searching.
It is important to point out that no two gold-bearing areas are exactly alike. An approach which might work better in one area, might not work very well in a different area. So, the purpose of this article is not to tell you what I think “the best” approach is. It is to give you information about each of the different approaches, so that you can gain a larger bag of tools to use when confronted with different situations out in the field.
I should begin by mentioning that the type of electronic detector used to find gold and other precious metals is not a “Geiger counter.” A Geiger counter is an entirely different electronic tool which is used to detect radioactive elements.
The type of electronic device used to prospect for gold is called a metal/mineral detector (“metal detector,” for short). Metal detectors are quite simple to use (once you understand them), and can be helpful in assisting you to locate gold or silver deposits or specimens once you have gained some personal experience in using one properly. While they are rather simple to use, it does take some practice with a metal detector before you can use one proficiently in gold prospecting activities.
There are many different models of metal detectors being offered on today’s market, most which are more useful to the treasure hunter than the gold prospector (two entirely different fields of detecting activity and procedure). Those detectors of most use to gold and silver prospectors generally fall under two separate categories: Beat Frequency Oscillator (“BFO”), and Very Low Frequency (“VLF”).
BEAT FREQUENCY OSCILLATOR
First we will take up the BFO, which is the simpler of the two—but is less-often found these days, due to the substantial electronic advancements of VLF detectors.
The BFO detector usually has two main settings, which are “metal” and “mineral.” As far as electronic detectors are concerned, the difference between the two is that “metals” are targets which are conductive of electricity–such as copper, gold, silver or iron. And, “minerals” are targets, or target areas, consisting of magnetic non-conductive materials such as magnetic black sands (Fe304). These are also known to prospectors as “black sand concentrates.” Electronic prospectors generally refer to them as “heavy ground mineralization.”
An iron object which has been in the earth for an extended period of time, and having thoroughly oxidized, will usually read-out on a metal detector as a mineral instead of a metal object–which it no longer is.
So the two basic settings on a BFO detector are “metal,” electrically conductive targets (gold and silver), and “mineral,” non-conductive magnetic particles (magnetic black sands).
The various models of detectors have different ways of sounding-out on reading targets. Some detectors have a light which turns on and off. Some have a meter with a needle on a dial–which will also give you an idea of the intensity of the signal given-off by various targets. Other detectors have a tone which changes in volume or pitch when passed over a reading target. Some newer-model detectors have an LED display which spells-out the different types of targets being encountered. Some detectors have a combination of these features.
Generally, the best type of metal detector for prospecting purposes is the type which includes an audio tone in which the audio pitch changes when the search coil is passed over a reading target, and which also allows a set of headphones to be connected. The advantage to using headphones while prospecting is that you can shut out the background noises from the surrounding environment and concentrate more intently on even the smallest audio changes which can and do occur while searching.
On most tone-changing BFO detectors, the tone will not only raise in pitch when the search coil is passed over a target for which it is set to sound, but it will also lower in pitch when the search coil is passed over a target of the opposite setting. For example, if a BFO detector is on the metal setting and is passed over a large gold nugget, the detector’s audio tone should rise in pitch. If the detector on the same metal setting is passed over top of a high concentration of magnetic black sand, the audio tone should lower in pitch. The same thing holds true in the opposite for the BFO detector which is adjusted to the mineral setting.
One other interesting thing to know about BFO detectors is they generally sound-out on the most dominant element, either “metal” or “mineral,” whichever is most present in the ground which the detector is being passed over. For example, if you are passing the search coil over ground which contains gold (this would read as a metal), yet there is a large amount of magnetic black sand in the same ground, it is likely that the BFO detector will read-out on the black sand as a mineral while ignoring the gold. Equal reading-amounts of both metal and mineral elements in a section of ground, in any quantity, will prevent the BFO detector from sounding-out on either element.
Because BFO detectors read-out so well on highly-mineralized ground, the presence of highly-mineralized ground tends to block-out reading traces of gold which lie in or under. This is known as “interference” in the electronic detecting field. Magnetite (magnetic black sands) has such a strong affect on metal detectors, that a concentration of only one percent magnetite in the ground may create a signal-imbalance which is hundreds of times stronger than the signal which might be given off by a small gold nugget.
So, a mineral reading on a BFO detector does not mean there is no gold present, only that there is heavily mineralized ground—which may be blocking-out gold readings.
One of the problems in electronic prospecting is that gold targets are often associated with highly-mineralized ground. Therefore, as a tool, the BFO has its advantages and limitations. In some prospecting situations, it can be very helpful to have a device which is good at pinpointing areas of concentrated heavy mineralization. The BFO does this exceptionally well.
This is further-discussed in my other article on this subject: Prospecting for Gold with a Metal Detector.
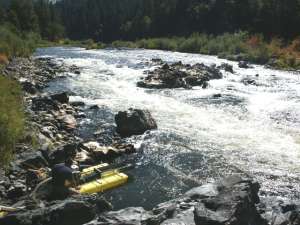
Some places where nuggets and larger flakes of gold become trapped do not allow heavy concentrations of black sand. One example of this would be a location (rapids) where the water runs fast over top of exposed bedrock during major flood storms. Such areas can be well out of the active waterway and directly accessible to metal detecting. BFO detectors can be very effective at helping to locate gold targets in places where heavy mineralization is absent.
GOLD TARGETS
Unfortunately, as a metal, gold is generally not picked-up very well by metal detectors. This is a comparative statement. Gold does not sound-off on a metal detector nearly as well as an iron object of the same size and shape. However, specialized metal detectors will detect gold well-enough that they will sound-off on nuggets, deposits of smaller pieces of gold or even very small individual flakes of gold.
No metal detectors are able to detect particles of gold dust at the time of this writing. This is probably a good thing, however; because there is so much fine gold spread throughout gold country that it would probably create additional interference problems on a sensitive gold detector.
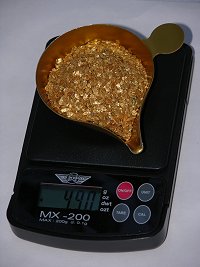
Therefore, in electronic prospecting for gold, we are looking for flakes, nuggets and accumulations of gold. These are targets which will add up more quickly to something of good value.
It is important to understand that different makes and models of metal detectors are not equal in their ability to detect gold objects. Some detectors will just barely sound-out on gold objects. Others will not sound-out at all.
I highly recommend that any person who is buying a metal detector for gold prospecting purposes should bring along some samples of natural gold to test the various detectors before deciding which one to buy.
Small samples of natural gold and small nuggets are readily available by doing a search on the Internet or contacting a prospecting shop. This is to be sure that the metal detector you do buy will sing-out well when it is passed over natural gold objects, even very small gold targets. If a specific detector will not sound-out on gold held in the air, it will most-likely never detect gold targets located in the ground.
When testing-out the various detectors, it is better to use natural gold samples—like nuggets, flakes or a sample bottle filled with smaller-sized gold,. Some detectors will, and some will not, sound-off on small bottles that are filled with fine gold. Using natural gold targets is better than using a gold ring or some other type of jewelry. Jewelry is nearly always made of gold which has been alloyed with other metals (like copper)—which may read-out on a metal detector better than natural gold objects. Therefore, gold jewelry might give you a wrong idea about how well a metal detector will sound-out on natural gold targets.
The best detectors for finding gold are not necessarily the most expensive. Varying costs in detectors are sometimes in proportion to the amount of additional electronic circuitry that is built into the detector for extra features. These sometimes have little or nothing to do with the detector’s capability of locating gold targets.
Gold targets give a solid, mellow sound on a metal detector, similar to lead or brass. Pieces of steel wire and bigger nails usually give a stronger beep—or often a double beep.
The capability of a metal detector to sound-off on a natural gold target will partly depend upon what other metals the gold is alloyed with. Silver and copper make natural gold targets sound-out stronger. Nickel, mercury and platinum alloys make natural gold targets more difficult to find.
Metal detectors read-out on gold better as the pieces become larger. As an example, an average gold detector might sound-out very well when its search coil is passed over an eighth-ounce nugget from several inches away, yet not sound-out at all when passed over three times as much fine gold accumulated in a glass jar at the same depth or distance from the search coil.
Actually, it is not just the size of the target which counts. The object’s shape also makes a difference, and also the direction which a target is facing. A larger, more solid surface-area of gold will sound-out stronger. For example, a flake-shaped nugget is likely to sound-out better on a metal detector than a round nugget of the same weight, as long as the flat-surface area of the flake is facing in the direction of the metal detector’s search coil. Also, coarse and irregular-shaped nuggets, as commonly found in dry placer areas, residual and eluvial deposits, do not generally sound-out as well as nuggets which have been worked-over and pounded by flood storms in a streambed (because these are more dense and solid).
How tightly a gold deposit is concentrated also makes a difference in how well it will cause a metal detector to sound-out. Whereas a quarter-ounce of flake-gold inside of a jar might sound-out well on a particular detector, perhaps two ounces of the same flake-gold spread-out over a slightly larger area might not read-out at all with the same detector when the targets are at the same depth beneath the surface. This is one factor which is important for the gold prospector to realize: Any metal detector wills read-out on tighter concentrations of gold better than larger amounts of gold which are more widely dispersed. Metal detectors will also read-out on nuggets (larger solid pieces of gold) best of all.
DEPTH CAPABILITIES
How deep into the ground that a specific metal detector will sound-out on an object depends upon various conditions. Surprising to many, how much a detector costs may not have much to do with its depth-sounding capability. In fact, some of the less-expensive models are able to probe deeper, and pick up on gold better, than some of the more expensive detectors. The Federal Communication Commission has put a maximum limit on the signal-strength which can be used in metal detectors. So the idea that a more expensive model puts out a stronger signal to probe deeper is simply not correct.
The type of object has much to do with how deep into the ground that it can be located with a metal detector. Different kinds of objects have varying amounts of magnetic and electrically-conductive properties. Therefore, they affect metal detectors differently. Also, some detectors will sound-out on some kinds of objects better than others. As mentioned earlier, gold is not one of the better-reading metals, so cannot be picked-up with a metal detector as deeply as an iron object of similar size and shape.
Another factor which determines how deep an object will be picked-up by any detector is the size of the object itself. Whereas a 2-pennyweight nugget (1/10th ounce) might be picked up five inches deep into the ground with a certain metal detector, a 5-pennyweight nugget (1/4 ounce) might be picked-up eight inches deep into the same ground with the very same detector.
How much an object has deteriorated and has been absorbed into the soil is another factor in how deep the object will be picked-up. Iron objects tend to oxidize and become slowly absorbed into the surrounding material. This causes the target to appear larger and read-out more strongly, so it will be picked-up at greater depth with a metal detector. Once such a target has thoroughly deteriorated as an object, it will stop reading as a metal and start reading as highly-mineralized ground. Gold does not oxidize or deteriorate, so this factor does not apply to natural gold targets.
The size of a search coil on a metal detector is also a factor in how deeply the detector will locate objects. Larger coils generally are able to detect objects at greater depth than smaller coils. But they generally do not have as much sensitivity in detecting smaller gold targets. Smaller search coils have greater sensitivity to small objects, yet do not have the depth-probing capability that larger coils do. Medium-sized coils, from five to eight inches in diameter, often combine the features of having both a reasonable amount of sensitivity for the smaller objects, and acceptable depth-scanning ability.
One thing to keep in mind is that a larger coil will also increase the size of the area being covered by each sweep.
Many nugget hunters prefer to have a smaller search coil handy, because it produces the greatest small-object sensitivity (gold flakes), and because the smaller coils can get into tighter spots—like in and around tree roots and inside of exposed crevices in the bedrock, where nuggets are most likely to be found with a metal detector.
Almost all detectors today are made so that various-sized coils can be attached, depending upon what they are to be used for. When testing a detector, do not make the mistake of assuming that if the device sounds out well on a gold sample when using a coil of one size, it will also sound-out well when using a coil of a different size. Your best bet is to test the detector with the various-sized coils to see which work best for your particular needs.
One of the most important factors determining how deep a metal detector will sound-out on a gold object is how much mineralization (interference) is present in the ground that is being prospected. More minerals equal less depth. This is especially true of BFO detectors. Because black sands usually exist, and sometimes actually concentrate, within the very same streambeds or soils where gold deposits are located, metal detectors are not always used to directly detect gold in streambeds or material of substantial depth. They are sometimes used to scan places where there is a very shallow amount of gravel or material (if any) present over top of the gold (exposed bedrock).
One excellent use of the BFO detector as a prospecting tool is to locate concentrations of black sands in a streambed. Black sands often accumulate in the very same locations that gold does (pay-streaks). From your fundamental knowledge of placer geology, after potential pay-streak locations have been pinpointed, those specific areas can sometimes be scanned with a BFO detector to locate the increases in other heavy elements. Specific sites which sound-out heavily on the “mineral” setting can then be sampled by conventional gold mining techniques.
VERY LOW FREQUENCY DETECTORS (VLF)
The VLF detector is a more recent development in the field of electronic prospecting. Very Low Frequency detectors may come under other names or descriptive abbreviations such as VLF, GEB, MF, GCD and others. These are designed with circuitry which is able to cancel-out the effects which highly-mineralized ground has on a BFO detector. VLF detectors have the ability to look through or past highly-mineralized ground and detect metal objects (gold) that may not read at all on a BFO metal detector.
The VLF, being able to cancel-out interference caused by mineralized ground, is more suited for locating gold deposits and gold specimens directly. However, it still remains true that gold targets will have to be large enough, or located close enough to the surface, or deposits will have to be tightly concentrated enough, to sound-out on a VLF, just as with a BFO detector.
Just because a particular detector is of VLF design, does not mean it will sound-out well on gold. In fact, there are some VLF detectors which have difficulty in sounding-out on gold samples at all. So this type of detector must be just as thoroughly tested using natural gold targets before buying for prospecting purposes.
The VLF detector, being a mineralization-cancelling device, sometimes does not have the ability to detect the heavy black sand concentrations the way a BFO detector is able to. Consequently, a VLF is more often better-suited for scanning directly for gold, whereas a BFO is generally better-suited in helping the prospector locate gold deposits in an indirect sort of way, by finding the highly-mineralized ground within a gold-bearing area.
MULTI-PURPOSE DETECTORS & SPECIALIZED GOLD DETECTORS
VLF detectors are sometimes also constructed with discrimination circuits that are designed to cancel or identify specific types of targets—like bottle tops, aluminum foil and pop-tops. For the most part, this type of electronic circuitry is better-suited for treasure and coin hunters. When used in prospecting for gold targets, discrimination circuitry sometimes has a tendency to also reduce the detector’s depth-probing capability, especially in highly-mineralized soil or streambed material. Since gold targets are already difficult to locate, it can sometimes be better to not utilize additional circuitry which could hamper sensitivity towards gold.
However, some conditions do exist in which discrimination circuitry may assist a gold prospector. If using such a detector, always test it against a sample-nugget planted in or on the ground that you are probing, to determine whether or not you can trust the discrimination circuitry.
There is a lot to be said about having a small natural gold target along with you at all times when you are prospecting for gold with a metal detector. This way, each time you decide to try something new to try and get the most out of your detector under changing circumstances, you can confirm the results using a target which is similar to what you are hunting for. It is common for electronic prospectors to glue a test-nugget for this purpose to a poker chip, which can be tossed to the ground and easily spotted again.
Some of the newer, specialized VLF gold detectors are utilizing specific discrimination circuitry called “Iron Identifiers.” This does not necessarily reduce the total depth capability in the detection of gold targets. In other words, the circuitry will identify iron objects which are nearly certain to be iron. The downside to the use of such circuitry is that if an iron target is too deep or too small, it might still be identified as iron. Also, if the ground is highly-mineralized, the accuracy of iron-identifying circuitry is likely to be reduced.
The best gold detectors which use a meter or other display to identify different types of objects, do not route the discrimination function through the same circuitry that produces sound variations through the headphones. In this way, you can obtain optimum depth probing and object sensitivity to your ears, along with some added visual ability to pre-identify what is sounding-out on the detector. This is all about reducing the amount of trash targets that you must dig up while looking for gold.
Some experienced electronic prospectors utilize discrimination circuitry (turning it on and off accordingly) only after a target has been located. This way, depth and sensitivity is not forfeited during preliminary searching.
Other experienced prospectors insist that no discrimination circuitry is needed. Once you are familiar with the area you are searching, and know the specific audio tone changes of gold and/or trash targets, you will form your own judgment of which targets (sounds) to dig and which targets to leave alone. Different prospectors have different methods. Also, different locations often require different methods. Some experienced electronic prospectors simply dig every target (sound).
Some VLF detectors are made with circuits designed to analyze targets. This means they are able to tell you if the target is a nail, bottle top, a nickel, silver dime or a piece of gold. Such circuitry has only limited accuracy in electronic prospecting; because highly-mineralized ground tends to interfere with the signal and can give a false reading in the analyzer. Still, the added capability can be useful.
None of these circuits are a problem with multipurpose detectors, providing the special circuits can be shut off or bypassed—and/or providing the additional circuitry does not hamper the detector’s efficiency in locating gold and silver targets.
Some VLF detectors are designed with manual ground-balancing controls, and others are designed with automatic ground-balancing circuitry. Some prospectors prefer the manual controls. Others prefer automatic ground-balancing. There is nothing wrong with automatic ground-balancing circuitry in gold prospecting, as long as it is fast enough to keep up with the rapidly changing mineralized conditions of the different areas you intend to prospect—and as long as the additional circuitry does not hamper the detector’s ability to locate gold and silver targets.
Some VLF detectors have been specifically designed as gold prospecting tools. Since most specialized gold detectors operate at a higher transmitting frequency, have extensive ground-balancing capabilities, and have special circuitry to avoid sensitivity overload in highly-mineralized ground, they definitely do have some advantages in their ability to locate small gold targets over most multipurpose detectors—or gold targets which are deeper in the ground.
The high-performance of some of today’s specialized gold detectors even make pinhead-sized gold targets recoverable.
Which detector you choose to buy will depend upon what you plan to use the detector for. If you plan to only use it for prospecting purposes, a special gold machine is probably best for you. If you intend to search for coins, caches, artifacts and lost articles, as well as prospecting for gold and silver, perhaps a multipurpose detector is best—or two separate detectors. Only you can decide.
I would suggest you buy your detector from a dealer located in the general area where you plan to prospect for gold. The local dealer will know which detectors are performing best in that area. Local dealers will also introduce you to other prospectors, and perhaps a local prospecting and/or treasure hunting club or association.
Communication with local prospectors can be a very big help in determining which detectors are best for specific areas. You can also get tips from them on productive places to prospect with your detector.
No detector made is the best for all locations. Some machines work better than others in wet or dry conditions. Some work better in hot or cold climates. Some detectors are affected by alkali “salts” in the soil or gravel more than others. When any of these examples is the case, a smaller coil might manage adverse conditions better than a larger coil. Each area is different.
Another reason to purchase your detector from a local dealer is the help and support that you will receive. Success in the field comes from understanding the workings of your detector, and perhaps receiving inside information on good places to hunt. The money saved by buying from a discount mail-order house may not be worth the loss of support you would otherwise receive from a local dealer—especially when you are just beginning.
When buying a detector which you intend to use for prospecting purposes, keep in mind that probably the most important feature is the detector’s capability of cancelling the heavy ground mineralization found in most gold-bearing areas.
Practice makes perfect. You must start with good equipment. The rest will be up to you.
ELECTRONIC PROSPECTING DRILLS
The following is a set of drills put together to give the new (or old) owner of a metal detector some practice with his tool and to allow him (or her) to get a good grasp of what the detector’s gold-finding capabilities are:
DRILL No.1: Take a file or electric grinder to a piece of iron or steel (like a nail), and allow the fine pieces of metal to fall into a container. Pour some filings onto a piece of paper and pour some glue over the filings to hold them intact. Pour more filings on top of the glue and then pour on more glue. Continue this until the conglomerate is giving off a strong mineral reading on your detector. Make three different sheets of mineralization; one giving off a very mild mineral reading, one causing a medium signal, and one which gives off a strong signal.
If you are already an experienced gold prospector, and have some black sand concentrates lying around somewhere, use a magnet to collect some magnetic black sand and use these instead of iron filings. Sometimes, you can get prospecting supply outlets to send you a small package of black sand concentrates. You can also find bags of mineral concentrates (which usually include some gold) which various sellers on the Internet market as panning sands. These are better than using a machine to create iron filings, because they are the actual material that you will encounter in the field.
These different mineralized conglomerates will give you a good idea of how your detector will react to different degrees of mineralized ground.
DRILL No.2: Acquire at least a half-ounce of placer gold, preferably more, with a variety of fine, flake, and nuggets so a wide range of testing can be done.
Carefully place the gold in a pile on a clean sheet of paper in a location where there is no other metallic object reading on your detector. Scan the gold with your detector from varying distances to get an idea of your distance-capabilities when scanning a concentrated gold deposit.
Now spread the gold out over a slightly-wider space on the paper and scan again to check distance. Continue to spread the gold out wider and wider until it no longer reads on your detector—or until you are picking up on individual flakes of gold. This drill will give you a good idea of what sized pieces and accumulations of gold will sound-out at what distances. Try different coil sizes to see what their capabilities are.
Pay particular attention to the specific sound-readings that you get when scanning over gold targets. These drills should be done with headphones. With some practice, you will start to be able to tell the difference between gold and other metallic sounds by the difference in the strength, crispness and tone of the signal. Stronger-reading metals will give a sharper and louder change in tone, whereas gold tends to cause a softer and more indistinct signal–especially when located in smaller amounts or at a distance. Do the drill and see for yourself.
DRILL No.3: Using the flake-gold and nuggets in different accumulations, as done in drill No. 2, place the different sheets of mineralization over the top of the gold and note the responses on your metal detector. If you have a VLF, practice cancelling-out the mineralized sheets and test to see what size-accumulations of gold can be picked-up while doing so. Try more and more mineralization, combining the sheets together if necessary, to see how much mineralization your VLF detector will look through and still have sensitivity to gold targets.
Notice how even a larger piece of gold puts out only an inkling of a reading when covered by heavy mineralization and/or scanned from a distance. Recognizing these very light signals is usually the difference between success and failure in electronic prospecting!
If you are doing these drills with a BFO detector, try combining different amounts of mineralization with the various-sized accumulations of gold. Determine for yourself on your own detector how much mineralization it takes to block-out the different accumulations of natural gold.
I am certainly aware that sometimes it is difficult to come by a collection of gold flakes and nuggets if you don’t already have a collection of your own. However, the time spent in locating some natural targets to practice with, or in talking a friend into lending you his collection–or in talking him into doing these drills with you—will be worth many times as much time spent out in the field with your detector.
These drills will not teach you how to prospect for gold deposits. Only practice and experience out in the field will do that. But these drills will go a long way to familiarize you with your detector and give you certainty on the use of it. They will help you with the basics that you will need to learn to prospect for gold with a metal detector.
HELPFUL TIPS ON TUNING
Each model of detector has its own set of operating and tuning instructions which you should follow. And, I highly suggest you familiarize yourself with every aspect of the manufacturer’s instructions. In addition, here are a few pointers which have proven successful in the prospecting field:
Some manufacturers recommend that their volume-changing detectors be tuned to just below the hearing range. The purpose of this is so that the slightest reading will make a sound— which can be easily distinguished from the silence. But for prospecting purposes, it usually works better if you tune your detector so the audio signal is always within hearing-range. This will use up the batteries just a bit faster, but it is much better to be able to hear the signal at all times.
The audio threshold (“threshold”) of a tone-difference sounding detector should also be set just in the hearing range. When looking for natural gold targets, just the slightest change can mean the difference of finding or missing a gold target. Changes in volume and/or audio tone also are an indication of changes in ground mineralization and let you know when adjustments are needed to ground-balance again and again.
Sometimes the detector’s audio signal will drift off to a lower volume range due to temperature changes or loss of battery life. If the audio signal is tuned into the non-hearing zone and drifts into an even lower range, you might be scanning for several minutes without having the detector tuned properly. That would just be a waste of time.
Sometimes a warming coil will cause the threshold sound to drift upwards. A cooling coil might cause the threshold to drift downward. Hunting in and out of water environments, while scanning the banks of a stream, might cause threshold changes. You should make adjustments as necessary.
The main cause for a detector’s tuning to drift is loss of battery life. When this occurs, it is time to replace the batteries with a new set so you can get the best performance out of your detector—which is needed when hunting directly for gold.
It is always a good idea to bring along an extra set of batteries into the field when prospecting. Because when they quit, you are finished until new batteries are installed. Extra batteries should be kept cool and dry. Zip-lock baggies work well for this.
Prospecting for gold targets directly with a VLF detector should almost always be done in the “all-metal” mode.
Setting Sensitivity: It is important to stress that you do not want to set the sensitivity too high on your VLF detector while prospecting in a heavily-mineralized area. A high sensitivity setting while testing a nugget in the air will show improved perception—and therefore can give you a false impression of the detector’s scanning ability for gold targets in the ground. It is better to do your settings while scanning over your test-nugget on the ground that you will be searching over.
Turning the sensitivity up too high in mineralized ground is similar to using high-beam headlights in the fog. You get lots of flashback and irregular sounds and false targets. If your sensitivity is set too high, your detector will operate in an erratic manner. There will be many false signals which do not repeat themselves (“flashback”).
Consequently, less sensitivity can give you more depth-penetration in mineralized ground. There is actually a middle ground, depending upon ground mineralization, which will give you optimum sensitivity without too many “ground noises” which are confusing and prevent you from selecting the real targets. Try and run with the sensitivity as high as possible—until the steady tone of the threshold begins to give off an uneven, wobbly sound while you are scanning.
I usually do not recommend using the factory preset marks on your detector controls. Such settings are for average conditions. Prospecting for gold targets requires continuous adjustment to ground-balancing, and the threshold and sensitivity need to be set as accurately as possible to ever-changing conditions. You need to get the most possible out of your detector to avoid missing gold targets.
“Peak Performance” on a metal detector for nugget hunting purposes in most cases is: maximum volume on detector, threshold set in minimum audio hearing range, maximum sensitivity without receiving too much flashback, and ground-balance to the average ground being scanned. When you accomplish peak performance on your detector, the rest is up to you! By this, I mean you will have to interpret which signals should be dug up.
Ground-balancing: Setting the proper ground-balance on your detector, and keeping it properly adjusted while you search, is perhaps the most important factor in successful nugget hunting. I cannot overstate this point; because without proper ground-balance, you simply cannot find natural gold targets—unless you just get lucky. All of the skills we will talk about in this article, skills and methods which will make you good at finding gold targets, all depend upon your detector being properly ground-balanced.
Always set your ground-balance to the average soil or material which you are searching. You will find the majority of gold nuggets in average ground. If you ground-balance to specialized heavier-mineralized zones which are not the average matrix, you may forfeit some depth-probing capability or sensitivity to smaller or deeper gold targets.
Detectors which come with permanently-set, predetermined ground-balance are usually not especially good for electronic prospecting.
You should hear a low hum when your detector is turned on properly (threshold sound). As the detector is raised or lowered from the ground, the threshold hum should get louder or softer. This tells you what needs to be done to get a proper ground-balance. Handling the ground-balance knob or button on your detector is similar to handling the volume control of a radio. If the threshold hum is disappearing as you lower the coil to the ground, turn the knob up. If the hum gets louder as you lower the coil, turn the knob down. The basic idea is to adjust the ground-balance knob (or press the button) until rising and lowering the coil to the ground creates little or no change in the threshold hum.
Ground-balancing has to be redone on a regular basis while prospecting. The reason for this is because placer deposits do not contain uniform amounts of magnetic mineralization. Water-flows create low pressure zones and high pressure zones from one place to the next. These different zones accumulate different amounts of mineralization during flood storms. Often, you can see changes in mineralization just by noting changes in the color or surface of the ground you are scanning. Also, changing from gravel-like material to bedrock surfaces almost always changes the amount of ground mineralization. Get into the habit of re-ground-balancing about every 15 or 20 feet, or about every five minutes, or whenever the ground conditions change.
Your detector will tell you what is going on. If the threshold hum is getting louder, it usually means there is less mineralization in the ground you are now searching. If the hum goes softer, the mineralization is increasing. With a little bit of experience, you will gain your own perception of when it is time to re-ground-balance.
It is almost never a good idea to balance a detector over top of a piece of metal in the ground. Move around until you find a non-reading area to ground-balance.
When ground-balancing, move your coil all the way down to touch the ground if possible. I say “if possible,” because you occasionally run across areas with so much mineralization that you are not able to put the coil within a few inches of the ground! “Alkali salts” in damp soil can sometimes also create so much interference that the coil of your detector needs to be raised several inches above the ground to search for targets. Naturally, depth penetration is lost by doing this. But sometimes you have no other choice. Sometimes you can also get around this problem by making adjustments to your detector’s sensitivity. This will allow you to search with your coil closer to the ground; but the reduced sensitivity will likely eliminate some perception of smaller or deeper gold targets.
Sometimes, you can obtain better results by ground-balancing your detector a little on the positive side. A slight positive ground-balance increases the detector’s sensitivity to smaller gold targets when hunting in an area of lighter mineralization. This means that the threshold makes a slightly louder hum as the coil is lowered to the ground. When operating this way, be sure to keep the threshold in the audio hearing range. You don’t accomplish this by adjusting the threshold; reset the ground-balance as necessary to remain in the audio hearing range when lowering the coil to the ground. Just a slight positive ground-balance boost is all that is needed. Some experienced prospectors like to operate in a positive range all the time.
However, you may find instances when working around highly irregular ground, vegetation and/or rocks when a slight positive ground-balance creates a problem. Lifting the coil up and down and around with a positive ground-balance setting can create a similar situation as with too much sensitivity.
In highly-mineralized ground, when there are too many flashback signals which could be real targets, you can try ground-balancing your detector to a slightly negative setting with the coil on the ground. This may reduce your sensitivity to some of the smaller gold targets. But it is likely to settle-out your machine, and it might make it possible to locate targets which otherwise would not be accessible.
Always bring along your small sample natural gold target (about the size of a match head). This should be glued to a bright colored poker chip, or something similar, to keep it from being lost. Some prospectors go so far as to drill a hole and tie a string to the poker chip to avoid losing valuable time searching for lost poker chips! When in doubt about your tuning, toss down the sample gold target, cover it over with the ground in question, and see how your detector reacts. It might not be necessary to cover the test-nugget. Just placing it on top of the ground may be enough to test the tuning of your detector over that type of ground.
One thing which should be mentioned is that while you are searching around, your threshold hum is likely to change. The answer is usually not to reset the threshold; it is to adjust ground-balance and sensitivity as necessary to challenge the changes in ground mineralization. Your sample gold target will be the final test of whether or not your adjustments are working. If you don’t have a small natural gold nugget, you really should get one! Otherwise, a small piece of lead will create a similar target.
Other Tips on Tuning and Setting up a Metal Detector for Prospecting: When you are operating a metal detector, it is good practice to remove all rings, bracelets, watches and other jewelry from your hands and arms (ankles and toes). They can give a false read on the detector. This is especially true when you are testing a detector before buying, or when you are tuning your detector to sound-out properly on a special metal target while passing it over or under the search coil with your hand. Sometimes, belt buckles, canteens, knives and other digging tools or large metal objects carried on a belt can create false signals when using the more sensitive and specialized gold detectors. Even metallic eyelets on boots can cause problems when scanning too close to your feet. It doesn’t take much practice to figure out how to solve these problems.
Make sure to adjust the shaft-length on your detector to a comfortable position. Bending over too far will create uncomfortable back strain when hunting for extended periods.
Also, when the angle of the search coil on the shaft is changed to fit a new set of search conditions, the detector must always be re-tuned to correspond with the new relationship between the coil and the metal shaft.
Some prospectors prefer to mount the control box of their detector on their belt or hip. This lightens the arm-load during longer periods of prospecting activity.
It is also a good idea to wind the coil connection cable firmly to the shaft. This way, it is not flopping around, giving false signals or getting caught on objects and vegetation. Be careful not to pull the cable so tight as to break inner wires and create irregular operation of the detector.
OTHER IMPORTANT FACTORS TO CONSIDER WHEN BUYING
If you are looking over a metal detector you are interested in buying, test it to make sure that its tuning does not drift on its own. This test can be done by placing a good set of batteries into the device, turning it on, allowing it to warm up for a minute, tuning it in, and allowing it to sit and run for 5-to-10 minutes. If the audio tone drifts during this time, you ought to look around for a similar detector which has better electronic stability.
CAUTION: Wetness and dampness are not good for the control box of any type of electronic detector. Be careful to avoid getting yours wet when working around water. If you intend to use a detector out in the field on a damp or rainy day, you can cover the control box with a clear, loose-fitting plastic bag and secure it to the shaft of the detector. The bag should be loose enough so you can work the various control knobs without having to untie the bag and take it off to setup or re-tune the detector.
HEADPHONES
It is important in electronic prospecting to use quality headphones. This point cannot be over emphasized. Some detectors work just fine with the headphones which come from the factory.
There are different types of headphones. Some are heavy and cover the ears thoroughly. Some are light. What is best for you will depend largely upon the conditions where you are going to search. For example, the heavy type which thoroughly covers the ears might not be very practical in the hot, quiet desert environment. But they might work exceptionally well in a cooler environment—say along the bed of a creek where running water is making lots of background noise.
Areas which include the company of occasional rattlesnakes might require the use of lighter, less sound-proofed headphones!
The proper headphones for a specific hunting environment are another area where the local dealer or members of the local prospecting club can make valuable suggestions.
It is a common practice for prospectors to shorten the length of cable on detector headphones to about 3 1/2 feet. This helps prevent the cable from snagging on branches and other obstructions when working in brushy areas or climbing over uneven terrain.
Some detectors have volume controls and others do not. Volume on a detector while prospecting should normally be turned to maximum. Don’t confuse this with threshold hum, which should be set near minimum audio level. If maximum volume on the detector is uncomfortable to you, obtain a set of headphones which have volume control. Then, turn your detector’s volume all the way up and use the headphone controls to turn the volume down if you must.
Many electronic prospectors highly recommend “sensitivity enhancers”—like those made by DEPTHMASTER. These help enhance the soft target sounds from gold, while lessening the noisier signals caused by trash and iron targets.
OTHER HELPFUL EQUIPMENT
A plastic cup or tray is sometimes necessary to recover gold targets, even in dry terrain. A plastic gold pan is helpful to work down material where water is present. Sometimes a portable garden rake is helpful for moving smaller rocks and obstructions away from a productive hunting area. A small G.I. shovel is helpful in some hunting environments. A canteen filled with liquid; tweezers, needle-nose pliers for removing gold from bedrock traps; and a small pick for digging and scraping. Sometimes the ground can be very hard. This is especially true when finding gold on hard caliche layers in the desert. A wide belt with a carpenter’s loop (for holding hammers) comes in very handy for a small pick. This keeps it out of the way, but also makes it quickly accessible.
A lot of your gear can be left at your vehicle, or carried in a backpack which can be set down at the hunt site. It is usually better to not load yourself down too heavy while prospecting with a metal detector.
Many electronic prospectors are using empty 35mm film containers to contain recovered gold targets. These are unbreakable, and the large mouth makes it easy to get a piece of gold inside. Zip-lock baggies are also helpful.
A magnet can be a very big help while electronic prospecting. Sometimes you can recover a faint-reading iron target right out of the dirt with a pass of a magnet. Otherwise, you might find yourself losing valuable minutes picking through the material, looking for a small piece of gold. Animal feed stores commonly stock a special magnet used for cows (traps small iron particles, preventing them from entering and damaging intestines). These magnets are powerful, yet inexpensive. You can mount one on the end of your small digging-pick or tape it to the handle of a plastic or stainless steel garden trowel. This way, the magnet is handy when you need it. Some prospecting picks are available which already have a magnet attached; very convenient!
A serrated-edge on a garden trowel also is helpful when you find yourself digging around roots or brush. Some prospectors keep one edge of their trowel sharpened just for this reason.
When working bedrock areas, a small crevice tool can be a big help to open cracks and crevices which are sounding-out on your detector.
Some kind of pouch or pocket creates a location to dispose of small pieces of trash and iron which you dig up. You only want to dig it up once! It is much better to remove all small trash targets from the playing field. With the continuous improvement of electronic prospecting tools, you could find yourself going back over the same areas again at a later time!
Some prospectors are using fishing or photography vests—lots of pockets. These come lightweight or heavy, depending upon the environment where you plan to hunt.


 Umm, I don’t quite know how to write this any other way than to report that the answer is no. That is, he may have looked at many of the sources, found some of them to be sure, and then wandered back to what he knew of as civilization. . . and then couldn’t find the place again. Or, he caught a fever and died or got shot in an argument over politics and couldn’t recover from the subsequent wounds. There are many instances where the discovery was made and the “natives” interrupted the process of removal and enforced strict “immigration regulations” by force of arms and left no survivors.
 There is hardly a spot on earth larger than a ten dollar bill that does not have tales of lost mines and buried treasure connected with it. And one could spend three or four lifetimes just investigating the ones in his own neighborhood, unless he sharpened his investigative wits and began looking for hard evidence alone.
 When we get out of bed in the morning, we step onto the carpet (calcium carbonate/limestone is used in the carpet backing). Many of us go directly to the kitchen to switch on the electric light and coffee pot. They are made either of aluminum, iron, copper, glass or ceramic (glass and ceramic are made entirely from minerals–silica sand, limestone, talc, lithium, borates, soda ash, and feldspar). While moving around the kitchen, we will be standing on linoleum (calcium carbonate, clay, and wollastonite) or ceramic tile. Once we get our cup of coffee, we may sit down to read the newspaper. Running across the travel section, we recall that we are planning a trip today, so we take a moment to consult the Official Airline Guide and then refer to the Yellow Pages of the telephone book to find the local number for the airline. All of these papers are filled with kaolin clay and use lime-stone, sodium sulfate, lime and soda ash in their processing. Then we fix a piece of toast and sneak a piece of cake from last night’s party (bakery items, such as bread, contain gypsum as an ingredient, and cakes have a high content of gypsum in the icing). The plate we are eating off of is made of glass, ceramic or china, the last being a special form of ceramic.

 Something we have known for quite some time is that

 Notwithstanding all the excitement and
  In most cases, the “fast water” you are in is not a steady flow of current. It is usually turbulent, varying in direction and intensity. A swirl can hit you from the side and knock you off balance. Or, sometimes it can even hit you from underneath and lift you out of the dredge-hole and into the faster flow. If you get swept down river in fast water, you usually just need to grab hold of the river bottom and work your way over to the slower water, nearer to the stream bank. This movement is normally best-done by continuing to face upstream, into the current, while you point your head and upper-body towards the river-bottom. That posture will nearly always drive you to the bottom where you can get a handhold on rocks or cobbles to anchor yourself down. Then, you can work your way upstream, through the more slack current near the stream bank, and back out to your work-site again. This is all pretty routine in fast-water dredging.
 There is not a single a person among us who won’t panic, given the right (wrong) situation. People who say they will never panic under any circumstances are just not facing reality and, obviously, have never come close to drowning. I believe it is better to understand and acknowledge your limitations before you get into trouble. The closer you cut your safety margin on safety issues, the more aware of your limitations you should be. And, the more important it is to plan in advance how you will react to certain types of emergencies. It is already too late to make such plans the moment something bad happens!
 Other types of underwater vulnerabilities are especially present during fast-water dredging activity. Some of this vulnerability is because it is sometimes necessary to weigh yourself down more-heavily with lead weights to stay on the river bottom. Extra weight is needed to give you the necessary stability and leverage to control the suction hose and nozzle and to move rocks and obstacles out of your way. The demands of dredging activity require divers to be so heavily weighted down, that it is impossible to swim at the surface without first discarding the weights that hold you to the bottom.
 When working in fast water, all of your normal safety precautions, preventative maintenance measures, and common sense instincts must be scrupulously observed. Fast water may be thought of as a liquid flow of energy that is constantly challenging you and your equipment. Murphy’s Law (“anything that can go wrong, will go wrong”) is always at work in fast water. It is hard enough to deal with the things that you cannot anticipate will happen. You will have enough of these as it is. But, if you neglect to take action with respect to those things that you can reasonably expect to go wrong, you will almost certainly fail in your efforts to dredge in fast water. If it is wrong, fix it now, before it gets worse!
 Otherwise, if we position the dredge directly in the fast water, it will become necessary for the divers to contend with fast water when entering the water from the dredge. This can be done; but it makes the operation more difficult – especially, when the dredgers need to climb back onto the dredge.
 Suction hose support booms are standard equipment on the commercial
  One of the persistent problems of dredging in fast water is the heavy drag on your air line. This can normally be solved by pulling some slack-line into the dredge hole and anchoring it against the current with a single cobble placed on top. This will allow some slack air line between you and the cobble. You want to be sure that your cobble-anchor is not so large that you cannot quickly free your air line in an emergency. Also, when you leave the dredge hole, don’t forget to first disconnect your air line from your anchor.
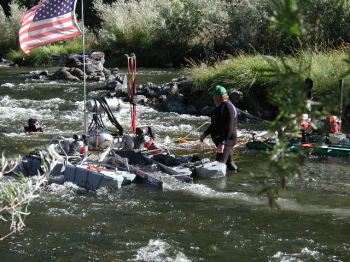 You should always keep an eye on your diving buddy while dredging in fast water. When we dive with multiple dredgers on an operation, it is standard policy for us all to keep track of each other. If one person needs to leave the dredge-hole or go to the surface for some reason, he always lets someone know he is leaving. Otherwise, when a diver suddenly disappears, we immediately go looking for him. A person in serious trouble underwater only has about 30 seconds to get it together. This is not much time. What good is diving with someone else for the sake of safely, if you are not paying attention to what is happening with him/her, especially in fast water where there is so very little margin for error? A tender, or anyone else resting at the water’s surface, should be paying close attention without distraction when there are dredgers down working in fast water.
 What is fast water? It depends upon the individual. An experienced dredger might be much safer in a typhoon of fast, turbulent water, than an inexperienced person would be in slow, shallow water near the bank. The key for each person is to begin learning in a safe and comfortable environment, gain valuable experience over time, and never attempt to do anything that you cannot easily manage, with safety.

 That was nearly ten years ago, and today Dan and Verna consider themselves to be some of the luckiest people in the world. Lucky because they have each other, share a love for the beauty of the great outdoors. They also have the greatest job in the world… looking for and finding gold. “Now that’s not to say that we don’t get disgusted and even a little depressed now and then,” says Verna. “We’ve even considered making our living in some other way. In fact, one time we sold our trailer and even our dredge and bought a house. But the minute that sun started shining, we just couldn’t stand it. We sold the house and bought our 34-foot travel trailer and a new dredge and headed out for the gold and the river. When you come right down to it, there’s just something about professional mining and getting into the gold that makes all the hard work worth it.”
 Verna is a firm believer in the equality of the sexes as far as gold mining is concerned. She gets a real big kick out of taking her turn at running the nozzle on their eight-inch Pro-Mack dredge. “You know, it’s amazing how many miners’ wives and girl friends I’ve turned on to the fun and adventure of actually getting under the water where the action is. At first, they often seem reserved or even a little taken aback, but boy do most of them have fun once they actually suit up and try it.”
 Some miners like to “clean-up” their
  There is a method of determining when a sluice box needs to be cleaned up, so that you can keep it operating at its utmost efficiency. If the majority of gold is catching in the upper-third section of the sluice box, then the recovery system is working well.
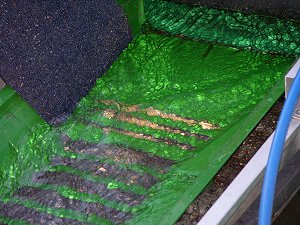
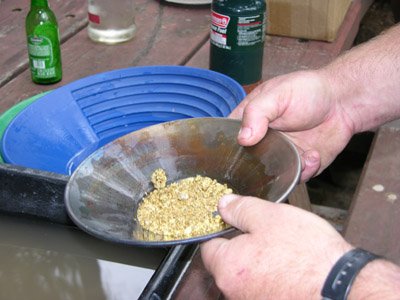
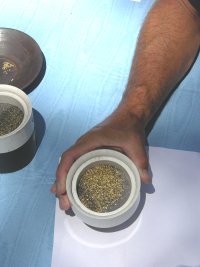
 Important: Before you do the first step of this process, it is best to work your concentrates down as far as possible, to remove all of the black sands that you possibly can. The more black sand you can remove while the material is wet, the less you have to deal with after it is dried. Sometimes you can remove more black sand with the careful use of a finishing pan (small steel gold pan about 6-inches in diameter) inside of a small wash tub.
 STEP 1: First dry out your final concentrates. This can be accomplished by pouring them into a small metal pan (finishing pan is best) and slowly heating them over an open fire or gas stove-whichever is at hand.
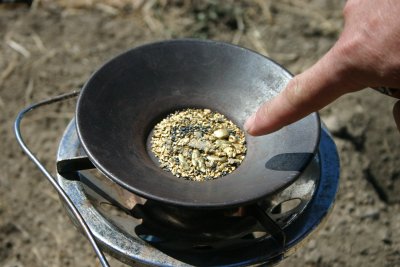
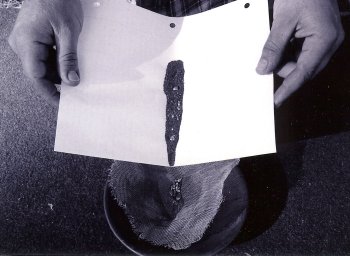 STEP 2: Once the concentrates have cooled enough that they can be handled, they should be screened through a piece of window screen (about 12-mesh). A small piece of window screen, about 6-inches square, is handy to use for this purpose.

 There are numerous markets where you can sell your gold. Refineries will pay you for the fineness (purity) of the gold itself and subtract a few percent for refining charges. In this case, you will receive a little less than the actual value of the gold. Refineries usually will
  “Chart of the North Pole,

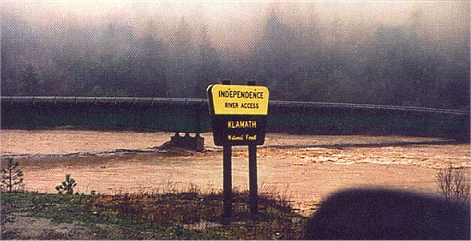
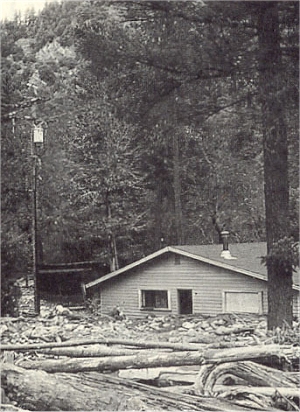 One of the homes bordering Walker Creek just upstream from Seiad Valley attests to the force of the creek at flood stage, which completely filled this home with debris and mud.